How to Secure Thread Tails When Starting Hand Quilting
Secure hand quilting start thread tails by burying a small knot inside the batting or hiding the tail beneath nearby stitches. Leave enough thread to anchor firmly, then trim only after the start feels stable.
On this page (7 sections)
- How do you secure thread tails when starting hand quilting?
- How should the first stitches affect thread tails?
- What should you do if the tail pulls through?
- Which quilt project helps you practice clean starts?
- Can a finished quilt help you study thread placement?
- How do you keep thread tails concealed while quilting?
- What is the simplest hand quilting start for beginners?
Secure hand quilting start thread tails by burying a small knot inside the batting or anchoring the tail beneath nearby stitches. Start with steady tension, keep the tail away from the quilt surface, and trim only after the first stitches hold.
A neat beginning keeps loose thread from showing on the front or back of the quilt. It also gives the first quilting stitches a stable base, so the line does not loosen as you continue.
How do you secure thread tails when starting hand quilting?
Use a buried knot or a short stitched anchor. A buried knot is simple for many hand quilting starts, while a stitched anchor avoids leaving a knot close to the fabric surface.
Before threading the needle, decide where the quilting line will begin. Your plan may follow a seam, a marked design, or one of the hand quilting techniques for beginners.
Keep the quilt layers flat on your work surface. For advice on how taut to keep the layers, see fabric tension while quilting.
Smooth the top, batting, and backing so the first stitches do not pull one layer into a fold.
How do you bury a knot in the batting?
A buried knot sits inside the quilt rather than on the visible surface. The basic sequence is:
- Thread the needle and leave a short tail.
- Tie a small knot near the tail end.
- Insert the needle through the quilt top only.
- Pull gently until the knot slips beneath the surface and rests in the batting.
- Bring the needle back up at the starting point.
- Take the first quilting stitches with even tension.
Do not pull so hard that the knot dimples the quilt top. If the fabric puckers, ease the thread slightly and smooth the layers before continuing.
Trim the visible tail close to the fabric only after the knot is inside the batting. A tail that remains too long can work back toward the surface, while trimming before the start is secure can release the thread.
Can you anchor the start without a knot?
Yes, several small stitches can hold the thread without a knot. Make short stitches in the same area, then cover or cross them with the beginning of the quilting line.
This method suits quilters who want a flatter start. It also works when you are following a marked design and want the first stitches to blend into the planned line.
Use a few close stitches rather than one long stitch. Short stitches spread the holding force and make it less likely that one pull will undo the start.
How should the first stitches affect thread tails?
The first stitches should be small, even, and close enough to support the buried tail. Avoid making the opening stitches much longer than the rest of the line.
Your stitch size can change the look of the quilt and the way the start blends into the pattern. For guidance on stitch length for hand quilting, compare the planned line before you anchor the thread.
Keep the thread at a consistent tension as you form the first few stitches. Pulling hard may create puckers, while leaving the thread loose can make the tail and starting knot easier to disturb.
If the quilting line follows a seam, place the start where the nearby stitching will make the anchor less noticeable. For a recessed seam line, quilting by hand in the ditch explains how to keep the stitches aligned.
What should you do if the tail pulls through?
Stop as soon as the tail starts sliding and secure the thread again before continuing. Do not keep quilting over a start that is already loose.
Remove only the few stitches needed to reach the weak section. Retie a smaller buried knot or add short anchoring stitches, then check the front and back for puckering.
A start that pulls through may have too little thread, too much tension, or an anchor that was placed only in the top fabric. The batting provides a useful place for a buried knot because it can hold the knot inside the quilt layers.
If the line is part of a larger design, review your hand quilting patterns before restarting. A small change in the starting point may let you hide the anchor near another line or seam.
Which quilt project helps you practice clean starts?
A small project with a printed pattern can give you a clear line to follow while you practice thread control. The June Tailor Quilt As You Go Table Runner Quilt Pattern Morning Blend has a printed pattern on 80% cotton/20% polyester batting, piece-by-number construction, and instructions.
The final table runner measures 48 in x 15 in, and the project uses 30 seams. Fabric is not included, so you would need to choose fabric separately before beginning.
Use the printed design to plan where each quilting line begins and ends. Keep the thread tails inside the batting and check the back after each section rather than waiting until the whole project is finished.
This project suits someone who wants a defined household-linen project with a limited finished size. It is less suited if you need a complete fabric kit, because fabric is not included.
For a broader start-and-finish method, see How to Start and Stop a Line of Quilting. It can help you keep both ends of each line concealed.
Can a finished quilt help you study thread placement?
A finished quilt can help you observe how channel stitching and wrapped edges keep a quilted surface orderly. It is not a replacement for practicing your own hand quilting, but its construction can give you a reference for stitch direction and line spacing.
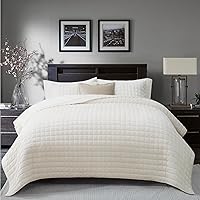
The RECYCO Channel Box Stitch Velvet Quilt Set, King Size, Cream White includes 1 velvet quilt measuring 108 in x 96 in and 2 pillow shams measuring 20 in x 36 in. It has a geometric channel stitch pattern and polyester material.
The set is machine washable, according to the care instructions, and its quilt and shams are designed as coordinated bedding. Its king or California king size may be more material than you need for a small practice area.
The RECYCO Channel Box Stitch Velvet Quilt Set, King Size, Mocha Brown also includes 1 velvet quilt measuring 108 in x 96 in and 2 pillow shams measuring 20 in x 36 in. Its geometric pattern and contemporary style give it a similar visual reference in a different color.
Choose between these finished quilt sets by the color and material details that fit your room. Neither product is a hand quilting supply, so use them as finished-quilt references rather than as a source of thread, needles, or batting for your project.
How do you keep thread tails concealed while quilting?
Work from a planned line, bury each start inside the batting, and inspect both sides before moving on. This routine catches loose tails while they are still easy to fix.
Use a needle size that passes through the quilt layers without making an unnecessarily large hole. Keep the thread path controlled, especially when changing direction or turning at a corner.
When a line ends, secure the tail with the same care as the starting tail. A clean start can still be spoiled by a loose ending, so use the same small knot or short stitched anchor at both points.
Mark only as much of the design as you can quilt comfortably. If the next section will cross the first line, plan the order so later stitches do not trap a loose tail where you cannot reach it.
What is the simplest hand quilting start for beginners?
The simplest hand quilting start is a small buried knot followed by several even stitches. It keeps the tail inside the batting and gives you a clear point from which to build the line.
Pick the start point, smooth the quilt, and make the knot small. Pull it beneath the quilt top without creating a dimple, then begin with stitches that match the rest of the design.
Choose the thread based on the fabric, batting, and stitch style you plan to use. Our guide to what is the best thread for quilting can help you compare thread choices before you begin.
The key decision is simple: bury a knot when you want a quick secure start, or use short anchoring stitches when you want to avoid a knot. In both cases, keep the tail inside the batting, maintain even tension, and trim only after the start holds.
Frequently asked questions
How do you hide thread tails when starting hand quilting?
Make a small knot near the thread end, insert the needle into the quilt top, and pull the knot into the batting without bringing it back through the fabric. Take a few quilting stitches, then trim the remaining tail only after the thread is anchored.
Should hand quilting thread tails be knotted?
A small knot can secure the start, especially when you bury it inside the batting. Keep the knot compact, avoid pulling it through the quilt top, and use a few nearby stitches to share the tension so the start does not loosen.
How long should thread tails be for hand quilting?
Leave enough tail to hold comfortably while forming a small knot or anchoring stitches. The exact length depends on your thread and method, but trimming too early makes the start harder to secure and can let the thread pull back through the layers.
Can you start hand quilting without a knot?
Yes. You can anchor the thread with several small stitches that will be covered by later quilting, or use a buried start that traps the thread inside the batting.
This works best when the first stitches are close together and the thread tension stays even.