How to Choose a 5x7 Embroidery Machine
An embroidery machine with 5x7 embroidery area is a good fit for medium designs like names, patches and quilt blocks. Choose it based on the designs you want to stitch, the size of the hoop, and the thread and stabilizer you will use.
On this page (10 sections)
- What does a 5x7 embroidery area let you stitch in one hooping?
- How does a 5x7 embroidery machine hoop compare with smaller hoops?
- Which machine features matter most for medium embroidery projects?
- How should you judge hoop capacity and fabric handling?
- What thread weight and color kits work for home embroidery?
- How does stabilizer affect a 5x7 design outcome?
- How should you set up a 5x7 embroidery machine for your first run?
- What care habits keep hoop and thread supplies in good shape?
- Which buyers should choose a 5x7 machine and which should size up?
- How do you get the most value from a 5x7 embroidery machine over time?
An embroidery machine with 5x7 embroidery area gives you room for medium projects that are too large for small 4x4 hoops. It suits names, monograms, patches, quilt labels and many commercial style designs.
This guide explains how to match hoop size, machine features and supplies to the work you plan to do.
You will learn what the 5x7 field really allows, how hoop choice changes your workflow, and which thread kits fit this size. We compared specs and product details to help you choose with care.
Our score weighs specs, features and buyer feedback against what you're shopping for.
What does a 5x7 embroidery area let you stitch in one hooping?
A 5x7 embroidery area lets you stitch a design up to about 5 inches wide and 7 inches tall in one hooping. That size covers many medium motifs, names with decorative borders, and quilt blocks that need more room.
You do not need to split those designs or move the fabric mid run.
The exact limit depends on the machine, because the hoop frame and clamp take space around the fabric. The stitch field is always smaller than the outside of the hoop.
Keep every part of the design inside the stitch field, including jump stitches that run near the edge.
Small designs still fit in a 5x7 hoop, but you may waste stabilizer and time if you hoop a large blank for a tiny motif. A smaller hoop can hold fabric more firmly for small work.
That is why many owners keep more than one hoop size. The plastic rectangular hoop in the Embroidex set also shows how hoop outline and stitch field are different measures.
Its listed M1 size is 9.46 inches by 7.88 inches, which gives clamp room around a medium design.
How to check if your design fits a 5x7 hoop
Open your design file and check its width and height in inches. Compare both numbers to the stitch field, not to the hoop name alone.
Leave a small margin inside the field so the needle never hits the hoop frame.
If a design is 5.2 inches wide, it will not fit a 5 inch field even if the hoop looks large. You can resize it in software, split it, or choose a larger machine.
Measure first, because resizing can change stitch density and look. Check height as well as width, because a 7 inch limit can fail for a tall motif even when width fits.
Turn the design sideways only if the grain and lettering still read correctly for the finished item.
How does a 5x7 embroidery machine hoop compare with smaller hoops?
A 5x7 hoop gives you more design room than a 4x4 hoop, while a larger hoop gives you more room still. The right choice depends on the size of the designs you stitch most often.
Bigger is not always better for daily use.
A 4x4 hoop is handy for small logos, socks and tiny motifs. It clamps a smaller area, which can make hooping faster for small blanks.
Many buyers outgrow 4x4 quickly when they want names or patches.
A 5x7 hoop sits in the middle for home use. It handles medium designs without forcing you to rehoop a tote bag or a quilt block.
It also leaves less extra fabric exposed than a very large hoop. A three hoop set can cover the gaps between sizes that one hoop leaves.
The Embroidex set lists M1 at 9.46 inches by 7.88 inches, M2 at 5 inches by 4.35 inches, and M3 at 2 inches by 2 inches. That spread lets you move from a medium name design to a small motif without changing machines.
When a larger hoop is worth choosing
Choose a larger hoop if you stitch full jacket backs, large quilt panels or wide borders. Those projects need more room than 5x7 allows in one hooping.
You would otherwise split the design and risk alignment gaps.
Larger hoops also need more fabric and stabilizer under the design. That can cost more per project and take more table space.
Match hoop size to your real design list, not to a vague hope for bigger work. Check the machine throat and carriage travel before you assume a larger hoop will fit.
Some models list a hoop that the machine cannot use at full size.
Which machine features matter most for medium embroidery projects?
Built in designs, editing tools and hoop size matter more than raw speed for most home buyers. A machine that lets you resize, rotate and combine designs helps you use a 5x7 field well.
Those tools reduce wasted thread and redo work.
You should also check the screen, because a clear display helps you place designs and read prompts. A bright screen makes it easier to check size and placement before you stitch.
Simple menus help when you hoop and unhoop often.
Stitch quality comes from tension control, a stable frame and the right needle and thread. No feature list can replace matching thread weight and stabilizer to your fabric.
Read the manual for the settings your model expects.
If you want a broader view of combo options, our Best Embroidery And Quilting Combo Machine For Home Use guide compares models that sew and embroider. That helps if you plan to quilt as well as embroider.
How built in designs and editing help you use 5x7 space
Built in designs save you time when you start, because you can stitch right away. Editing tools let you resize a motif to fit the field and move it to the right spot.
You can also add letters around a shape.
Check whether the machine lets you preview the design at actual size. That preview helps you confirm that a name fits across a pocket or a block.
It also shows if a border will run too close to the hoop edge. Some editing tools also let you flip a design for pockets or mirrored layouts.
That helps when a name must read correctly on a left chest placement.
How should you judge hoop capacity and fabric handling?
Hoop capacity means how much fabric the hoop can hold flat and firm for clean stitches. A good hoop grips without leaving marks and keeps layers aligned.
Loose fabric leads to shifting, puckering and misaligned colors.
A 5x7 hoop needs fabric that extends past the hoop on all sides. You need enough depth and width to clamp without pulling the design area.
Short fabric pieces can be hard to hoop for a full 5x7 design.
Stabilizer choice affects how well fabric stays firm in the hoop process. Cutaway, tearaway and washaway types each suit different fabrics.
Use the type that matches your fabric weight and design density.
Our guide to How to Use Your Quilting Machine for Embroidery explains basic hooping and stabilizer habits in plain terms. It is a useful first read if you are new to embroidery workflows.
How hoop size changes fabric tension
A larger hoop spreads fabric over a wider area, so pulling one side can distort the opposite side. Tighten the hoop screw in small steps and check that the fabric does not slide when you press it lightly.
Fabric that is too tight can pull stitches inward and create puckers around dense areas.
A smaller hoop gives you less room to pull fabric straight, but it can hold small blanks more firmly. That is one reason the 2 inch by 2 inch M3 hoop in a multi hoop set is useful for tiny motifs.
Use the smallest hoop that still fits the design and leaves clamp room. That habit improves control and saves stabilizer.
What thread weight and color kits work for home embroidery?
Most home designs use 40 weight polyester embroidery thread for top thread. That weight is a standard choice for medium designs and gives clear coverage.
Thicker or thinner thread will change the look and may need tension changes.
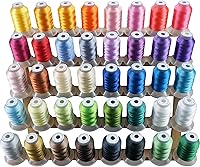
Color kits help you build a palette without buying single spools one by one. A 40 color kit gives you a starter range for many designs.
A 63 color kit gives you more choices for shading and matching.
The New brothread kit includes 40 spools with a color chart that matches Brother color numbers. It also includes a Madeira conversion chart.
Each spool holds 500 meters, which is 550 yards, so you get plenty for home runs. The full kit lists 66,000 feet of thread and weighs 1.9 pounds, which matters for storage and travel.
Its polyester thread is described with good tensile strength, which helps lower the risk of breaking or fraying during stitching.
The Simthread kit includes 63 spools, each labeled with a matching Brother color number. It is made of 100 percent trilobal polyester yarn, which New brothread does not state in the same way.
Both kits use 40 weight thread, so the main trade off is color count and extra items in the box. The Simthread kit lists 103,950 feet of thread and weighs 3 pounds, which reflects the larger spool count.
Its description also points to color fastness through laundering, bleaching, rubbing and perspiration for daily use.
How to choose between 40 colors and 63 colors
Pick 40 colors if you want a compact starter set that covers common design colors. You will still need to buy special shades for some projects.
The set is easier to store and sort.
Pick 63 colors if you like to match many shades without reorders. The larger set gives you more options for gradients and seasonal work.
You will need more storage space for the extra spools. Look at the color chart before you buy, because both kits use Brother color numbers for matching design files.
A chart helps you find a close match when a design calls for a named shade. Conversion charts for Madeira also help when you switch between thread brands.
How does stabilizer affect a 5x7 design outcome?
Stabilizer supports fabric during stitching and helps prevent puckering in a 5x7 field. The right type depends on fabric stretch, thickness and design density.
A design with many stitches needs more support than a light outline.
Cutaway stabilizer stays in the garment after stitching, so it suits knits and stretch fabrics. Tearaway stabilizer is removed after stitching, so it suits woven fabrics that do not stretch much.
Washaway types dissolve in water for sheer or delicate fabrics.
Hoop the fabric and stabilizer together for many woven projects. For knits, you may float the fabric on top of hooped stabilizer instead.
That method reduces hoop burn on stretchy material.
Do not use a stabilizer that is too light for a dense 5x7 design. The fabric can shift and distort as the needle passes through many times.
Test a small design on scrap fabric before you run a full design on a good blank. Dense satin borders and fill areas put more stress on fabric than outline stitches.
Test the same color order and stitch types that the full design will use.
How should you set up a 5x7 embroidery machine for your first run?
Set up starts with a clean machine, the right needle and a test design on scrap fabric. That order helps you spot tension or hooping problems before you use a good blank.
It also saves thread and time.
Thread the machine exactly as the manual shows, because path matters for tension. Use the needle type and size the manual recommends for your thread weight.
Change the needle if it looks bent, dull or scored.
Run a small test design that uses several colors and stitch types. Check the back side to see how the bobbin thread shows.
Adjust tension only in small steps, then test again.
If you are still deciding on a machine, our How to Choose the Best Quilting Machine for Your Needs guide walks through size, features and budget questions. It helps you match a model to your sewing and embroidery plans.
Keep the first test design in the same hoop size you plan for the real project. That way you check fit, tension and stabilizer use in the exact setup.
What care habits keep hoop and thread supplies in good shape?
Clean hoops with a soft cloth and avoid harsh cleaners that can rough the surface. A smooth hoop surface helps fabric grip evenly.
Store hoops flat or stacked so they do not warp.
Clean lint from the hoop area, needle plate and bobbin area after each run. Lint can affect tension and stitch quality over time.
Use a small brush and follow the manual for oiling points.
Store thread spools away from direct light and dust. Keep spool ends clean, because dirty thread can snag and break.
A covered thread box or rack keeps colors sorted and ready.
Keep stabilizer in a dry place, because moisture can change how it tears or washes away. Cut pieces to size and store scraps flat.
Label types so you can find the right one fast. Check plastic hoops for cracks or rough spots after drops or heavy use.
A damaged hoop edge can snag fabric and change tension mid run.
Which buyers should choose a 5x7 machine and which should size up?
Choose a 5x7 embroidery machine if your designs fit inside 5 inches by 7 inches. It suits names, patches, monograms, quilt labels and medium motifs in one hooping.
It also suits buyers who want room beyond a small 4x4 field.
Size up if you want large jacket backs, full quilt panels or wide borders in one pass. Those designs need a larger field to avoid splits and alignment work.
A larger machine will save you time on those projects.
Pick a combo model if you plan to sew and quilt as well as embroider. A combo can save space in a small sewing room.
Our Best Quilting Machine For Embroidery guide lists models that handle both tasks.
Our pick for beginners is the best brother embroidery machine for beginners, because the guide focuses on ease of use. If you want a detailed look at one model, read our brother se2000 embroidery machine review.
Both help you compare features before you commit. Make a list of your ten most wanted designs and measure each one before you decide.
That list will show whether 5x7 covers most of your work or only part of it.
How do you get the most value from a 5x7 embroidery machine over time?
Value comes from using the 5x7 field for the work you do most, not from buying the largest hoop you can find. A machine that fits your design list will run more often and waste less material.
That habit saves money on thread, stabilizer and blanks.
Plan a short list of designs you want to stitch first. Include names, patches and quilt blocks that fit the field.
Buy thread kits and stabilizer for those projects, then add supplies as new designs call for them.
Keep a simple log of designs, thread colors and stabilizer types that worked. That log helps you repeat a good result without guessing.
It also helps you spot which designs need a larger hoop.
Choose the 5x7 machine that matches your first 10 projects, not your next 100 maybe projects. You can always add hoops, thread kits and software later.
Start with a setup that works for medium embroidery today, and grow from there. Revisit your design list after a few months of stitching, because your habits may change.
You may find that small hoops or a larger field would serve new projects better than the first setup.
Frequently asked questions
Is a 5x7 embroidery machine large enough for most projects?
A 5x7 area fits many medium designs, names, patches and quilt blocks. It will not fit full quilt panels or very large motifs without rehooping or splitting the design.
Check your design files against the hoop size before you buy.
What does a 5x7 hoop size mean in daily use?
It means the largest design area you can stitch in one hooping is about 5 inches by 7 inches. The hoop itself is larger than that area, because fabric needs room to clamp.
You must keep the design inside the stitch area, not the outer hoop edge.
Can I use thread kits with a 5x7 embroidery machine?
Yes, most 40 weight polyester embroidery thread works in home machines. Kits give you many colors in one set, which helps you match designs without buying single spools.
Check that the weight suits your machine and design.
Do I need extra hoops for a 5x7 machine?
Extra hoops help when you switch sizes often or want a smaller hoop for small designs. A multi hoop set can save you from rehooping large blanks for small motifs.
Make sure the hoops fit your exact machine model.