Quilting machine tape serves as a temporary guide to keep your fabric layers aligned and your stitching lines straight during quilting projects.
You can use quilting machine tape to mark seam allowances, create consistent borders, and maintain proper spacing between quilting patterns.
What Is Quilting Machine Tape
Quilting machine tape is a low-tack adhesive tape designed for fabric use. It sticks gently to your sewing machine bed, quilting surface, or fabric without leaving residue.
The tape comes in different widths, from quarter-inch to two inches. Most quilters keep several sizes on hand for different projects.
You’ll find two main types: removable quilting tape and washable quilting tape. Removable tape works best on machines and cutting mats. Washable tape can stay on fabric through gentle washing cycles.
Why Use Quilting Machine Tape
Think of quilting tape as your personal quilting assistant. It never gets tired, never makes mistakes, and always keeps your measurements exact.
Regular marking tools can stain fabric or wash out before you finish. Tape gives you clear visual guides that stay put until you remove them.
Many quilting experts recommend tape over chalk or washable markers for temporary guidelines. The tape creates crisp lines that won’t smudge or fade.
Setting Up Your Machine for Tape Use
Clean your machine bed before applying any tape. Lint and thread bits prevent tape from sticking properly.
Remove the needle and presser foot when placing tape near these areas. You don’t want to accidentally hit them while positioning your guides.
Choosing the Right Tape Width
Quarter-inch tape works perfectly for seam allowances and narrow spacing. Half-inch tape suits most quilting projects and border work.
One-inch tape helps with larger measurements and block spacing. Two-inch tape works best for wide borders or when you need bold visual guides.
Start with quarter-inch and half-inch tape. These two sizes handle about 80% of quilting situations I’ve come across in my research.
Tape Placement Tips
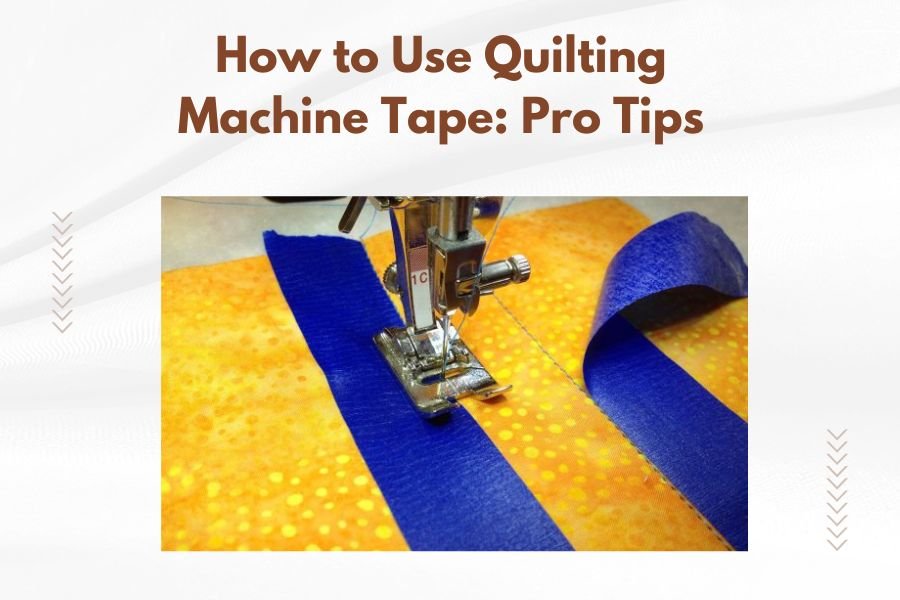
Place tape parallel to your needle for straight-line quilting. The tape edge becomes your fabric guide.
For curved quilting, use short tape segments instead of long strips. This prevents puckering and allows smoother fabric movement.
Always smooth tape down completely. Air bubbles create uneven surfaces that can catch your fabric.
Basic Quilting Machine Tape Techniques
The most common technique involves placing tape on your machine bed as a seam guide. Position the tape exactly where your fabric edge should run.
Feed your fabric along the tape edge while sewing. This keeps your seam allowance consistent from start to finish.
Creating Seam Allowance Guides
Measure from your needle to create accurate seam allowances. For a quarter-inch seam, place tape exactly quarter-inch from the needle position.
Use your machine’s seam guide markings as a reference point. Some machines have these built in, but tape gives you a raised edge to feel.
Double-check your measurement with a ruler before sewing your first seam. Getting this right saves time later.
Testing Your Setup
Always test on fabric scraps first. Sew a sample seam using your tape guide to confirm the measurement.
Check both sides of your test seam with a ruler. The seam should measure exactly what you intended.
Advanced Quilting Machine Tape Methods
You can create multiple parallel lines using several tape strips. This technique works great for channel quilting or consistent spacing.
Start with your first tape line, then measure and place additional strips. Keep each line perfectly parallel to the previous one.
Echo Quilting with Tape
Echo quilting creates concentric lines around a central design. Tape helps maintain consistent spacing between each “echo” line.
Place your first tape line around your central design. Quilt along this line, then move the tape outward for the next echo.
Each echo should be the same distance from the previous line. Quarter-inch or half-inch spacing works well for most echo quilting.
Grid Quilting Setup
Grid quilting requires perpendicular lines that intersect at regular intervals. Tape makes this much easier than trying to estimate.
Start with horizontal lines using tape as your guide. Complete all horizontal quilting before starting the vertical lines.
For the vertical lines, rotate your quilt 90 degrees and use tape again. This prevents confusion and keeps your grid square.
Tape Techniques for Different Quilt Types
Baby quilts need gentler handling than bed quilts. Use lighter-tack tape that won’t stress delicate fabrics.
Large quilts require longer tape sections to maintain consistency across the entire piece. Plan your tape placement before starting to quilt.
Working with Pieced Tops
Pieced quilt tops have seams that can catch or snag. Position tape to avoid crossing over bulky seam intersections when possible.
If you must cross seams, press them flat and use extra care when feeding fabric past these points.
Applique Quilts
Applique work often has raised areas that can interfere with tape placement. Work around these areas or use shorter tape segments.
Consider placing tape on the quilt top itself for applique work, rather than on the machine bed.
Common Mistakes to Avoid
Don’t leave tape on your machine for weeks or months. Even low-tack tape can become difficult to remove over time.
Avoid stretching tape while applying it. Stretched tape springs back and creates uneven guidelines.
| Problem | Cause | Solution |
|---|---|---|
| Tape won’t stick | Dirty surface | Clean with rubbing alcohol |
| Tape leaves residue | Wrong tape type | Use quilting-specific tape |
| Uneven seams | Tape placement error | Remeasure and reposition |
| Fabric catches | Tape edges not smooth | Press down all edges firmly |
Removing Tape Properly
Remove tape slowly and at a low angle. Quick removal can leave adhesive residue or damage your machine’s finish.
If residue remains, use a small amount of adhesive remover made for sewing machines. Test this in an inconspicuous area first.
Tape Care and Storage
Store tape rolls in a cool, dry place. Heat and humidity can affect the adhesive quality.
Keep different widths organized so you can grab the right size quickly. Many quilters use small boxes or drawer organizers for this.
When to Replace Tape
Replace tape that no longer sticks well or has collected lint and debris. Dirty tape doesn’t provide clean guidelines.
Old tape can also become brittle and tear during removal. Fresh tape works better and removes more cleanly.
Alternative Uses for Quilting Machine Tape
Use tape on cutting mats to create temporary measurement guides. This helps with repetitive cuts that need exact measurements.
Tape works well for marking button placement or pocket positions on garment sewing projects too.
Creative Applications
Some quilters use tape to create temporary stencils for quilting patterns. The tape blocks thread while creating negative space designs.
You can also use tape to secure pattern pieces to fabric during cutting. This prevents shifting better than pins in some cases.
Troubleshooting Common Issues
If your fabric keeps veering away from the tape guide, check your seating position and fabric handling. You might be unconsciously pulling the fabric off course.
Inconsistent spacing usually means the tape wasn’t placed accurately. Take time to measure twice before cutting or sewing.
Machine-Specific Considerations
Different sewing machines have different throat plate designs. Some have more space for tape placement than others.
Long-arm quilting machines often need longer tape sections to be effective. Plan accordingly when working with these larger machines.
Professional Tips from Quilting Experts
I found that many quilting instructors recommend starting with simple straight-line projects when learning to use tape guides. This builds confidence before moving to complex patterns.
Some experts suggest using contrasting tape colors for different measurements. Blue for quarter-inch, red for half-inch, for example.
Time-Saving Strategies
Pre-cut common tape lengths and store them on wax paper. This saves time during projects when you need quick setup.
Mark frequently-used measurements on your machine with permanent tape. This creates built-in reference points for future projects.
Conclusion
Quilting machine tape transforms your sewing from guesswork into precision. With proper placement and technique, you’ll create consistently professional results on every project.
Start with basic seam allowance guides, then expand to more advanced techniques as you gain confidence. Remember that practice with tape guides leads to muscle memory that improves all your quilting work.
The small investment in quality quilting tape pays dividends in time saved and frustration avoided. Your quilts will look more professional, and you’ll enjoy the quilting process much more when your guidelines stay exactly where you put them.
What type of quilting machine tape should beginners use?
Beginners should start with quarter-inch and half-inch removable quilting tape. These widths handle most common quilting tasks, and removable tape allows for easy correction of placement mistakes while learning proper technique.
Can quilting machine tape damage my sewing machine?
Quality quilting machine tape designed for sewing use won’t damage your machine when used properly. Avoid household tapes or leaving tape on your machine for extended periods, as these can leave residue or cause finish problems.
How long can I leave quilting tape on my machine?
Remove quilting tape within a few days of application for easiest removal. While most quilting tapes can stay on for a week or two without problems, longer periods may make removal more difficult and increase residue chances.
Should I use tape on the fabric or the machine for curved quilting?
For curved quilting, use short segments of tape on the machine bed rather than trying to curve long strips. Alternatively, place tape directly on the quilt top following your desired curved path, but test adhesion on scraps first.
What’s the difference between quilting tape and regular masking tape?
Quilting tape uses specialized low-tack adhesive that removes cleanly from fabric and machine surfaces. Regular masking tape often leaves residue, may pull fabric fibers, or damage machine finishes when removed.