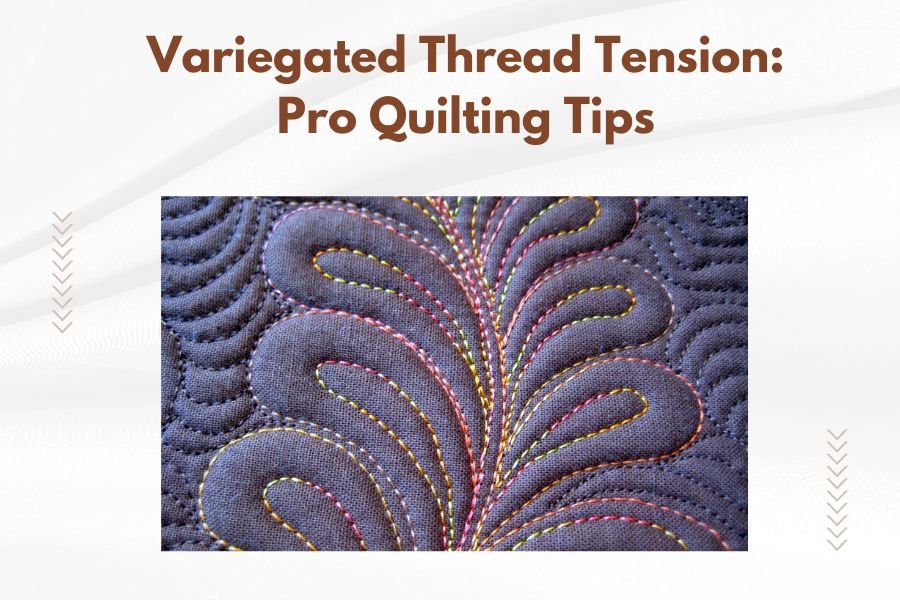
Variegated thread tension requires different settings than solid thread because the varying thicknesses create uneven pull through your machine.
Start with slightly looser tension than normal and test on scraps – variegated thread typically needs 0.5 to 1 full number lower on your tension dial.
Understanding Variegated Thread Challenges
Variegated thread looks beautiful but acts differently than regular thread. The color changes come with thickness changes. Thin sections pull through faster. Thick sections create resistance.
Your quilting machine feels this difference with every stitch. One moment it’s pulling thin thread smoothly. The next moment it hits a thick section and struggles.
This creates visible problems in your quilting. Loose stitches appear where thread was thin. Tight, puckered areas show where thick sections caused tension.
Why Normal Tension Settings Fail
Standard tension works for consistent thread diameter. Variegated thread breaks this rule constantly.
When thick sections hit your tension discs, they compress more than thin sections. This creates uneven pressure. Your stitches show this inconsistency clearly.
I found that most quilters set tension too high initially. They see loose stitches and tighten up. This makes thick sections even tighter while barely helping thin sections.
The Thickness Problem
Variegated threads can vary by 30% in diameter within inches. That’s like switching between 40-weight and 60-weight thread mid-seam.
Your tension discs can’t adjust this fast. They squeeze based on your setting, not the thread’s needs.
Feed Rate Issues
Thick sections move slower through guides and needles. This creates timing problems between your top and bobbin threads.
The result? Loops on top or bottom that ruin your quilt’s appearance.
Pre-Quilting Thread Preparation
Smart preparation prevents most variegated thread problems. You can’t control the thread’s thickness, but you can prepare for it.
Thread Inspection Method
Run the thread between your fingers before loading. Feel for thick and thin spots. Note where major changes happen.
Mark extremely thick sections with tiny pencil dots on your spool. This helps you slow down when these sections approach your needle.
Spool Positioning
Place variegated thread so it unwinds smoothly. Jerky unwinding makes thickness variations worse.
Use a vertical spool pin when possible. This reduces twist as thread feeds into your machine.
Thread Path Smoothing
Check every thread guide on your machine. Remove any rough spots or buildup. Variegated thread catches on problems that regular thread ignores.
Clean your needle eye carefully. Thick thread sections need maximum clearance.
Optimal Tension Settings for Variegated Thread
Start with your normal tension minus one full number. If you usually use 4, try 3.
This gives thick sections room to pass without creating excessive tightness. Thin sections might look slightly loose, but this beats having tight, puckered areas.
Testing Your Settings
Use identical fabric layers as your actual quilt. Different fabric weights change how tension appears.
Quilt a 6-inch square using various stitch patterns. Include straight lines, curves, and dense areas.
Look for these good signs:
- Stitches look balanced from both sides
- No puckering around dense quilting areas
- Thread lies flat against fabric surface
- No visible bobbin thread on quilt top
Fine-Tuning Process
Make tiny adjustments – quarter-turn increments on your tension dial. Big changes create new problems.
Test each adjustment with 20-30 stitches. This ensures you catch both thick and thin thread sections.
Upper Tension Adjustments
If you see bobbin thread on top, tighten upper tension slightly. Move up by 0.25 increments.
If top thread shows on the back, loosen upper tension the same small amount.
Bobbin Tension Considerations
Keep bobbin tension consistent. Many experts recommend against changing bobbin tension for variegated thread issues.
Focus your adjustments on upper tension only. This gives you better control and easier troubleshooting.
Needle Selection for Variegated Threads
Choose needles one size larger than normal. If you typically use 80/12, try 90/14.
Larger needles create bigger holes. This helps thick thread sections pass through fabric without resistance.
Needle Type Recommendations
Quilting needles work well for most variegated threads. Their tapered point and larger eye accommodate thickness changes.
Metallic needles help with specialty variegated threads that have shiny or textured sections.
When to Change Needles
Replace needles after 8 hours of quilting with variegated thread. The thickness variations dull needles faster.
Watch for skipped stitches or thread shredding. These signal needle problems before you can see damage.
Quilting Speed and Technique Adjustments
Slow down your quilting speed by 25-30%. This gives your machine time to handle thickness changes smoothly.
Fast quilting with variegated thread creates jerky tension that shows in your stitches.
Consistent Speed Benefits
Maintain steady speed throughout each quilting line. Speed changes amplify the thread’s natural variations.
Use your machine’s speed control if available. Set it lower and keep your foot pressure steady.
Direction Changes
Pause briefly at corners and curves. This prevents thick thread sections from bunching up in tight turns.
Lift your foot but keep the needle down. This maintains tension while allowing thread to settle.
Dense Quilting Areas
Reduce density in heavily quilted sections. Variegated thread creates visual interest that makes up for simpler patterns.
Space your quilting lines slightly wider than usual. This prevents thread buildup that can cause tension problems.
Troubleshooting Common Issues
Even with perfect setup, variegated thread can surprise you. Know how to fix problems quickly.
Looping on the Bottom
This usually means upper tension is too loose. Tighten by 0.5 increments until loops disappear.
Check that thread isn’t catching on your spool or guides. Clear any snags before adjusting tension.
Puckering Around Stitches
Too-tight tension causes this. Loosen upper tension and check needle size.
Also verify your quilting speed isn’t too fast for the thread thickness changes.
Thread Breaking
Thick sections can break under excessive tension. Loosen settings and check your thread path.
Make sure no guides have rough edges that catch thick thread sections.
Skipped Stitches
This often signals needle problems. Try a larger needle size or replace your current needle.
Check timing if the problem continues. Variegated thread can affect machine timing over time.
Advanced Techniques for Problem Threads
Some variegated threads challenge even experienced quilters. These advanced methods help with difficult threads.
Dual-Spool Setup
Use two spools of the same variegated thread. Alternate between them when you hit problem sections.
This works well for threads with extreme thickness variations.
Blending Approach
Combine variegated thread with solid thread in adjacent lines. This reduces the visual impact of tension inconsistencies.
Choose solid colors that appear in your variegated thread for seamless blending.
Stabilizer Support
Add lightweight stabilizer under problem areas. This gives fabric more support against uneven thread tension.
Remove stabilizer after quilting if desired, or leave it for added quilt body.
| Thread Issue | Quick Fix | Prevention |
|---|---|---|
| Loops on bottom | Tighten upper tension 0.5 | Start with looser initial setting |
| Puckering | Loosen tension, larger needle | Slower quilting speed |
| Thread breaking | Check thread path, loosen tension | Inspect thread before use |
| Skipped stitches | Replace needle, check timing | Change needles frequently |
Maintenance for Variegated Thread Quilting
Variegated threads leave different residue patterns in your machine. Clean more frequently than usual.
Check tension discs weekly when using variegated threads regularly. Thickness variations can cause uneven wear.
Cleaning Focus Areas
Pay extra attention to thread guides and the needle area. Variegated threads deposit lint differently.
Use compressed air to blow out accumulated debris from tight spaces.
Conclusion
Mastering variegated thread tension transforms your quilting results. Start with looser tension settings and larger needles. Test thoroughly on scraps before beginning your actual project.
Remember that perfect consistency isn’t always the goal. Variegated thread’s natural character adds beauty to your quilts. Small tension variations often enhance rather than detract from the final appearance.
Practice with different variegated threads builds your intuition. Each thread behaves differently, but these fundamental principles apply to all. Your patience with initial setup pays off in beautiful, professional-looking quilts.
What’s the best starting tension for variegated thread?
Begin with your normal tension minus 1 full number. If you usually quilt at tension 4, start testing at 3. This accommodates the thick sections while preventing excessive looseness.
Should I change my bobbin tension for variegated thread?
Keep bobbin tension at your standard setting. Make all adjustments to upper tension only. This simplifies troubleshooting and gives you better control over stitch quality.
How often should I replace my needle when using variegated thread?
Change needles every 6-8 hours of quilting time, or sooner if you notice skipped stitches. The thickness variations in variegated thread cause faster needle wear than regular thread.
Why does my variegated thread keep breaking?
Thread breaking usually indicates tension that’s too tight for the thick sections, or rough spots in your thread path. Check all guides and try loosening your tension by 0.5 increments.
Can I use the same quilting patterns with variegated thread?
Yes, but consider spacing lines slightly wider than usual. Dense quilting can amplify tension inconsistencies. The thread’s color variation often makes simpler patterns look more complex anyway.