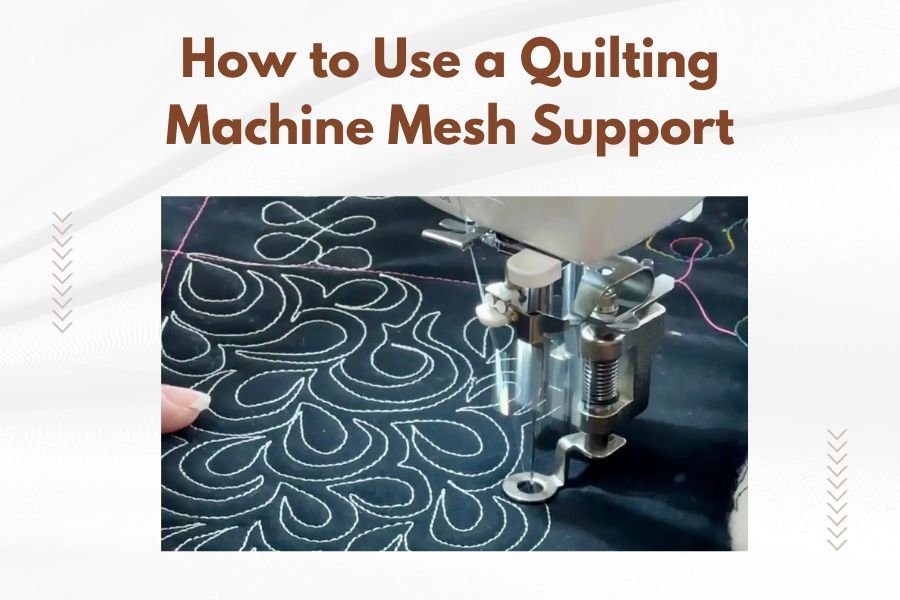
A quilting machine mesh support is a reinforcement panel that prevents fabric from drooping through the open spaces of your quilting machine table, ensuring smooth fabric movement during quilting.
You install the mesh support by attaching it underneath your quilting machine table opening, creating a stable surface that supports your quilt while allowing free-motion quilting.
What Is a Quilting Machine Mesh Support
Think of a quilting machine mesh support like a safety net for your quilt. When you’re working on large quilts, the fabric can sag through the throat space of your machine table. This creates drag and makes smooth quilting nearly impossible.
The mesh support sits below your quilting surface. It catches the quilt weight without blocking your needle’s movement. Most supports use fine mesh or perforated metal that’s strong enough to hold fabric but won’t interfere with your stitching.
Why You Need Mesh Support
Without proper support, your quilt becomes your enemy instead of your art project. The fabric pulls down, creating tension that fights against your machine. Your stitches become uneven. Your arms get tired from fighting the drag.
I found that quilters who skip this step often struggle with thread tension issues and skipped stitches. The fabric movement becomes jerky instead of smooth.
Types of Quilting Machine Mesh Supports
Fixed Mesh Panels
Fixed panels attach permanently to your table frame. They’re usually made from metal mesh or perforated steel. These work great if you always quilt in the same setup.
The downside? You can’t adjust the height or remove them easily for cleaning underneath.
Adjustable Support Systems
Adjustable supports let you change the height based on your quilt thickness. They often use telescoping poles or adjustable brackets.
Many quilters prefer these because thick batting needs different support than thin quilts. You can fine-tune the distance between mesh and needle plate.
Removable Mesh Inserts
Some quilting tables come with removable mesh sections. You pop them in when quilting and take them out for cleaning or storage.
These are perfect for shared spaces where the table serves multiple purposes.
How to Install Your Mesh Support
Measuring Your Table Opening
Start by measuring the throat space opening in your quilting table. You need length, width, and depth measurements.
Most longarm quilting machines have openings between 18-24 inches wide. Domestic machines on extension tables are usually smaller.
Getting Accurate Measurements
Use a metal measuring tape, not a fabric one. Fabric tape can stretch and give you wrong numbers.
Measure twice at different points. Table openings aren’t always perfectly square.
Choosing the Right Height
The mesh should sit about 6-8 inches below your needle plate. This gives enough support without getting in your way.
For thick quilts with high-loft batting, you might need the mesh closer to 4-5 inches below. Thin quilts can handle more distance.
Testing Your Height Setting
Before you lock everything in place, test with a scrap quilt sandwich. Move the fabric around like you’re quilting.
The fabric should glide smoothly without catching on the mesh. If it snags, adjust the height.
Step-by-Step Installation Process
Gathering Your Tools
You’ll need basic tools for most installations:
- Screwdriver (usually Phillips head)
- Measuring tape
- Level (small torpedo level works fine)
- Pencil for marking
- Safety glasses if drilling
Preparing the Table
Clear everything off your quilting table. You want full access to the throat opening area.
Clean the mounting areas where brackets will attach. Dust and lint can prevent secure mounting.
Checking for Obstacles
Look underneath your table for any wires, supports, or other parts that might interfere with your mesh support installation.
Some tables have electrical components or drawer slides that limit where you can mount brackets.
Mounting the Support Brackets
Most mesh supports use L-shaped brackets that attach to the table frame. Position them according to your manufacturer’s instructions.
Use the level to make sure brackets are even. Uneven support creates fabric flow problems.
Securing the Brackets
Don’t over-tighten the screws. You want them snug but not so tight they strip the threads or crack the table.
Check that brackets don’t flex when you push on them. Loose mounting means poor support.
Installing the Mesh Panel
Positioning the Mesh
Place your mesh panel on the installed brackets. It should sit flat without bowing or gaps at the edges.
The mesh should extend slightly beyond the throat opening on all sides. This prevents fabric from finding gaps to fall through.
Securing the Panel
Most panels attach with clips, screws, or sliding locks. Follow your specific system’s instructions.
Test the security by gently pushing up on the mesh from below. It shouldn’t move or rattle.
Final Height Check
With everything installed, double-check your height measurement. You might need small adjustments after seeing the complete setup.
Testing Your Installation
Using a Test Quilt
Create a small quilt sandwich with your typical batting and backing materials. This gives you a realistic test.
Try different quilting motions – straight lines, curves, and free-motion patterns. The fabric should move smoothly in all directions.
Checking for Problems
Watch for these common issues during testing:
- Fabric catching on mesh edges
- Bouncing or spring-like feel
- Gaps where small pieces could fall through
- Rattling or loose components
Making Adjustments
Small problems usually need small fixes. Maybe the height needs tweaking by half an inch. Perhaps one bracket isn’t quite level.
Don’t settle for “good enough.” Poor support makes every quilting session harder than it needs to be.
Maintenance and Care
Regular Cleaning
Lint and thread bits collect on mesh supports just like everywhere else in your quilting area. Clean them regularly with a vacuum brush attachment.
For deeper cleaning, remove the mesh panel if possible and wash it with warm soapy water.
Checking for Wear
Inspect your mesh support every few months for signs of wear or damage. Look for:
- Bent or broken mesh wires
- Loose mounting screws
- Cracked brackets
- Sharp edges that could snag fabric
When to Replace Parts
Replace damaged components right away. A broken mesh wire can snag your quilts and ruin hours of work.
Most manufacturers sell replacement parts separately, so you don’t need to buy a whole new system for minor damage.
Troubleshooting Common Issues
Fabric Still Sagging
If your quilt still sags with the mesh support installed, the mesh might be too far below the needle plate. Try raising it an inch or two.
Very heavy quilts might need additional support around the edges of your table too.
Difficulty Moving Fabric
Fabric that drags or moves roughly usually means the mesh is too close to your work surface. Lower it gradually until movement improves.
Sometimes the mesh holes are too small for your quilting style. Larger openings might help.
Thread Breaking Issues
If you start having thread breaks after installing mesh support, check for sharp edges or burrs on the mesh that could cut thread.
The mesh shouldn’t interfere with your thread path at all. If it does, you need better positioning.
Choosing the Right Mesh Material
Metal vs. Fabric Mesh
Metal mesh lasts longer and provides more consistent support. It’s easy to clean and doesn’t stretch over time.
Fabric mesh is quieter and gentler on delicate quilts. But it can sag and needs replacement more often.
Mesh Opening Size
Smaller openings provide better support for detailed work and thin fabrics. Larger openings allow more airflow and easier cleaning.
Most quilters find 1/4 to 1/2 inch openings work well for general quilting.
| Mesh Size | Best For | Pros | Cons |
|---|---|---|---|
| 1/8 inch | Fine detail work | Maximum support | Harder to clean |
| 1/4 inch | General quilting | Good balance | Standard choice |
| 1/2 inch | Large quilts | Easy cleaning | Less support |
Safety Considerations
Sharp Edges
Always check mesh supports for sharp edges that could cut you or damage fabric. File down any rough spots before using.
Pay special attention to cut edges on metal mesh. These often have burrs that need smoothing.
Secure Mounting
A falling mesh support can damage your machine or injure you. Make sure all mounting hardware is properly tightened and rated for the weight.
Check mounting screws periodically. Vibration from quilting can loosen them over time.
Conclusion
Installing a quilting machine mesh support transforms your quilting experience from a wrestling match with fabric into smooth, enjoyable stitching. The key is getting the height right and ensuring secure, level mounting.
Take time with your installation and testing. A properly installed mesh support will serve you for years, making every quilting project easier and more professional-looking. Your arms will thank you, and your quilts will show the difference in stitch quality.
How far should the mesh support be from the needle plate?
Position your mesh support 6-8 inches below the needle plate for most quilting projects. Adjust closer for very thick batting or farther for thin quilts, but test fabric movement before finalizing the height.
Can I make my own quilting machine mesh support?
Yes, you can create a DIY mesh support using hardware cloth and metal brackets from a hardware store. Just ensure the mesh has smooth edges and secure mounting to prevent safety issues or fabric damage.
What mesh opening size works best for free-motion quilting?
A 1/4 to 1/2 inch mesh opening provides the best balance for free-motion quilting. Smaller openings give more support but collect more lint, while larger openings are easier to clean but provide less fabric support.
Do I need mesh support for small quilting projects?
Small projects like placemats or wall hangings typically don’t need mesh support since there’s less fabric weight to cause sagging. However, if you notice any fabric drag or pulling, adding support will improve your stitching quality.
How often should I clean my quilting machine mesh support?
Clean your mesh support monthly or whenever you notice lint buildup affecting fabric movement. Use a vacuum brush attachment for regular cleaning and wash removable panels with soap and water quarterly.