Quilting clips help you maintain better control over fabric layers by holding them firmly in place without creating permanent holes like pins do.
These clips work especially well on thick batting, slippery fabrics, and curved seams where pins might shift or damage your material.
What Are Quilting Clips and Why Use Them
Think of quilting clips as tiny plastic clothespins designed for fabric work. They grip your quilt sandwich without piercing through the layers.
I found that many quilters prefer clips over pins for several reasons. Clips won’t poke you while you work. They don’t leave holes in delicate fabrics. And they stay put better on thick materials.
When Clips Beat Pins Every Time
Clips shine in situations where pins fall short. Working with vinyl, leather, or laminated cotton? Pins leave permanent marks. Clips don’t.
Thick batting makes pins hard to push through. Clips just snap on the edge. No wrestling required.
Types of Quilting Clips Available
You’ll find several clip styles on the market. Each serves different needs.
Wonder Clips
These colorful clips are the most popular choice. They open wide and have a flat bottom so they won’t tip your fabric.
The pointed tip helps you align seams precisely. Most quilters start with these.
Binding Clips
Smaller and stronger than Wonder Clips, binding clips work great for finishing quilt edges. They grip tightly without being bulky.
Jumbo Clips
For really thick projects, jumbo clips provide extra holding power. They’re perfect when you’re layering multiple quilts or working with puffy batting.
How to Position Clips for Maximum Control
Placement makes all the difference. Random clip placement leads to puckering and shifting.
The Edge Rule
Always clip close to the edge you’re sewing. This keeps the fabric layers aligned right where it matters most.
Place clips about 1/8 inch from your seam line. Any closer and your presser foot might hit them.
Spacing Guidelines
Space clips 2 to 4 inches apart for straight seams. Curves need clips every 1 to 2 inches for smooth results.
More clips aren’t always better. Too many can make the fabric stiff and hard to maneuver.
Test Your Spacing First
Try different spacing on scraps before clipping your real project. Each fabric combination behaves differently.
Step-by-Step Clipping Technique
Good clipping technique prevents fabric distortion and saves time.
Step 1: Align Your Layers
Lay your fabric pieces exactly how you want them sewn. Smooth out any wrinkles or bubbles.
Don’t rush this step. Clips will hold whatever position you give them.
Step 2: Start at Key Points
Place your first clips at corners, pattern matching points, or seam intersections. These spots need the most control.
Step 3: Fill in Between
Add clips between your key points, working from one end to the other. This prevents fabric from shifting as you clip.
Step 4: Check Your Work
Flip your project over and look at the back. Are the layers still aligned? Adjust any clips that shifted during placement.
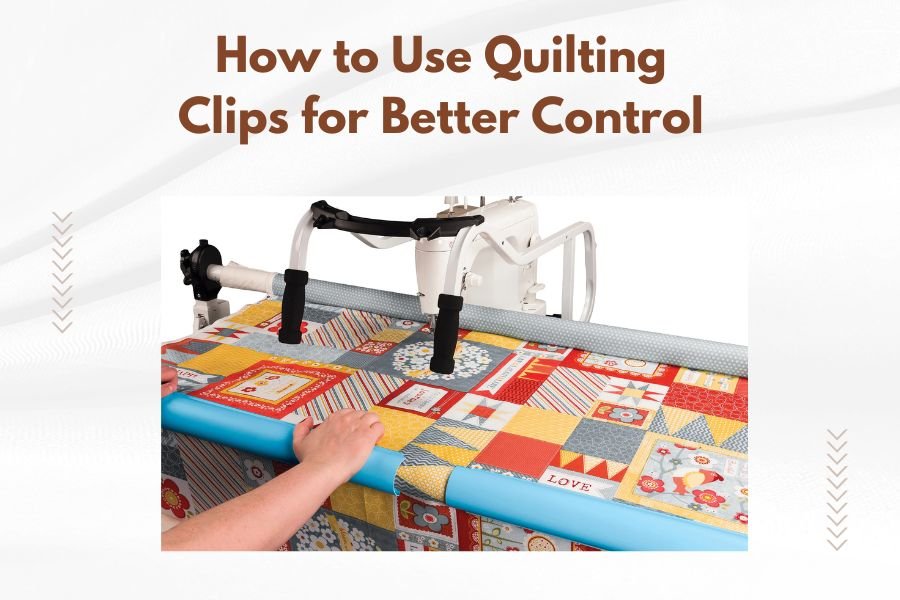
Using Clips with Your Sewing Machine
Clips and sewing machines work together beautifully when you follow a few simple rules.
Remove Clips as You Sew
Take each clip off just before your needle reaches it. This keeps the flow smooth and prevents accidents.
Your machine foot will push the clip off if you forget, but this can throw off your seam alignment.
Free Arm Benefits
When sewing sleeves or binding, clips work great with your machine’s free arm. They hold curves in place while you navigate tight spaces.
Clip Placement for Curves
On curved seams, place clips perpendicular to the curve. This reduces bulk and helps the fabric feed smoothly.
Special Techniques for Different Projects
Different quilting projects call for different clipping strategies.
Binding Your Quilt
Clips excel at holding binding strips in place. Start at one corner and work your way around, overlapping the binding slightly at each clip.
The clips let you see exactly how the binding will look before you sew.
Applique Work
Small clips can hold applique pieces better than pins. They don’t get in the way when you’re doing detailed stitching.
Place clips at the thickest parts of your applique shape for best results.
Quilt Sandwiches
When basting your quilt layers, clips around the edges keep everything aligned while you add safety pins or spray basting to the center.
Common Mistakes to Avoid
Even simple tools like clips can cause problems if used incorrectly.
Over-Clipping
Using too many clips makes your fabric stiff. The layers can’t settle naturally, leading to puckering.
Start with fewer clips than you think you need. Add more only if the fabric shifts.
Wrong Clip Size
Tiny clips on thick fabric won’t hold. Giant clips on thin fabric create unnecessary bulk.
Match your clip size to your project thickness for best results.
Testing Clip Strength
Before clipping your whole project, test one clip on a sample. Can you pull the fabric out easily? Try a stronger clip.
Caring for Your Quilting Clips
Good clips last for years with basic care.
Cleaning Tips
Wipe clips with a damp cloth after use. Fabric fibers and thread can build up in the hinges over time.
For sticky residue, gentle dish soap works well. Avoid harsh chemicals that might crack the plastic.
Storage Solutions
Store clips in a container where they won’t get crushed. Some quilters use magnetic strips to keep metal clips handy.
| Clip Type | Best For | Fabric Thickness |
|---|---|---|
| Wonder Clips | General quilting | Light to medium |
| Binding Clips | Quilt edges | Medium |
| Jumbo Clips | Thick projects | Heavy |
Troubleshooting Common Issues
When clips don’t work as expected, usually there’s a simple fix.
Clips Keep Falling Off
This means the clip is too weak for your fabric thickness. Try stronger clips or double up on thin ones.
Fabric Puckering
You’re probably clipping too tightly or using too many clips. Lighten your grip and space clips farther apart.
Seam Distortion
If your seams come out wavy, check that you’re not stretching the fabric when you clip. Let the layers lie naturally.
Advanced Clipping Strategies
Once you master basic clipping, these advanced tips will boost your control even more.
Color Coding System
Use different colored clips to mark different things. Red for areas that need extra attention, blue for standard seams, green for matching points.
This visual system helps you work faster and make fewer mistakes.
Combination Techniques
Sometimes clips and pins work better together. Use clips at key points and pins for general holding.
This gives you the benefits of both tools without the drawbacks of using just one.
Conclusion
Quilting clips give you better fabric control than pins alone. They work great on thick materials, don’t leave holes, and help you see your seam alignment clearly. Start with basic Wonder Clips and expand your collection as you discover which projects benefit most from different clip types. Remember to space clips appropriately, remove them as you sew, and match the clip strength to your fabric thickness. With practice, clips will become your go-to tool for keeping quilt layers exactly where you want them.
How many clips do I need for a typical quilt project?
Most quilters find 20-30 clips sufficient for average projects. You’ll use 10-15 clips for seaming and the rest for binding and detail work. Buy a variety pack first to see which sizes you use most.
Can I use quilting clips on all fabric types?
Clips work on most fabrics, but very delicate materials like silk chiffon might show clip marks. Test on a scrap first. For extremely thick materials like leather, you’ll need heavy-duty clips designed for upholstery work.
Do clips work better than pins for machine quilting?
For straight-line quilting, pins usually work better since clips add bulk. But for free-motion quilting and curves, clips can help control fabric movement without getting caught in the machine mechanism.
How do I prevent clips from leaving marks on my fabric?
Don’t over-tighten clips or leave them on finished projects for extended periods. If you see indent marks, try using wider clips that distribute pressure over a larger area, or place tissue paper between the clip and fabric.
What’s the difference between quilting clips and regular office clips?
Quilting clips have smooth edges that won’t snag fabric, flat bottoms for stability, and are designed to open wide enough for multiple fabric layers. Office clips have sharp edges and narrow openings that can damage textile projects.