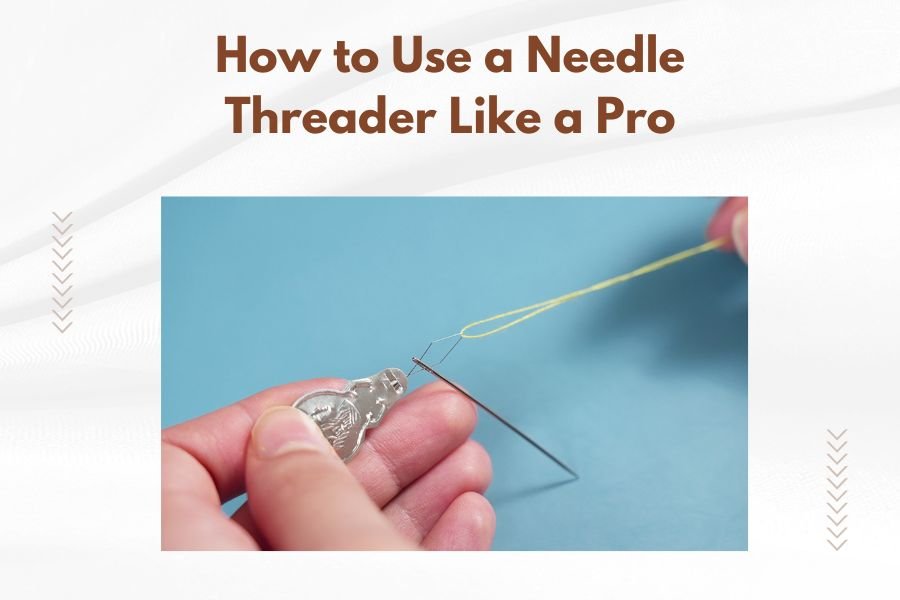
Using a needle threader requires sliding the thin wire loop through your needle’s eye, passing thread through the wire loop, then pulling the wire back through to draw the thread into position.
Master this simple tool by keeping steady hands, using good lighting, and practicing the wire-loop technique until threading becomes second nature.
What is a Needle Threader and Why You Need One
A needle threader is a small tool with a thin wire loop attached to a handle. Think of it as your threading assistant. The wire loop collapses to fit through the tiniest needle eyes, then expands to hold your thread.
You’ll wonder how you ever sewed without one. No more squinting. No more licking thread ends. No more frustration when your hands shake slightly.
Types of Needle Threaders You’ll Encounter
Traditional wire threaders cost pennies and work for most projects. The wire loop bends easily but breaks after heavy use.
Automatic threaders come built into some sewing machines. You position the thread, press a lever, and the machine does the work.
Coin-style threaders have a sturdy metal body with a replaceable wire. They last longer than basic versions.
Step-by-Step Guide to Using a Wire Needle Threader
Step 1: Set Up Your Workspace
Position yourself near good light. Natural daylight works best, but a bright desk lamp helps too.
Hold your needle firmly between your thumb and index finger. Keep the eye facing you.
Step 2: Insert the Wire Loop
Take your needle threader by the handle. The wire loop should be clean and straight.
Push the wire loop through the needle’s eye from front to back. Don’t force it. The wire should slide through easily.
Common Mistake to Avoid
Many people try to thread from the wrong direction. Always go front to back with the wire loop first.
Step 3: Thread the Wire Loop
Cut your thread at an angle for a clean end. Thread that’s too long tangles easily, so keep it around 18 inches.
Pass your thread through the wire loop. Pull about 2 inches of thread through the loop.
Step 4: Pull Everything Through
Here’s where the magic happens. Gently pull the needle threader back through the needle’s eye.
The wire loop collapses and draws your thread through with it. Keep pulling until you have several inches of thread on the needle side.
If the Thread Gets Stuck
Stop pulling immediately. Wiggle the threader gently side to side while pulling. This helps the thread slip through narrow needle eyes.
Advanced Techniques for Different Thread Types
Threading Heavy or Fuzzy Threads
Quilting threads and embroidery floss can be tricky. The fibers catch on the needle eye.
Twist the thread end tightly before threading. This compacts the fibers and makes a smoother surface.
For very thick threads, use a larger needle. Fighting with a tiny eye wastes time and breaks threaders.
Working with Metallic or Specialty Threads
Metallic threads split and fray easily. Handle them like delicate jewelry.
Cut metallic thread with sharp scissors. Dull cuts create rough ends that won’t thread smoothly.
Thread shorter lengths of metallic thread. Long pieces tangle and stress the wire loop.
Troubleshooting Common Threading Problems
When Your Wire Loop Breaks
Wire loops break from normal use. Don’t feel bad about it.
Some threaders have replaceable wires. Check if yours unscrews or pops out.
Keep spare threaders in your sewing kit. They’re cheap insurance against threading frustration.
Thread Won’t Go Through the Eye
Check if you’re pulling the threader straight back. Angled pulling can jam the thread.
Make sure you have enough thread through the wire loop. Too little thread slips out.
Sometimes the needle eye has rough spots. Try a different needle if threading stays difficult.
Needle Threader Maintenance Tips
Keeping Your Threader in Good Shape
Store your threader in a small container or magnetic pin holder. Loose threaders get bent in sewing boxes.
Clean the wire loop occasionally with a soft brush. Thread fibers and lint build up over time.
When to Replace Your Threader
Replace threaders when the wire loop stays bent after use. Bent wires don’t thread smoothly.
If the handle cracks or breaks, get a new threader. Broken handles make threading harder, not easier.
Alternative Threading Methods
The Paper Method
No threader handy? Fold a small piece of thin paper around your thread end. The paper stiffens the thread and helps it pass through needle eyes.
Using Thread Conditioner
Thread conditioner smooths fibers and reduces tangling. Run your thread through conditioner before threading for easier handling.
DIY Thread Stiffening
A tiny drop of clear nail polish on thread ends works like thread conditioner. Let it dry completely before threading.
Choosing the Right Needle for Easy Threading
Eye size matters more than you think. Match your needle size to your thread weight.
Universal needles work for most cotton threads. Sharp needles have smaller eyes and need thinner threads.
Embroidery needles have larger eyes designed for specialty threads. They’re often easier to thread than regular needles.
| Thread Type | Best Needle Size | Threading Difficulty |
|---|---|---|
| Cotton quilting thread | 80/12 to 90/14 | Easy |
| Embroidery floss | 75/11 embroidery | Medium |
| Metallic thread | 90/14 metallic | Hard |
Pro Tips from Experienced Quilters
Lighting Makes All the Difference
I found from talking to long-time quilters that good lighting solves half of all threading problems. Position your work light to shine directly on the needle eye.
The Right Threading Position
Hold the needle at eye level when possible. Looking down at an angle makes the eye appear smaller than it really is.
Using Magnification
Reading glasses or a magnifying glass help even if you don’t normally need them. Threading tiny needles strains everyone’s eyes.
Conclusion
Learning to use a needle threader like a pro takes practice, but the payoff is huge. You’ll thread needles faster and with less frustration. Remember to work in good light, keep your threader clean, and don’t force things if they’re not working smoothly. With these techniques, you’ll spend more time creating beautiful quilts and less time struggling with thread and needles.
Can I use a needle threader with any type of needle?
Most needle threaders work with standard sewing and quilting needles, but very small beading needles or large tapestry needles might need special threaders designed for their eye sizes.
Why does my wire loop keep breaking so quickly?
Wire loops break faster when you force them through needle eyes or pull too hard when retrieving the thread. Gentle, steady pressure extends threader life significantly.
What should I do if thread keeps slipping out of the wire loop?
Pull more thread through the wire loop before drawing it back through the needle eye. Having 3-4 inches of thread in the loop prevents slipping during the threading process.
Are expensive needle threaders worth the extra cost?
Higher-quality threaders with replaceable wires or sturdier construction last longer, but basic wire threaders work just as well for occasional use. Buy based on how often you sew.
Can I thread multiple strands of embroidery floss at once?
Yes, but separate each strand first, then group them together with twisted ends. Threading tangled floss often breaks needle threaders and wastes time.