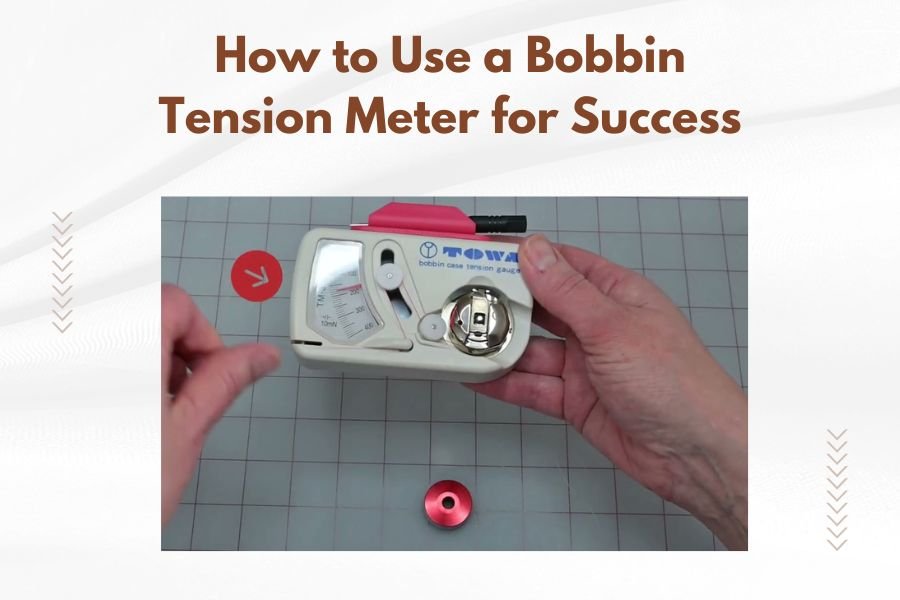
A bobbin tension meter measures the resistance of thread pulling off your bobbin to ensure proper stitch formation. Set your meter to match your thread type, pull thread through at a steady speed, and adjust your machine’s bobbin tension until readings match manufacturer recommendations.
Using a bobbin tension meter correctly prevents skipped stitches, thread breaks, and uneven tension that can ruin your quilting projects.
What Is a Bobbin Tension Meter
Think of a bobbin tension meter as a tiny scale for thread tension. Just like you wouldn’t bake without measuring ingredients, you shouldn’t quilt without checking your bobbin tension.
This small tool clips onto your thread and measures how much force it takes to pull thread off the bobbin. The reading tells you if your tension is too tight, too loose, or just right.
Why Bobbin Tension Matters
I found through research that most quilting problems trace back to tension issues. When your bobbin tension is wrong, you get:
- Loops on the back of your fabric
- Tight, puckered seams
- Thread that breaks constantly
- Stitches that skip or look uneven
Perfect tension creates beautiful, balanced stitches on both sides of your fabric.
How to Set Up Your Bobbin Tension Meter
Choosing the Right Meter Type
You’ll find two main types of bobbin tension meters. Digital meters give exact readings but cost more. Analog meters use a spring-loaded gauge and work great for most quilters.
I researched different models and found that most quilting experts prefer meters with a range of 20 to 200 grams. This covers all thread types from delicate silk to heavy topstitch thread.
Calibrating Your Meter
Before first use, check if your meter needs calibration. Most quality meters come pre-calibrated, but it’s smart to verify.
Hold the meter vertically with no thread attached. The reading should show zero. If not, look for a calibration screw or reset button on your model.
Initial Setup Steps
Place your loaded bobbin in the tension meter’s bobbin holder. Make sure the thread feeds off the bobbin the same direction it would in your machine.
Thread the end through the meter’s guide and clip. Give yourself about 6 inches of thread to work with.
Taking Accurate Tension Readings
Proper Pulling Technique
Here’s where many quilters go wrong. You can’t just yank the thread and expect good readings.
Pull the thread at a steady, moderate speed. Think of drawing thread off a spool when hand sewing. Too fast gives false high readings. Too slow doesn’t engage the meter properly.
Reading the Results
Take three separate readings and average them. Thread isn’t perfectly uniform, so one reading might be off.
Write down your results. I found that keeping a tension log helps you spot patterns and remember what works for different projects.
What the Numbers Mean
| Thread Type | Ideal Tension Range (grams) | Common Issues if Wrong |
|---|---|---|
| Cotton Piecing Thread | 80-120 | Puckering, thread breaks |
| Polyester Thread | 90-130 | Loops, skipped stitches |
| Silk Thread | 60-90 | Thread shredding |
| Metallic Thread | 50-80 | Constant breaking |
Adjusting Your Machine Based on Readings
When Tension Is Too High
If your meter reads above the recommended range, your bobbin tension is too tight. You’ll see tight, puckered seams and the top thread gets pulled to the back.
Turn your bobbin case tension screw counterclockwise in tiny increments. We’re talking quarter-turns here, not full rotations.
When Tension Is Too Low
Low readings mean loose tension. Your bobbin thread shows on top, and you get loops underneath your fabric.
Turn the tension screw clockwise, again in small increments. Test after each adjustment.
The Testing Process
After each adjustment, test on a scrap of the same fabric you’ll use for your project. Different fabrics behave differently, even with identical tension settings.
Look at both sides of your test stitches. Perfect tension shows the same stitch quality on top and bottom.
Common Mistakes to Avoid
Over-Adjusting Your Machine
The biggest mistake? Making huge adjustments all at once. I’ve read countless forum posts from quilters who turned their tension screws too far and couldn’t get back to good settings.
Make tiny changes. Test. Repeat. This patience saves hours of frustration later.
Ignoring Thread Direction
Thread has a direction, just like fabric has a grain. Always pull thread off your bobbin the same direction it feeds in your machine.
Some meters have arrows showing the correct thread path. Follow them exactly.
Environmental Factors
Room temperature and humidity affect thread tension. I found research showing that thread tightens in dry conditions and loosens when humid.
Check your tension when you start sewing, especially if weather conditions changed since your last session.
Different Threads Need Different Approaches
Working with Cotton Thread
Cotton thread is forgiving and holds tension well. Most meters give consistent readings with cotton.
Pre-wound cotton bobbins often have slightly different tension than thread you wind yourself. Check both types if you use them.
Managing Polyester Thread
Polyester has more stretch than cotton, which can fool your meter. Pull at a very steady speed to get accurate readings.
Many quilting experts recommend slightly looser tension for polyester to prevent breaking.
Specialty Thread Challenges
Metallic and rayon threads need extra care. These threads are weaker and more sensitive to tension changes.
Start with tension readings at the low end of the recommended range. You can always tighten if needed.
Troubleshooting Tension Problems
When Good Readings Give Bad Stitches
Sometimes your tension meter gives perfect readings, but your stitches still look wrong. What gives?
Check your needle. A bent or dull needle causes tension problems that no amount of adjustment can fix.
Also verify your upper thread path. One missed thread guide throws off your entire tension system.
Inconsistent Readings
If your meter gives different readings each time, you might have a problem with the bobbin itself.
Look for nicks in the bobbin or old thread wrapped too tightly. Both cause uneven tension.
Machine-Specific Issues
Different sewing machines need different tension settings, even with identical readings on your meter.
Keep notes about what works for each machine if you use multiple models.
Maintaining Your Bobbin Tension Meter
Regular Cleaning
Thread lint builds up in your meter’s moving parts, affecting accuracy. Clean the mechanism monthly with compressed air or a small brush.
Avoid oils or lubricants unless your manual specifically recommends them.
Storage Tips
Store your meter in a padded case to protect the delicate measuring mechanism. Dropping it can throw off calibration.
Keep it away from magnets, which can affect some meter types.
When to Replace Your Meter
A good tension meter lasts years with proper care. Replace it if readings become consistently inconsistent or if the mechanism feels loose or sticky.
Advanced Tips for Better Results
Creating Your Own Reference Chart
I found that successful quilters often create personal reference charts. Record tension readings for different thread and fabric combinations you use regularly.
Include notes about environmental conditions when you took the readings.
Seasonal Adjustments
Your sewing room’s humidity changes with seasons. Many quilters find they need slightly different tensions in winter versus summer.
Check and record seasonal patterns in your sewing.
Project-Specific Settings
Different quilting techniques need different tensions. Piecing requires different settings than free-motion quilting or applique work.
Test tension for each new technique, even if you’re using the same thread.
Conclusion
Using a bobbin tension meter transforms your quilting from guesswork to precision. Start with proper setup, take careful readings, and make small adjustments based on what your meter tells you.
Remember that perfect tension creates beautiful stitches on both sides of your fabric. With practice, checking bobbin tension becomes as natural as threading your needle.
Your quilting projects will thank you with consistent, professional-looking results every time.
Can I use the same tension settings for all my quilting projects?
No, different fabrics, threads, and quilting techniques require different tension settings. Always test on scraps of your actual project materials before starting.
How often should I check my bobbin tension during a project?
Check tension at the start of each sewing session and whenever you change thread types or bobbins. Also check if you notice any stitch quality changes during sewing.
What should I do if my tension meter gives different readings for the same bobbin?
Take multiple readings and average them, as thread isn’t perfectly uniform. If readings vary widely, check your bobbin for nicks or uneven winding, and ensure you’re pulling thread at a consistent speed.
Is it normal for pre-wound bobbins to have different tension than self-wound ones?
Yes, pre-wound bobbins often have different tension due to industrial winding methods and thread treatments. Always test both types separately and adjust your machine accordingly.
Can I use a bobbin tension meter with vintage sewing machines?
Absolutely, tension meters work with any machine that uses standard bobbins. Vintage machines often benefit from tension monitoring since their original tension markings may have worn off over time.