When your top thread shows on the back of your quilting project, the tension is too loose on your upper thread or too tight on your bobbin thread.
Fix this by increasing your upper thread tension gradually, checking your threading path, and ensuring your bobbin is wound evenly and inserted correctly.
What Causes Top Thread to Show on the Back
You know that sinking feeling when you flip over your beautiful quilting work and see those top thread loops staring back at you? I’ve researched this common problem extensively, and the good news is that it’s totally fixable.
The main reason your top thread appears on the back comes down to tension imbalance. Think of thread tension like a tug-of-war between your upper and lower threads. When one side pulls harder than the other, the meeting point shifts away from the fabric center.
When your upper tension is too loose, the bobbin thread wins the battle. It pulls the top thread down through the fabric layers, creating those visible loops on the back.
Upper Thread Tension Problems
Your machine’s upper tension controls how tightly the thread flows through the tension discs. If it’s set too low, the thread moves too freely.
Most quilting machines have numbered tension dials from 1 to 9. Normal quilting tension usually sits between 3 and 5. When you see top thread on the back, your setting might be too low.
Signs Your Upper Tension Needs Adjusting
- Loose loops of top thread on the fabric back
- Stitches look uneven from the top view
- Thread feels loose when you tug gently on completed stitches
- Fabric puckers or pulls together
Bobbin Thread Tension Issues
Your bobbin case controls lower thread tension. If this tension is too tight, it overpowers the upper thread and drags it downward.
Many quilters forget about bobbin tension, but it plays a huge role in stitch quality. From what I’ve read, bobbin tension problems cause about 40% of quilting thread issues.
How Bobbin Tension Affects Your Stitches
When bobbin tension is too high, the lower thread acts like a bully. It yanks the top thread through the fabric layers and creates visible loops underneath.
This problem gets worse with thicker batting or multiple fabric layers. The extra bulk makes it harder for threads to balance properly.
Step-by-Step Tension Fix Solutions
Let’s walk through the exact steps to fix your tension problem. I always recommend starting with the simplest solutions first.
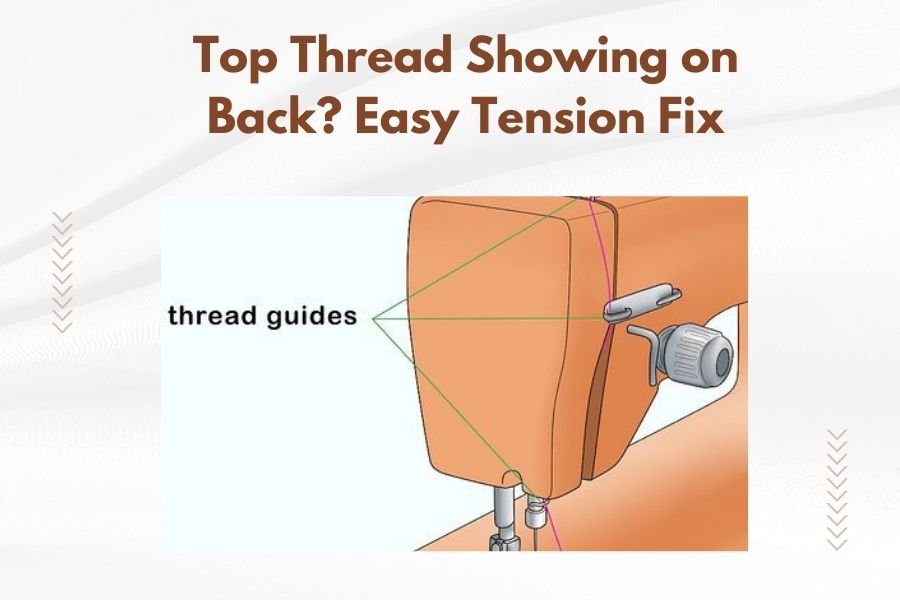
Check Your Threading First
Before touching any tension settings, double-check your threading path. A single missed guide or tension disc can cause the same symptoms as wrong tension settings.
Remove your thread completely and rethread from scratch. Make sure you catch every thread guide and that your presser foot is up while threading.
Common Threading Mistakes
- Missing the take-up lever completely
- Threading with the presser foot down
- Skipping thread guides near the needle
- Not seating thread properly in tension discs
Adjust Upper Thread Tension Gradually
Start by increasing your upper tension by half a number. If you’re at 3, move to 3.5. Test on a fabric scrap that matches your project.
Sew a few inches of straight stitching and check the back. Still seeing top thread? Increase tension by another half number and test again.
Finding the Sweet Spot
Perfect tension creates stitches where threads interlock right in the middle of your fabric layers. You shouldn’t see either thread color on the wrong side.
Keep small test scraps handy for tension checks. I found that using the same batting and fabric as your main project gives the most accurate results.
Test Your Bobbin Case Tension
Hold your bobbin case with thread attached and let it dangle. Give the thread a gentle flick. The case should drop about 2-3 inches and stop.
If it drops too far, the tension is too loose. If it won’t budge, the tension is too tight.
Adjusting Bobbin Tension Safely
Bobbin case adjustments need tiny movements. Use a small screwdriver to turn the tension screw clockwise to tighten, counterclockwise to loosen.
Make quarter-turn adjustments only. Test after each small change. Going too far can create bigger problems.
Thread and Needle Factors
Your thread choice and needle size directly impact tension behavior. Different threads need different tension settings to work properly.
Thread Weight Considerations
Heavier threads (like 12-weight) need lower tension numbers. Lighter threads (like 60-weight) often need higher tension settings.
Cotton threads behave differently than polyester or rayon. Cotton has less stretch, so it needs gentler tension to avoid breaking.
Matching Thread to Project
| Thread Weight | Suggested Tension Range | Best For |
|---|---|---|
| 40-weight cotton | 3.0 – 4.5 | General piecing and quilting |
| 50-weight cotton | 3.5 – 5.0 | Detailed quilting, applique |
| 12-weight cotton | 2.0 – 3.5 | Decorative topstitching |
Needle Size Impact
Wrong needle size creates artificial tension problems. Too small a needle makes thread squeeze through, acting like extra tension. Too large a needle creates loose holes.
Match your needle size to your thread weight. Size 80/12 needles work well for most 40-weight quilting threads.
When to Change Your Needle
Dull or damaged needles cause thread to fray and break, making tension seem wrong when it’s actually fine.
Change your needle after every 8 hours of quilting time, or whenever you hear popping sounds as it penetrates fabric.
Machine-Specific Tension Tips
Different quilting machine brands handle tension differently. Some respond quickly to small adjustments, while others need bigger changes.
Electronic vs Manual Tension
Electronic tension systems make smaller, more precise adjustments. Manual dials often jump between settings, making fine-tuning trickier.
If you have electronic tension, try 0.1 or 0.2 increments. Manual systems might need 0.5 number jumps to see any difference.
Longarm Machine Considerations
Longarm quilting machines often need different tension settings than domestic machines. The thread path is longer, and the stitching speed affects tension differently.
Start with your manual’s recommended settings and adjust from there. Many longarm quilters find they need slightly higher upper tension than expected.
Environmental Factors That Affect Tension
Your workspace conditions can throw off perfect tension settings without warning.
Humidity and Temperature Effects
High humidity makes threads swell slightly, effectively tightening tension. Dry conditions make threads shrink and loosen tension.
I came across research showing that thread diameter can change up to 3% based on humidity levels. That small change impacts stitch formation.
Seasonal Adjustments
You might need to adjust tension settings between summer and winter, especially if your sewing space isn’t climate-controlled.
Keep notes about what settings work in different seasons. This saves time when you switch projects months apart.
Troubleshooting Persistent Problems
Sometimes tension problems persist even after trying standard fixes. Here’s what to check next.
Machine Maintenance Issues
Lint buildup in tension discs or bobbin area creates uneven thread flow. Even tiny bits of fuzz can cause major tension headaches.
Clean your machine thoroughly, paying special attention to the bobbin case and tension disc areas. Use a small brush or compressed air.
When to Seek Professional Help
If cleaning and adjustment don’t solve the problem, your machine might need professional attention. Worn tension discs or damaged bobbin cases require expert repair.
Don’t keep forcing wrong tension settings to compensate for mechanical problems. This can damage your machine long-term.
Prevention Strategies
Preventing tension problems beats fixing them every time. These simple habits keep your stitches balanced.
Quality Thread Habits
Store thread properly to prevent weakening. Heat, sunlight, and humidity damage thread quality and make tension unpredictable.
Use thread from the same dye lot for consistent results. Even the same color from different batches can behave differently.
Regular Maintenance Schedule
- Clean bobbin case after every project
- Oil machine according to manual instructions
- Replace needles regularly
- Check thread guides for rough spots
Conclusion
Fixing top thread showing on the back doesn’t have to ruin your quilting day. Start with simple solutions like rethreading and small tension adjustments. Most problems resolve with patience and systematic troubleshooting. Remember that perfect tension creates invisible thread locks right in the middle of your fabric layers. Keep test scraps handy, make small changes, and don’t be afraid to experiment. Your next quilting project will have beautiful, balanced stitches on both sides.
Why does my tension seem perfect but top thread still shows on back?
This often happens when your bobbin isn’t wound evenly or your needle is too dull. Try rewinding your bobbin with consistent tension and replace your needle. Also check that your thread guides aren’t damaged or rough.
Should I adjust upper or bobbin tension first?
Always start with upper tension adjustments first. Bobbin tension is factory-set and rarely needs changing. Only adjust bobbin tension if upper tension changes don’t solve the problem and you’ve verified proper threading.
Can different fabric types cause tension problems?
Yes, fabric weight and weave affect how threads interact. Dense fabrics like denim need different settings than lightweight cottons. Always test tension on scraps that match your actual project materials, including batting thickness.
How often should I check my tension settings?
Check tension whenever you change threads, needles, or fabric types. Also verify settings if you haven’t used your machine in several weeks, as environmental changes can affect thread behavior and machine components.
What’s the difference between quilting tension and regular sewing tension?
Quilting usually requires slightly higher tension than regular sewing because you’re working with multiple fabric layers and batting. The extra bulk changes how threads lock together, often needing tension settings 0.5 to 1.0 higher than normal sewing.