To tighten a loose quilting machine pulley, first turn off and unplug your machine, then locate the pulley system and use the appropriate wrench to tighten the pulley bolt clockwise.
A loose pulley causes poor stitch quality, skipped stitches, and timing issues that can damage your quilting machine if left unfixed.
Have you ever been in the middle of a beautiful quilt project when your machine starts acting up? That wobbling sound, those uneven stitches, the timing that seems completely off – chances are, you’re dealing with a loose pulley. Don’t panic. This is one of those problems that looks scary but is actually pretty manageable once you know what you’re doing.
Your quilting machine’s pulley system is like the heart of the whole operation. When it gets loose, everything else suffers. The good news? You can fix this yourself with basic tools and a little patience.
What Is a Quilting Machine Pulley System
Think of your pulley system as the machine’s power transfer hub. The motor spins the main pulley, which connects to your machine’s timing system through a belt. This spinning motion creates the synchronized dance between your needle and bobbin hook.
When everything works right, you get perfect stitches. When the pulley gets loose, that timing gets thrown off. Your needle might hit the bobbin case, or your stitches become uneven and sloppy.
Main Pulley Components
Most quilting machines have these key pulley parts:
- Main drive pulley (the big wheel)
- Motor pulley (smaller wheel connected to motor)
- Drive belt connecting both pulleys
- Pulley bolt or set screw
- Timing marks for proper alignment
Signs Your Pulley Needs Tightening
Your machine will tell you when something’s wrong. You just need to listen and look for the right clues.
Audio Warning Signs
A loose pulley often sounds different. You might hear clicking, grinding, or a wobbling noise that wasn’t there before. Some quilters describe it as a “thunking” sound that happens with each rotation.
Visual Signs to Watch For
Look for these red flags:
- Visible wobbling when the pulley spins
- Belt slipping off during operation
- Uneven belt tension
- Pulley sitting crooked on its shaft
Stitch Quality Problems
Bad stitching often points to timing issues caused by loose pulleys. You might see skipped stitches, uneven stitch length, or thread breaking more than usual.
Timing Issues
When your timing gets messed up, the needle and bobbin hook don’t meet at the right moment. This creates loops, knots, or missed stitches that ruin your quilting projects.
Tools You’ll Need
Good news – you probably have most of these tools already. Gathering everything before you start makes the job much smoother.
Essential Tools
- Socket wrench set or adjustable wrench
- Screwdriver set (flathead and Phillips)
- Needle-nose pliers
- Flashlight or work lamp
- Clean rags or paper towels
Optional But Helpful Items
These aren’t required, but they make the job easier:
- Digital camera (to photograph belt routing)
- Magnetic parts tray for screws
- Thread locker compound
- Belt tension gauge
Safety Preparation Steps
Safety first, always. Working on any sewing machine requires basic precautions that protect both you and your equipment.
Power Safety
Turn off your machine and unplug it completely. Don’t just flip the switch – pull that cord from the wall. Electrical accidents around moving parts can be serious.
Workspace Setup
Clear a good working area with plenty of light. You’ll be working with small parts, so good visibility prevents lost screws and mistakes.
Protecting Your Machine
Place a clean towel under your work area. This catches any dropped parts and prevents scratches on your machine’s finish.
Step-by-Step Pulley Tightening Process
Now for the main event. Take your time with each step. Rushing leads to stripped screws and bigger problems.
Step 1: Access the Pulley System
Remove the machine’s side panel or belt cover. Most quilting machines have either screws or clips holding these panels. Keep track of which screws go where – they’re not always the same size.
Step 2: Inspect the Current Situation
Before you start turning wrenches, take a good look at what you’re working with. Can you see obvious looseness? Is the belt properly seated? Are there any damaged parts?
Document Belt Routing
Snap a quick photo of how the belt runs around the pulleys. Trust me on this – belt routing can be tricky to remember later.
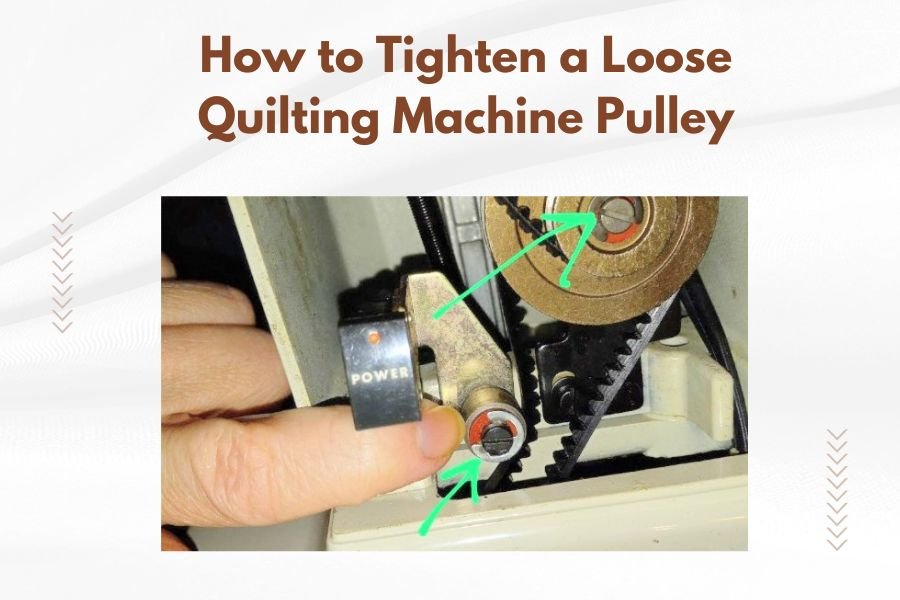
Step 3: Locate the Pulley Fastener
Find the bolt or set screw that holds your pulley to its shaft. This is usually on the side of the pulley facing outward, but some machines hide it behind the pulley.
Step 4: Tighten the Pulley
Here’s where the actual fixing happens. Use your wrench to turn the pulley bolt clockwise. Start gentle – you want snug, not overtightened.
How Tight Is Right
Tighten until the pulley doesn’t wiggle on its shaft, then add just a tiny bit more tension. Over-tightening can strip threads or crack the pulley.
Step 5: Check Belt Tension
With the pulley secure, check your belt tension. Press the belt halfway between pulleys – it should deflect about half an inch with moderate finger pressure.
Testing Your Repair
Don’t celebrate yet. Testing confirms your fix actually worked and prevents future headaches.
Initial Rotation Test
Turn the pulley by hand several complete rotations. It should spin smoothly without wobbling or binding. Any roughness means something’s still wrong.
Powered Test Run
Reassemble your machine and plug it back in. Run it slowly at first, listening for unusual sounds. Gradually increase speed to normal operating levels.
Stitch Quality Check
Test your stitching on scrap fabric. Check for even stitch formation, proper tension, and smooth feeding. If problems persist, your timing might need professional adjustment.
Common Mistakes to Avoid
I’ve researched common pulley repair errors, and these mistakes pop up again and again.
Over-Tightening Problems
Cranking that wrench too hard causes more problems than it solves. Stripped threads, cracked pulleys, and bent shafts all result from excessive force.
Wrong Tools
Using pliers instead of proper wrenches rounds off bolt heads. Once damaged, those bolts become much harder to work with later.
Ignoring Belt Condition
While you’re in there, check your belt for cracks, fraying, or stretching. A bad belt causes recurring pulley problems.
Belt Replacement Signs
Replace your belt if you see cracking, missing chunks, or if it feels loose even with proper pulley tension.
When to Call a Professional
Sometimes the smart move is admitting you need help. Certain problems require professional expertise and specialized tools.
Timing Issues
If tightening the pulley doesn’t fix your stitch problems, timing adjustment might be needed. This requires special knowledge and tools that most home users don’t have.
Damaged Components
Cracked pulleys, stripped threads, or bent shafts need professional repair or replacement. Attempting these repairs yourself often makes things worse.
Preventive Maintenance Tips
Prevention beats repair every time. Regular maintenance keeps your pulley system running smoothly for years.
Regular Inspection Schedule
Check your pulley tightness every few months or after heavy quilting sessions. A quick visual inspection catches problems before they get serious.
Proper Machine Storage
Store your machine in a stable environment. Temperature swings and humidity changes can affect belt tension and pulley alignment.
Cleaning Considerations
Keep lint and thread debris away from the pulley area. This buildup can cause binding and uneven wear.
Troubleshooting Persistent Problems
What if tightening doesn’t solve your issues? Don’t give up – there might be other factors at play.
Multiple Loose Components
Sometimes several parts get loose at once. Check all fasteners in the drive system, not just the main pulley bolt.
Worn Parts
Old machines develop wear in pulleys, shafts, and mounting points. These worn areas prevent proper tightening and require replacement.
| Problem | Likely Cause | Solution |
|---|---|---|
| Pulley won’t stay tight | Stripped threads or worn keyway | Professional repair needed |
| Belt keeps slipping | Wrong belt size or worn pulleys | Replace belt, inspect pulleys |
| Timing still off | Multiple loose components | Check all drive system fasteners |
Conclusion
Tightening a loose quilting machine pulley is well within your capabilities. With basic tools and careful attention to detail, you can restore your machine’s smooth operation and get back to creating beautiful quilts. Remember to work safely, take your time, and don’t hesitate to seek professional help for complex timing issues. Regular maintenance prevents most pulley problems, so make inspection part of your routine machine care. Your quilting projects deserve a machine that runs at its best, and now you have the knowledge to keep that pulley system tight and reliable.
Why does my quilting machine pulley keep getting loose?
Repeated vibration from normal machine operation gradually loosens pulley bolts over time. Heavy quilting, inadequate initial tightening, or worn threads in the pulley assembly can accelerate this process.
Can I use thread locker on my pulley bolt?
Yes, a small amount of removable thread locker (blue type) helps prevent future loosening while still allowing disassembly for maintenance. Avoid permanent thread locker which makes future repairs difficult.
How often should I check my pulley tightness?
Check pulley tightness every 3-6 months with regular use, or immediately if you notice unusual sounds, vibration, or stitch quality changes. Heavy quilting sessions may require more frequent inspection.
What size wrench do most quilting machine pulleys need?
Most domestic quilting machines use 10mm, 12mm, or 1/2 inch bolts for pulley attachment, though this varies by manufacturer. Check your manual or measure the bolt head before starting work.
Is it normal for the belt to have some deflection after tightening the pulley?
Yes, proper belt tension allows about 1/2 inch deflection when pressed firmly midway between pulleys. Too tight restricts motor operation while too loose causes slipping and timing problems.