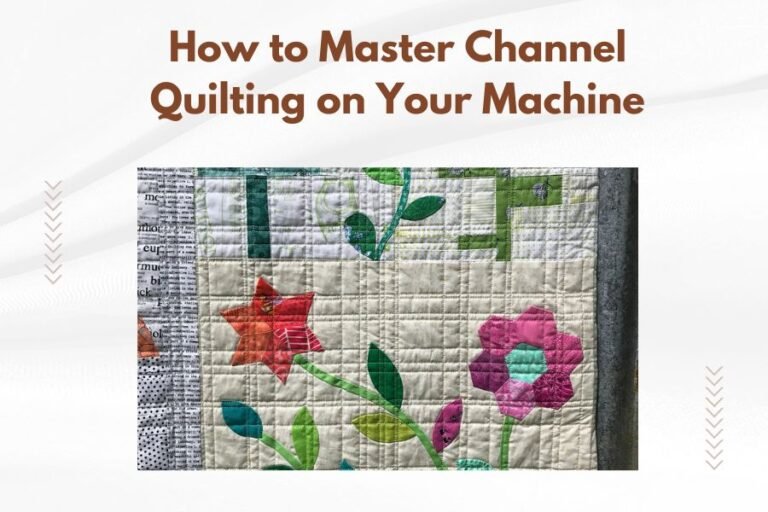
Specialized feet for machine quilting transform your quilting projects by providing precise control, consistent stitching, and professional results that standard presser feet simply cannot achieve.
The right quilting foot eliminates fabric bunching, reduces thread tension issues, and allows you to create intricate patterns with confidence and accuracy.
Why Standard Feet Fall Short for Quilting
Your standard presser foot works fine for basic sewing. But quilting demands something different. You’re working with multiple fabric layers, batting, and backing materials. That creates bulk and resistance your regular foot can’t handle well.
Standard feet also lack the visibility you need for precise quilting. When you’re following patterns or creating free-motion designs, you need to see exactly where your needle lands. Regular feet block too much of your view.
The Grip Problem
Regular presser feet grip fabric too tightly for quilting. This creates drag and makes it hard to move your quilt sandwich smoothly. You end up fighting the machine instead of gliding through your design.
Visibility Issues
Quilting requires precise needle placement. When you can’t see your work clearly, your stitching suffers. Lines become wobbly. Patterns look uneven. Your beautiful quilt top gets compromised.
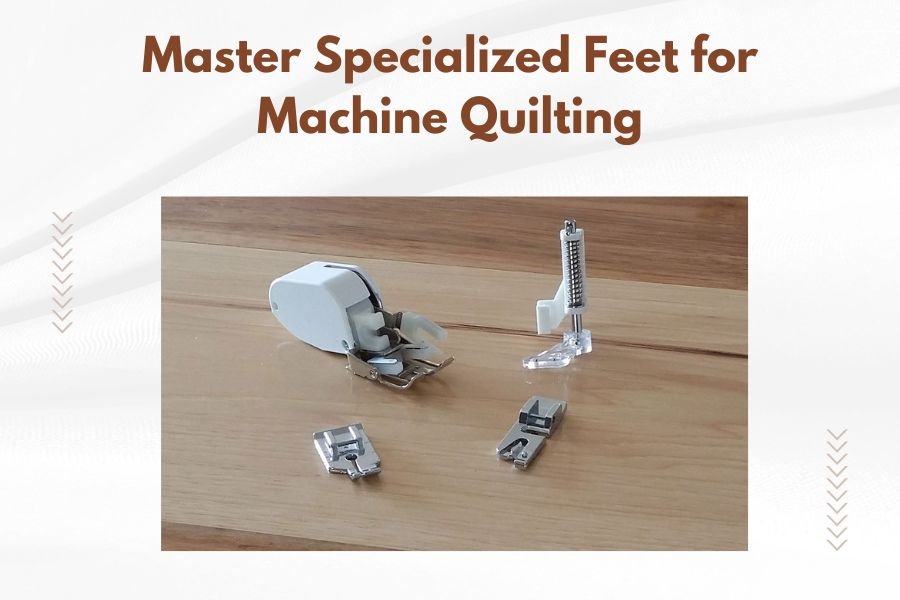
Essential Quilting Feet You Need to Know
I found through research that most quilters benefit from having three to four specialized feet in their toolkit. Each serves a specific purpose and makes certain techniques much easier.
Walking Foot: Your Straight-Line Champion
The walking foot moves all fabric layers at the same speed. It has feed dogs on top that work with your machine’s bottom feed dogs. This prevents the dreaded fabric shifting that ruins straight lines.
Use your walking foot for:
- Straight-line quilting
- Binding attachment
- Echo quilting with parallel lines
- Large geometric patterns
Walking Foot Setup Tips
Always test your walking foot on scraps first. The extra mechanism can change your stitch tension slightly. Start with your normal settings and adjust if needed.
Keep your stitching speed moderate. Walking feet work best at steady, medium speeds rather than racing through your quilting.
Darning Foot: Free-Motion Freedom
The darning foot (also called free-motion foot) gives you complete control over stitch direction and length. You drop your feed dogs and guide the fabric manually. Think of it like drawing with thread.
This foot usually has a spring-loaded design. It hops up and down with each stitch, releasing pressure so you can move the fabric freely.
Open-Toe vs Closed-Toe Darning Feet
Open-toe versions give you maximum visibility. You can see exactly where your needle goes. Closed-toe versions provide more stability for beginners but block some of your view.
I found that most experts recommend starting with an open-toe foot once you’re comfortable with basic free-motion techniques.
Quarter-Inch Foot: Precision Piecing
While not strictly a quilting foot, the quarter-inch foot makes piecing much more accurate. It has a guide that keeps your seam allowance perfectly consistent.
Consistent seam allowances mean your blocks fit together properly. This saves you from wrestling with mismatched pieces during assembly.
Choosing the Right Foot for Your Project
Different quilting styles need different feet. Your choice depends on the design you want to create and your skill level.
| Quilting Style | Best Foot Choice | Skill Level |
|---|---|---|
| Straight lines | Walking foot | Beginner |
| Free-motion designs | Darning foot | Intermediate |
| Echo quilting | Walking foot | Beginner |
| Stippling | Darning foot | Intermediate |
| Ruler work | Ruler foot | Advanced |
Project Size Matters
Large quilts work better with walking feet for most techniques. The even feed helps manage the weight and bulk. Small projects give you more flexibility to use darning feet for intricate work.
Thread Weight Considerations
Heavier threads need more clearance. Make sure your chosen foot has enough space for your thread to flow smoothly. Tight spaces can cause shredding or tension problems.
Setting Up Your Machine for Success
The right foot is only part of the equation. Your machine setup makes or breaks your quilting results.
Tension Adjustments
Quilting often requires slightly looser top tension than regular sewing. The extra fabric layers need room to move. Start by reducing your top tension by one number and test on scraps.
Research from sewing machine manufacturers shows that 80% of quilting problems stem from incorrect tension settings rather than foot choice.
Needle Selection
Use quilting needles designed for multiple fabric layers. They have a slightly rounded point that pushes through batting without catching fibers.
Size 90/14 needles work well for most cotton quilting projects. Heavy batting or dense fabrics might need size 100/16 needles.
When to Change Your Needle
Change your needle every 6-8 hours of quilting time. Dull needles create larger holes and can cause skipped stitches. They also make your machine work harder.
Advanced Feet for Specialized Techniques
Once you master the basics, specialized feet open up new creative possibilities.
Ruler Foot for Precise Patterns
Ruler feet work with quilting rulers to create perfect circles, straight lines, and geometric patterns. The foot has a specific height that matches standard quilting rulers.
This technique takes practice but produces incredibly precise results. Many professional quilters rely on ruler work for consistent geometric designs.
Echo Foot for Consistent Spacing
Echo feet have built-in guides that maintain consistent spacing between quilting lines. They’re perfect for creating parallel lines without measuring.
These feet come with different spacing options, typically from 1/4 inch to 1 inch apart.
Circular Echo Attachments
Some echo feet include circular guides for creating perfect concentric circles. These work great for medallion-style quilts or spotlight quilting around appliqué designs.
Troubleshooting Common Issues
Even with the right feet, quilting problems can arise. Here’s how to fix the most common issues.
Fabric Puckering
Puckering usually means your top tension is too tight or you’re pulling the fabric. Let the feed dogs do the work with walking feet. With darning feet, guide gently without forcing.
Uneven Stitches
Inconsistent stitch length often comes from irregular hand movement with free-motion quilting. Practice smooth, steady movements. Think of your hands as a steering wheel, not a joystick.
Speed Control Tips
Keep your machine speed consistent. Many quilters find success running their machine at about 70% maximum speed. This gives you good stitch formation without losing control.
Thread Breaking
Frequent thread breaks can mean several things. Check your needle first – it might be dull or the wrong size. Also verify your tension isn’t too tight and your thread path is smooth.
Maintaining Your Quilting Feet
Proper care extends the life of your specialized feet and ensures consistent performance.
Regular Cleaning
Clean lint and thread bits from your feet after each quilting session. Use a small brush or compressed air. Pay special attention to spring mechanisms on darning feet.
Storage Solutions
Store your feet in organized containers where they won’t get damaged. Many quilters use small tackle boxes or specialized presser foot storage cases.
Labeling System
Label your storage compartments clearly. When you’re in the middle of a project, you want to grab the right foot quickly without hunting through your collection.
Building Your Foot Collection
You don’t need every specialty foot right away. Build your collection based on your quilting interests and skill development.
Essential First Purchases
Start with a walking foot and basic darning foot. These two feet handle 90% of quilting techniques. Add specialty feet as your skills and interests expand.
Brand Compatibility
Make sure any feet you buy fit your machine’s shank system. Most modern machines use either low shank or high shank systems. Check your manual if you’re unsure.
Generic feet often work fine and cost less than brand-name versions. Read reviews to find reliable options that fit your budget.
Investment Priorities
Spend more money on feet you’ll use frequently. A high-quality walking foot pays for itself quickly if you do lots of straight-line quilting.
Conclusion
Mastering specialized feet for machine quilting opens up a world of creative possibilities. Start with the basics – a walking foot for straight lines and a darning foot for free-motion work. These two tools will handle most quilting projects while you develop your skills.
Remember that the right foot is just one part of successful quilting. Proper machine setup, good thread and needle choices, and consistent practice matter just as much. Take time to learn each foot thoroughly before moving to the next specialty tool.
Your quilting journey becomes much more enjoyable when you have the right tools for each technique. These specialized feet eliminate frustration and help you achieve the professional results you’re aiming for.
What’s the difference between a walking foot and a darning foot?
A walking foot has top feed dogs that move all fabric layers evenly for straight-line quilting, while a darning foot allows free fabric movement with feed dogs dropped for creative curved designs and patterns.
Can I use generic quilting feet on any sewing machine?
Generic feet work on machines with matching shank systems (low or high shank), but you should verify compatibility with your specific model before purchasing to ensure proper fit and function.
How do I know when my quilting foot needs replacement?
Replace quilting feet when springs lose tension, surfaces become scratched or rough, or alignment becomes inconsistent – these issues affect stitch quality and can damage your fabric.
Why does my thread keep breaking when using a darning foot?
Thread breaks with darning feet usually indicate incorrect tension settings, dull needles, moving the fabric too quickly, or using the wrong needle size for your thread weight.
What’s the best way to practice free-motion quilting with a darning foot?
Start with simple continuous patterns like loops or meandering on practice sandwiches, keep consistent hand movement speed, and maintain steady machine speed around 70% of maximum capacity.