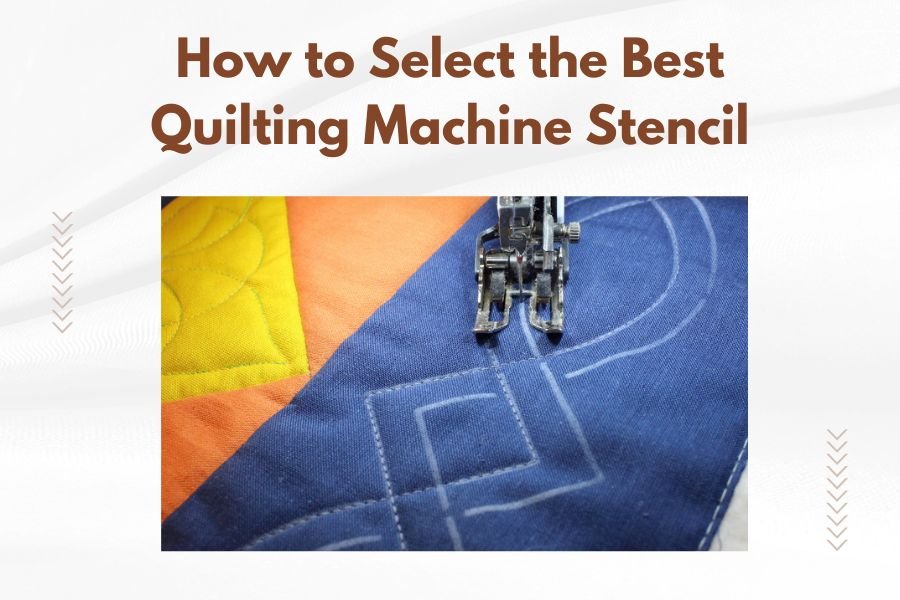
The best quilting machine stencil depends on your project size, design complexity, and machine compatibility – look for durable materials like mylar or acrylic with clean, precise cut lines.
Start by matching the stencil size to your quilting hoop dimensions and choose designs that complement your fabric pattern while considering your skill level.
Understanding Quilting Machine Stencils
You need to know what makes a good stencil before you shop. Think of stencils as your quilting roadmap. They guide your machine to create beautiful, consistent patterns.
The right stencil transforms plain fabric into stunning artwork. But the wrong one? It can turn your project into a frustrating mess.
What Are Quilting Machine Stencils
Quilting machine stencils are templates that help you create repeating patterns. They work with your quilting machine’s pantograph system or computerized functions.
Most stencils come in different materials. Mylar and acrylic are the most common. Each has its own benefits for different quilting styles.
Types of Quilting Stencils Available
You’ll find several stencil types when shopping:
- Continuous line stencils for uninterrupted stitching
- Block stencils for specific quilt sections
- Border stencils for edges and frames
- Corner stencils for neat angle transitions
- Pantograph stencils for longarm machines
Key Factors When Selecting Stencils
Your stencil choice affects your entire quilting experience. Get it right, and your machine purrs along smoothly. Get it wrong, and you’ll fight every step.
Machine Compatibility Requirements
Not every stencil works with every machine. Check your machine’s hoop size first. A 12-inch stencil won’t fit in a 10-inch hoop.
Some machines need specific stencil thicknesses. Too thick, and your machine can’t read the pattern. Too thin, and the stencil might bend or tear.
Hoop Size Matching
Your machine’s hoop size limits your stencil options. Measure your hoop carefully. Include the usable quilting area, not just the outer frame.
Most home quilting machines use 5-inch to 12-inch hoops. Longarm machines can handle much larger stencils.
Stylus and Sensor Requirements
Your machine’s tracking system matters too. Some machines use laser sensors. Others rely on physical styluses that follow the stencil lines.
Laser systems need clear, contrasting stencil lines. Stylus systems need smooth, raised edges to follow.
Material Quality and Durability
Cheap stencils break after a few uses. Quality ones last for hundreds of projects. The material makes all the difference.
Mylar Stencils
Mylar stencils are flexible and affordable. They work well for beginners who want to try different patterns without spending much money.
From what I read, mylar can tear if you’re not gentle. But for occasional quilting, they’re perfect.
Acrylic Stencils
Acrylic stencils cost more but last longer. They’re rigid and precise. Professional quilters often prefer them for repeated use.
The smooth edges help your stylus glide smoothly. This reduces wear on your machine and creates more consistent stitching.
Design Considerations
Your stencil design should match your project and skill level. A complex Celtic knot might look amazing, but it’s torture for beginners.
Pattern Complexity Levels
Start simple if you’re new to machine quilting. Basic geometric patterns let you focus on technique without getting lost in complicated curves.
Complex patterns need steady hands and patient machines. They also take much longer to complete.
Beginner-Friendly Patterns
Look for patterns with gentle curves and minimal direction changes. Straight lines, simple loops, and basic floral designs work great.
These patterns forgive small mistakes. If your stitching wavers slightly, the overall design still looks good.
Advanced Pattern Features
Advanced patterns include tight curves, sharp points, and intricate details. They create stunning results but demand precision.
Many experts say to master basic patterns first. Build your confidence before tackling complex designs.
Scale and Proportion Guidelines
Your stencil size should match your quilt’s proportions. A tiny pattern gets lost on a king-size quilt. A huge pattern overwhelms a baby quilt.
Consider your fabric too. Busy prints hide intricate stencil work. Solid colors show every detail.
Practical Shopping Tips
Shopping for stencils can feel overwhelming. Hundreds of patterns, different materials, varying prices. Where do you even start?
Where to Buy Quality Stencils
Local quilt shops often carry stencils suited to your area’s popular machine brands. The staff can offer personalized advice too.
Online retailers offer wider selections and better prices. But you can’t touch the material or check the cut quality before buying.
Online vs Local Shopping
Online shopping gives you access to specialty stencils and international designs. Reviews help you avoid poor-quality products.
Local shopping lets you examine stencils personally. You can check for rough edges, unclear lines, or flimsy materials.
Price vs Quality Balance
Expensive doesn’t always mean better. But extremely cheap stencils usually disappoint. Look for the sweet spot in the middle price range.
Consider cost per use too. A $30 stencil used 50 times costs less per project than a $10 stencil that breaks after 5 uses.
| Material | Average Price | Durability | Best For |
|---|---|---|---|
| Paper | $5-10 | Single use | Testing patterns |
| Mylar | $15-25 | 10-20 uses | Casual quilting |
| Acrylic | $25-50 | 100+ uses | Regular quilting |
Testing and Maintenance
Even the best stencil needs proper care. A few simple steps keep your stencils working perfectly for years.
Before First Use
Check new stencils for manufacturing defects. Look for rough edges, unclear lines, or bent sections. These problems only get worse with use.
Test the stencil on scrap fabric first. This lets you adjust your machine settings without risking your real project.
Edge Quality Inspection
Run your finger along the stencil edges. They should feel smooth and consistent. Rough spots will catch your stylus and create uneven stitching.
Sand minor rough spots with fine-grit sandpaper. Replace stencils with major defects.
Proper Storage Methods
Store stencils flat or hanging vertically. Don’t stack heavy items on top of them. This prevents warping and cracking.
Keep them away from heat sources. High temperatures can warp plastic materials and change their shape permanently.
Cleaning and Care
Clean stencils with mild soap and water after each use. Thread bits and fabric lint can build up in the pattern lines.
Dry them completely before storage. Moisture can cause warping or promote mold growth on some materials.
Common Mistakes to Avoid
I found that most quilting frustrations come from avoidable stencil mistakes. Learn from others’ experiences instead of making these errors yourself.
Size Mismatches
Buying stencils too big for your hoop wastes money and creates frustration. Measure twice, buy once.
Stencils too small for your project create awkward repetition patterns. Plan your layout before purchasing.
Pattern Complexity Overreach
Jumping to complex patterns too quickly discourages many quilters. Build skills gradually with simpler designs first.
Complex patterns also take much longer to complete. Make sure you have the patience and time before starting.
Making the Final Decision
You’ve considered compatibility, quality, design, and price. Now it’s time to choose. Trust your research and go with what feels right for your projects.
Remember, you don’t need perfect stencils to create beautiful quilts. Good technique matters more than expensive tools.
Start Small and Build
Buy one or two stencils first. Learn how they work with your machine and quilting style. Then expand your collection based on experience.
This approach saves money and prevents buyer’s remorse. You’ll understand what works before investing heavily.
Conclusion
Selecting the best quilting machine stencil comes down to matching your machine’s capabilities with your project goals and skill level. Start with your machine’s requirements – hoop size, tracking system, and material compatibility. Then choose designs that challenge you without overwhelming your abilities.
Quality matters more than quantity. A few well-made stencils serve you better than many cheap ones that break quickly. Take time to research materials, read reviews, and start with simpler patterns before advancing to complex designs. Your quilting journey becomes much more enjoyable when you have the right tools supporting your creativity.
What’s the difference between continuous line and block stencils?
Continuous line stencils let you quilt entire sections without stopping, while block stencils are designed for specific quilt blocks or smaller areas. Continuous line patterns work better for all-over quilting, and block stencils give you more control over individual sections of your quilt.
Can I use regular craft stencils with my quilting machine?
Regular craft stencils usually won’t work well with quilting machines because they’re designed for different applications. Quilting machine stencils have specific thickness requirements and smooth edges that work with your machine’s tracking system, while craft stencils may be too thin or have rough edges.
How do I know if my stencil is wearing out?
Watch for rough or chipped edges, visible cracks, warping that prevents flat laying, or areas where your stylus catches or skips. These signs mean it’s time to replace your stencil before it starts affecting your quilting quality.
Should I buy paper stencils to test patterns first?
Paper stencils work great for testing patterns and layouts before investing in permanent materials. They’re inexpensive and help you see how a design looks on your specific quilt without committing to a more expensive option you might not use again.
What size stencil should I start with as a beginner?
Choose stencils that fit comfortably within your machine’s hoop with at least an inch of space around the edges. For most home machines, this means starting with 4-6 inch patterns that give you room to work without fighting tight spaces while you’re learning.