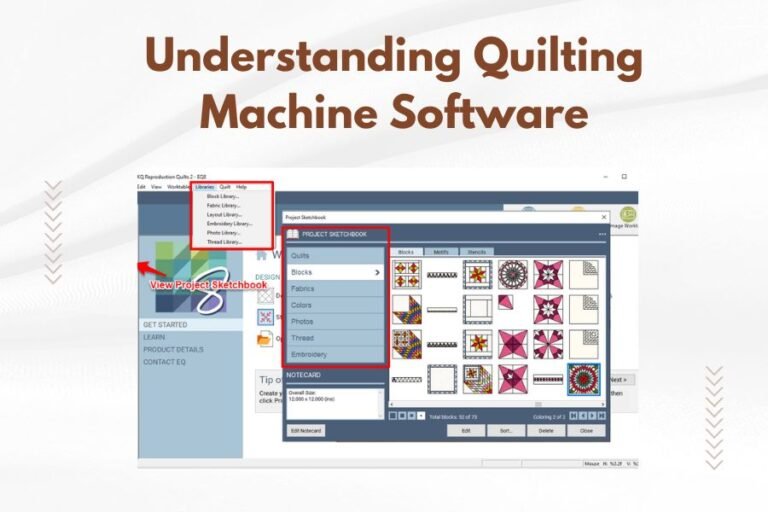
Quilting machine tension controls how tightly the top and bottom threads pull against each other as they form stitches through your quilt layers.
Proper tension creates balanced stitches where threads lock together in the middle of your quilt sandwich, not on the top or bottom surface.
What Is Quilting Machine Tension
Think of quilting machine tension like a tug-of-war between two threads. Your top thread comes from the spool and goes through several tension discs. Your bottom thread sits in the bobbin case below.
When tension is perfect, these threads meet and lock together right in the middle of your fabric layers. You won’t see loops, puckers, or loose threads on either side.
Bad tension shows up fast. You might see bobbin thread peeking through on top. Or top thread might create loops underneath. Your quilt could pucker or pull in weird ways.
How Tension Discs Work
Most quilting machines use metal discs that squeeze your top thread as it passes through. When you turn the tension dial higher, the discs press tighter together.
Tighter discs mean more resistance for your thread. This creates stronger pull against the bobbin thread below.
Bobbin Tension Basics
Your bobbin case has a small screw that controls bottom thread tension. Many quilters never touch this screw. They adjust only the top tension dial.
I found through research that most tension problems come from incorrect top tension settings, not bobbin issues.
Signs Your Tension Needs Adjustment
Spotting tension problems early saves you from ripping out hours of quilting. Here are the clear warning signs.
Top Thread Too Tight
When your top tension is too high, you’ll see these issues:
- Bobbin thread shows on the quilt top
- Fabric puckers along stitch lines
- Thread breaks frequently
- Stitches look pulled or distorted
Top Thread Too Loose
Low tension creates different problems:
- Loops of top thread appear on the quilt back
- Stitches look loose and sloppy
- Thread nests up under your fabric
- Seams don’t hold together well
Uneven Tension Issues
Sometimes tension changes as you quilt. This happens when:
- Thread gets caught in the tension discs
- Lint builds up in the machine
- Your thread quality varies
- Needle becomes dull or bent
Testing Your Current Tension
Before you start adjusting dials, test your current settings. This simple process tells you exactly what needs fixing.
The Sandwich Test Method
Make a small quilt sandwich with your actual project fabrics. Use the same batting you plan to quilt with. This test gives you real-world results.
Stitch several straight lines about 2 inches long. Leave space between each line so you can see the results clearly.
What to Look For
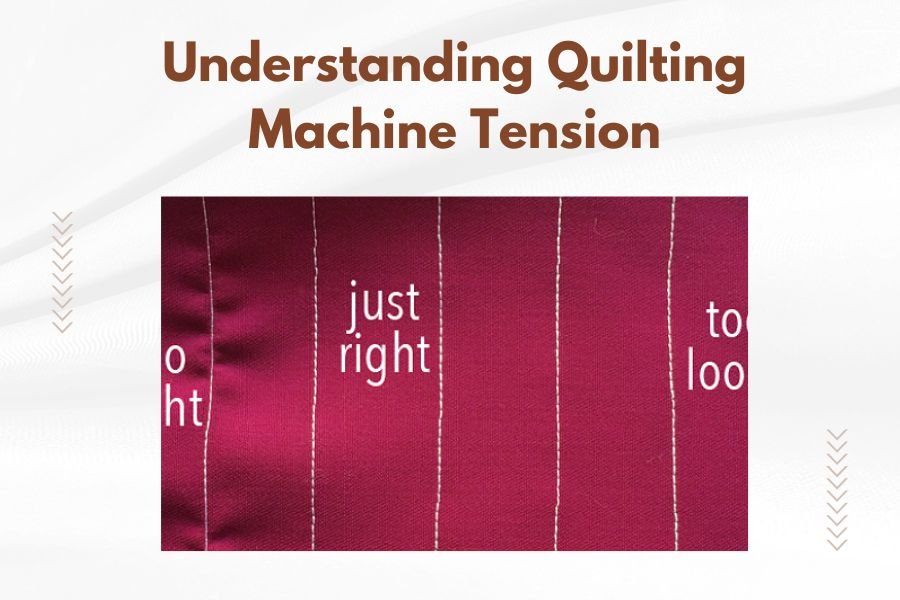
Examine both sides of your test stitches. Perfect tension shows threads that lock in the middle of the sandwich. You shouldn’t see contrasting thread colors bleeding through to the wrong side.
Turn your test piece over. The back should look just as balanced as the front.
The Thread Color Trick
Use different colored threads in your top and bobbin for testing. Bright contrasting colors make tension problems obvious right away.
I learned this tip from quilting forums where experts recommend using red thread on top and green in the bobbin. Any color combination works as long as they’re different.
Step-by-Step Tension Adjustment
Adjusting tension feels scary at first. But following these steps makes the process simple and safe.
Start With Your Threading
Before touching any tension dials, rethread your entire machine. Pull thread through every guide and tension disc properly.
Wrong threading causes 80% of tension problems, according to sewing machine repair experts I found online. Double-check your manual for the correct threading path.
Check Your Presser Foot
Your presser foot must be down when threading through tension discs. When the foot is up, tension discs stay open and won’t grip your thread.
This mistake trips up even experienced quilters. Always lower that presser foot before threading.
Adjusting Top Tension
Most machines have tension numbers from 0 to 9. Start at your machine’s default setting, usually around 4 or 5.
Make small changes. Move your dial just one number at a time. Test stitch after each adjustment.
| Problem | Solution | Direction |
|---|---|---|
| Bobbin thread shows on top | Decrease top tension | Lower number |
| Top thread loops underneath | Increase top tension | Higher number |
| Fabric puckering | Decrease top tension | Lower number |
| Thread breaking | Decrease top tension | Lower number |
When to Adjust Bobbin Tension
Only adjust bobbin tension if top tension changes don’t fix your problems. Bobbin tension affects all your sewing projects, not just quilting.
Mark your bobbin case’s original screw position with nail polish or permanent marker. This way you can return to the factory setting if needed.
Common Tension Problems and Solutions
Let’s tackle the most frequent tension issues quilters face. These solutions come from sewing machine technician guides and quilting expert advice I researched.
Thread Keeps Breaking
Constant thread breaks usually mean your tension is too tight. But other factors contribute too.
Check your needle first. Bent, dull, or wrong-size needles cause thread stress. Use size 90/14 needles for most quilting cotton.
Old or cheap thread also breaks easily. Quality thread costs more upfront but saves time and frustration.
Needle and Thread Matching
Your needle size must match your thread weight. Thick threads need larger needles. Thin threads work better with smaller needles.
Most cotton quilting thread works well with 80/12 or 90/14 needles. Metallic or specialty threads often need different sizes.
Stitches Look Uneven
Inconsistent stitch quality points to several possible issues. Start by cleaning your machine.
Lint and thread bits collect around tension discs and bobbin areas. This buildup changes how smoothly thread moves through your machine.
Speed and Tension Connection
Quilting too fast can create tension-like problems. When you rush, thread doesn’t have time to settle properly between stitches.
Slow down and see if your stitches improve. Many quilters find their sweet spot around medium speed settings.
Fabric Bunching or Puckering
Puckers form when thread pulls too tight against your fabric. This usually means high top tension.
But puckering also happens with wrong needle sizes or damaged needles. A needle that’s too large can distort fabric fibers.
Different Fabrics, Different Tension
Cotton quilting fabric is forgiving. But other materials need special attention to get tension right.
Working With Minky and Fleece
Thick, stretchy fabrics like minky need lower tension settings. These materials compress under the presser foot.
Start with tension around 2 or 3 for minky backs. Use a walking foot to help feed thick layers evenly.
Silk and Delicate Fabrics
Delicate fabrics tear easily under high tension. Use the lowest tension setting that still creates balanced stitches.
Consider using fine needles (size 70/10 or 75/11) with delicate materials. Smaller holes mean less fabric damage.
Batting Affects Tension Too
Dense batting creates more resistance as your needle passes through. This can throw off tension that was perfect with thinner batting.
Test your settings whenever you switch batting types. Wool batting behaves differently than cotton or polyester.
Machine-Specific Tension Tips
Different quilting machine brands have unique tension systems. Here’s what I found works for popular models.
Domestic Sewing Machines
Regular sewing machines used for quilting often need frequent tension adjustments. They’re designed for lighter-weight projects.
Use a walking foot or dual feed system when possible. These features help thick quilt layers feed evenly through tension discs.
Longarm Quilting Machines
Longarm machines typically have separate top and bobbin tension controls. This gives you more precise adjustment options.
Many longarm quilters set bobbin tension once and mainly adjust top tension for different threads and patterns.
Maintaining Proper Tension
Good tension doesn’t just happen once. Regular maintenance keeps your settings stable and reliable.
Regular Cleaning Schedule
Clean your tension discs and bobbin area after every major quilting project. Use compressed air or a small brush to remove lint.
Don’t use oil or cleaning products on tension discs unless your manual specifically recommends it.
Thread Quality Matters
Cheap thread creates more lint and breaks more often. Both problems affect tension stability.
Invest in quality thread from reputable brands. Your machine will run smoother and your tension will stay consistent longer.
Storing Thread Properly
Old thread becomes brittle and uneven. Store thread away from sunlight and extreme temperatures.
If you’re unsure about thread age, test it by pulling a strand firmly. Brittle thread snaps easily.
Troubleshooting Persistent Problems
Sometimes tension problems persist despite all your adjustments. Here are advanced solutions.
When Nothing Seems to Work
If basic adjustments don’t help, your machine might need professional service. Worn tension discs or damaged springs cause ongoing problems.
Document what you’ve tried before taking your machine to a repair shop. This saves diagnostic time and money.
Environmental Factors
Humidity and temperature affect thread behavior. Very dry conditions make thread brittle. High humidity can cause thread to swell slightly.
Consider your sewing room environment if tension problems come and go seasonally.
Conclusion
Understanding quilting machine tension transforms your quilting experience from frustrating to enjoyable. Start with proper threading and clean machine parts. Make small tension adjustments and test each change.
Remember that perfect tension creates stitches where threads lock in the middle of your quilt sandwich. You shouldn’t see contrasting threads bleeding through to the wrong side.
Most tension problems come from simple causes like incorrect threading or dirty tension discs. Clean your machine regularly and use quality thread for the best results. When in doubt, make small adjustments one number at a time until your stitches look balanced and beautiful.
What tension setting should I use for cotton quilting fabric?
Start with your machine’s default setting, usually 4 or 5. Cotton is forgiving, so this middle range works for most projects. Adjust up or down based on your test stitches.
Why does my thread keep breaking even after adjusting tension?
Thread breaks often come from dull or bent needles, not just tension issues. Check your needle size and condition first. Also verify you’re using quality thread and threading correctly through all guides.
Should I ever adjust bobbin tension on my quilting machine?
Only adjust bobbin tension as a last resort when top tension changes don’t solve your problems. Mark the original screw position first so you can return to factory settings if needed.
How often should I test my quilting machine tension?
Test tension whenever you change thread brands, fabric types, or batting. Also test after cleaning your machine or if you notice any stitch quality changes during quilting.
Can using different thread brands affect my tension settings?
Yes, different thread weights and manufacturing quality require tension adjustments. Thicker threads may need lower tension, while thin threads often need slightly higher settings. Always test when switching brands.