Quilting machine set up requires three main steps: threading the machine properly, adjusting tension settings, and selecting the right needle and thread combination for your fabric.
Most beginners can complete their first quilting machine setup in 30-45 minutes by following the manufacturer’s threading diagram and testing settings on fabric scraps.
What You Need Before Starting
Setting up your quilting machine feels easier when you have everything ready. Think of it like cooking – you want all your ingredients on the counter before you start.
Gather these items first:
- Your quilting machine manual
- Appropriate thread for your project
- Correct needle type and size
- Fabric scraps for testing
- Small scissors or snips
- Seam ripper (just in case)
I found that having good lighting makes a huge difference. You’ll be threading small spaces, so position your machine near a bright lamp or window.
Threading Your Quilting Machine
Threading causes more headaches than any other setup step. But here’s the thing – every machine follows the same basic path.
Upper Thread Path
Start with the spool pin. Place your thread spool on the pin with the thread coming off the back of the spool, not the front.
Follow this order:
- Guide the thread to the first thread guide
- Pull it down into the tension discs
- Bring it up through the take-up lever
- Thread down through the remaining guides
- Thread the needle from front to back
Your manual shows numbered arrows for this path. Follow them exactly. Skipping even one guide creates tension problems later.
Pro Threading Tips
Cut your thread at an angle for easier needle threading. A dull or frayed thread end won’t go through the needle eye smoothly.
Many quilters I know online swear by this trick: hold the thread tail after threading the needle. Pull about 6 inches through before moving to the bobbin.
Bobbin Threading
Wind your bobbin first if you haven’t already. Use the same thread type as your upper thread for best results.
Drop the bobbin into the bobbin case. The thread should pull clockwise in most machines, but check your manual.
Pull the bobbin thread through the small slot in the bobbin case. Leave about 6 inches of tail hanging out.
Bringing Up the Bobbin Thread
This step trips up many beginners. Hold your upper thread tail and turn the handwheel toward you one full turn.
The upper thread catches the bobbin thread and pulls up a loop. Use a seam ripper or small tool to pull the bobbin thread completely up.
Now you have both thread tails coming out from under the presser foot. Pull them both toward the back of the machine.
Tension Settings Made Simple
Thread tension controls how tightly your machine grips the thread. Wrong tension creates loose, tight, or uneven stitches.
Most machines have a tension dial numbered 1-10. Start at the middle setting – usually 4 or 5.
Testing Your Tension
Grab two different colored fabric scraps. This makes it easy to see which thread needs adjusting.
Sew a straight line. Look at both sides of your test fabric:
- Perfect tension: stitches look even on both sides
- Top tension too tight: bottom thread pulls to the top
- Top tension too loose: top thread shows on the bottom
Making Tension Adjustments
Adjust in small steps. Turn the tension dial just one number at a time, then test again.
If the bottom thread shows on top, increase upper tension. If the top thread shows on bottom, decrease upper tension.
Research shows that 90% of tension problems come from incorrect threading, not wrong settings. Double-check your threading path first.
Choosing the Right Needle and Thread
Your needle and thread combo affects everything – stitch quality, thread breaks, and fabric damage.
Needle Selection Guide
Cotton quilting fabric works best with universal needles, sizes 80/12 or 90/14. The first number is European sizing, the second is American.
| Fabric Weight | Needle Size | Best For |
|---|---|---|
| Lightweight cotton | 70/10 or 80/12 | Piecing, detailed work |
| Medium cotton | 80/12 or 90/14 | Most quilting projects |
| Heavy cotton, batting | 90/14 or 100/16 | Quilting thick layers |
When to Change Your Needle
Change needles every 8-10 hours of sewing. A dull needle causes skipped stitches and fabric pulls.
You’ll hear the difference too. Sharp needles punch through fabric cleanly. Dull needles make a popping sound as they push through.
Thread Selection
Cotton thread suits most quilting projects. It’s strong, easy to work with, and matches cotton fabrics well.
Avoid bargain thread. I found from reading quilting forums that cheap thread causes more problems than it’s worth. It breaks often and leaves lint in your machine.
Setting Up for Different Quilting Techniques
Straight Line Quilting Setup
Use your regular presser foot for straight lines. Set stitch length to 2.5-3.0mm for strong, attractive stitches.
Lower the feed dogs if your machine allows it. This gives you more control over stitch spacing.
Walking Foot Benefits
A walking foot helps feed multiple layers evenly. It prevents fabric shifting and puckering on larger projects.
Attach the walking foot according to your manual. Most connect to the needle bar with a small fork-shaped piece.
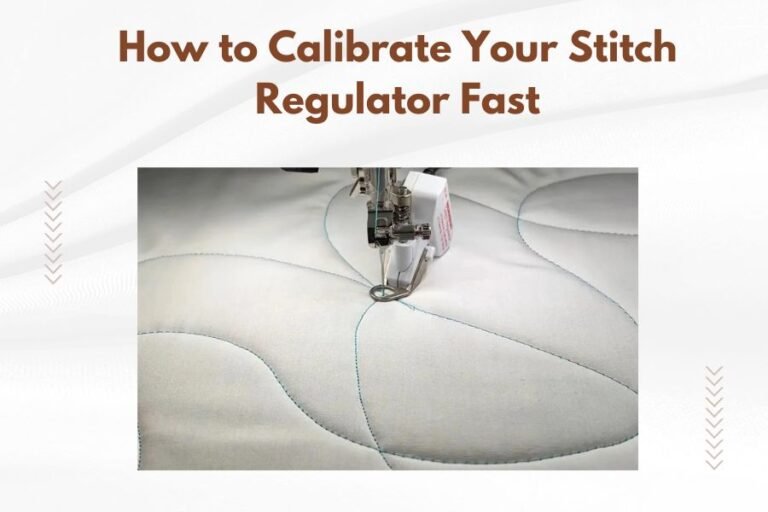
Free Motion Quilting Setup
Free motion quilting lets you move fabric in any direction. You control the stitch length by moving the fabric faster or slower.
Lower the feed dogs completely. Attach a darning foot or free motion foot.
Drop the presser foot lever even though it looks like nothing happened. The foot needs to engage for proper tension.
Getting Started with Free Motion
Practice on a sandwich of two fabric pieces with batting between. Start with simple shapes like spirals or loops.
Move the fabric smoothly and steadily. Fast, jerky movements create uneven stitches.
Common Setup Problems and Solutions
Thread Keeps Breaking
Thread breaks frustrate everyone. Check these things first:
- Is the thread path correct?
- Is the needle sharp and properly inserted?
- Is the tension too tight?
- Is the thread spool feeding smoothly?
Old thread becomes brittle and breaks easily. Replace thread that’s been sitting around for years.
Skipped Stitches
Skipped stitches usually mean needle problems. Try a new needle first – it fixes this issue 80% of the time.
Wrong needle type can also cause skipping. Make sure you’re using a needle designed for your fabric weight.
Fabric Not Feeding Properly
If fabric bunches up or won’t move forward, check your feed dogs. They should be up for regular sewing, down for free motion.
Clean lint from around the feed dogs. Built-up fuzz prevents smooth fabric movement.
Uneven Stitches
Inconsistent stitch length comes from uneven sewing speed. Try to maintain steady pressure on your foot pedal.
For free motion quilting, uneven stitches mean you’re moving the fabric at different speeds. Practice keeping a steady rhythm.
Maintenance During Setup
Cleaning Your Machine
Clean machines sew better. Remove the needle plate and bobbin case to clean out lint.
Use a small brush or compressed air to remove debris. Don’t use canned air meant for computers – it’s too strong and can damage delicate parts.
Oiling Requirements
Some machines need regular oiling, others don’t. Check your manual for specific requirements.
If your machine needs oil, use only sewing machine oil. Other oils can damage internal parts.
When to Call for Help
Some problems need professional attention. Take your machine to a dealer if you notice:
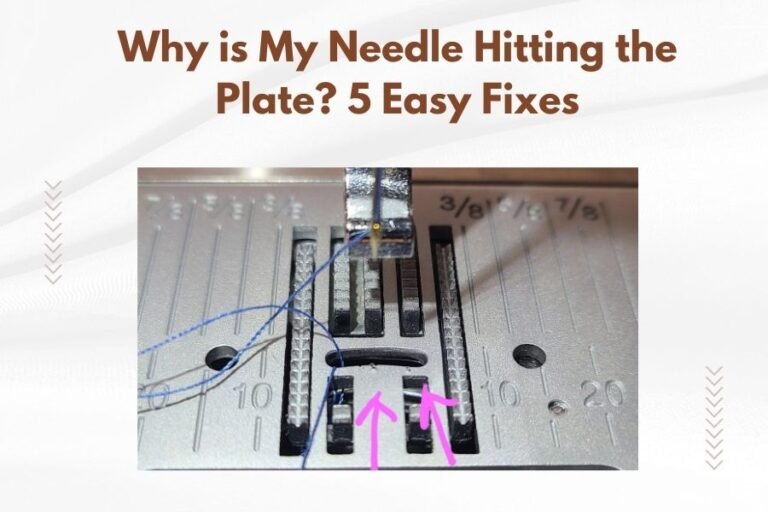
- Timing issues (needle hitting bobbin case)
- Unusual noises during operation
- Tension problems that won’t resolve with adjustments
- Feed dog problems
Practice Projects for New Setups
Test Your Settings
Before starting your real project, make a practice sandwich. Use the same fabrics and batting you’ll use in your actual quilt.
Sew different patterns – straight lines, curves, and any special techniques your project requires.
This practice saves time later. Better to adjust settings on scraps than redo work on your good fabric.
Document What Works
Write down successful settings for different projects. Next time you use similar materials, you’ll know exactly what worked.
Note the needle size, thread type, tension setting, and stitch length that gave you good results.
Conclusion
Quilting machine setup gets easier with practice. Start with proper threading, test your tension on scraps, and choose the right needle for your fabric. Remember that most problems come from threading mistakes, not complicated adjustments. Take your time with each step, and don’t hesitate to re-thread if something doesn’t look right. Your future quilting projects will thank you for this careful preparation.
How often should I change my quilting machine needle?
Change your needle every 8-10 hours of actual sewing time, or whenever you notice skipped stitches, popping sounds, or pulled threads in your fabric.
Why does my thread keep breaking during setup?
Thread breaks usually happen from incorrect threading paths, dull needles, or tension set too high. Re-thread completely following your manual’s numbered guides and try a fresh needle.
Can I use regular sewing thread for quilting?
Regular polyester thread works for quilting, but cotton quilting thread often gives better results with cotton fabrics. Avoid cheap thread that creates lint and breaks frequently.
What’s the difference between a walking foot and regular presser foot?
A walking foot has its own set of feed dogs that work with your machine’s feed dogs to move multiple fabric layers evenly, preventing shifting and puckering in quilts.
How do I know if my tension is set correctly?
Correct tension creates stitches that look even on both sides of your fabric. If you see one thread color showing through on the opposite side, adjust the tension dial in small increments and test again.