Quilting machine ergonomics focuses on positioning your body, machine, and workspace to prevent pain and fatigue during long quilting sessions.
Proper ergonomic setup includes adjusting your chair height, positioning your machine at elbow level, and taking regular breaks to avoid repetitive strain injuries.
Why Your Body Hurts After Quilting
Ever notice how your back aches after a quilting marathon? You’re not alone. Quilting puts your body in positions that weren’t meant to last for hours.
Your neck cranes forward to see tiny stitches. Your shoulders hunch up from tension. Your back rounds as you lean over the machine. Your wrists bend at awkward angles to guide fabric.
I found that many quilters ignore these warning signs until pain becomes a real problem. The good news? Small changes make a huge difference.
The Perfect Quilting Chair Setup
Chair Height Matters Most
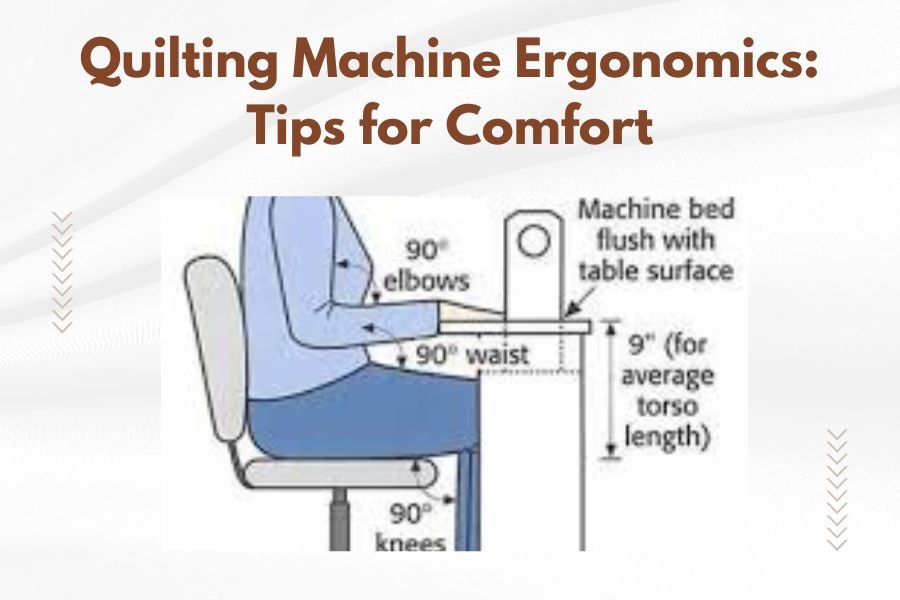
Your chair height controls everything else. When you sit, your feet should rest flat on the floor. Your thighs should be parallel to the ground.
If your chair is too low, you’ll hunch your shoulders. Too high, and you’ll strain your neck looking down.
Back Support You Actually Need
Skip those fancy expensive chairs. Look for firm lumbar support that curves with your lower back. The backrest should hit right at your belt line.
Many quilters I’ve heard from swear by adding a small pillow behind their lower back. It’s cheap and works great.
Armrest Position
Set armrests so your shoulders stay relaxed. Your elbows should rest lightly without lifting your shoulders or forcing them down.
If armrests get in your way, remove them. Better to have no support than bad support.
Machine Height and Positioning
The Elbow Rule
Your quilting machine bed should sit at your elbow height when you’re seated. This keeps your arms in a neutral position.
Too high, and your shoulders will ache. Too low, and you’ll lean forward and hurt your back.
Distance from Machine
Sit close enough that you don’t reach for the handwheel or controls. Your back should touch the chair backrest while your hands work comfortably.
Think of it like driving a car. You adjust the seat so you can reach everything without stretching.
Machine Angle Adjustments
Tilt your machine bed slightly toward you if possible. A 10-15 degree angle reduces neck strain because you don’t have to look down as much.
Some quilting tables come with this feature built in. For regular tables, furniture risers work well.
Lighting That Saves Your Eyes and Neck
Overhead vs Task Lighting
Room lighting alone isn’t enough. You need bright, focused light on your work area. Poor lighting makes you lean forward and squint.
LED task lamps work best. Position them to eliminate shadows where you’re stitching.
Reducing Eye Strain
Follow the 20-20-20 rule. Every 20 minutes, look at something 20 feet away for 20 seconds. This relaxes your eye muscles.
Many eye doctors recommend this for anyone doing close-up work (American Optometric Association).
Hand and Wrist Protection
Neutral Wrist Position
Keep your wrists straight while guiding fabric. Bending them up, down, or sideways strains the delicate tendons inside.
Your hands should flow in a straight line from your forearms. No kinks or bends.
Grip and Pressure
Use light touch when moving fabric. White knuckles mean you’re gripping too hard. Tension in your hands travels up your arms to your shoulders.
Let the feed dogs do most of the work. You’re just guiding, not forcing.
Wrist Support Options
Padded wrist rests help some quilters. Place them in front of your machine so your wrists don’t rest on hard edges.
But don’t rely on them completely. The best support comes from proper positioning.
Movement and Break Strategies
The 30-Minute Rule
Stand up and move every 30 minutes. Set a timer if you lose track of time. Your body wasn’t designed to hold one position for hours.
Even a 30-second stretch makes a difference. Walk to the kitchen. Look out a window. Shake out your hands.
Micro-Breaks During Quilting
Take tiny breaks between seams. Roll your shoulders back. Stretch your neck side to side. Flex your fingers.
These mini-movements prevent stiffness from building up.
Simple Quilting Stretches
Try these quick stretches during breaks:
- Shoulder rolls backward 5 times
- Neck turns left and right
- Wrist circles in both directions
- Upper back stretch by hugging yourself
- Standing back extension with hands on hips
Workspace Organization for Less Strain
Tool Placement Strategy
Keep frequently used tools within arm’s reach. Scissors, seam ripper, pins should all be close by.
Reaching and twisting puts extra stress on your spine. Create zones around your workspace for different activities.
Fabric Management
Support large quilts with tables or stands on your left side. Heavy fabric pulling down creates shoulder and neck strain.
Some quilters use wheeled carts that adjust height. The fabric stays supported as it moves through the machine.
Storage Solutions
Store heavy supplies at waist level. Lifting from floor level or reaching overhead both strain your back.
Use drawer organizers to keep small items sorted. Less searching means less repetitive reaching.
Common Ergonomic Mistakes
The Forward Head Problem
This is the biggest issue I found among quilters. Your head weighs about 10 pounds. When you push it forward, your neck muscles work overtime.
Check yourself regularly. Is your head directly over your shoulders, or jutting forward?
Rounded Shoulder Trap
Hunched shoulders create a domino effect. Your chest muscles tighten. Your upper back weakens. Everything gets out of balance.
Think about pulling your shoulder blades back and down. Like you’re trying to put them in your back pockets.
Ignoring Pain Signals
Mild discomfort is your body’s early warning system. Don’t push through pain hoping it will go away.
Research shows that addressing ergonomic issues early prevents long-term problems (National Institute for Occupational Safety and Health).
Equipment That Actually Helps
Adjustable Tables vs Fixed Height
Adjustable quilting tables cost more upfront but save money on doctor visits later. You can fine-tune the height for different projects.
Fixed height tables work if they match your body measurements perfectly. Most people aren’t that lucky.
| Table Type | Pros | Cons |
|---|---|---|
| Adjustable | Perfect height, multiple users, different projects | Higher cost, more complex |
| Fixed | Lower cost, stable, simple | One height only, may not fit |
Ergonomic Accessories Worth Buying
A few items make a real difference:
- Adjustable footrest for proper leg position
- Document holder to keep patterns at eye level
- Quilting gloves for better fabric grip
- Magnetic pin holder to reduce reaching
When to Seek Professional Help
Warning Signs to Watch
See a doctor if you have persistent pain that lasts after quilting sessions. Numbness or tingling in your hands needs immediate attention.
Don’t wait until you can barely move. Early treatment works better than trying to fix chronic problems.
Physical Therapy Benefits
Physical therapists can assess your specific situation. They’ll identify muscle imbalances and teach you exercises that target your problem areas.
Many insurance plans cover physical therapy for repetitive strain injuries.
Conclusion
Quilting machine ergonomics isn’t about expensive equipment or complex setups. Small adjustments to your chair, machine height, and work habits prevent pain and keep you quilting longer.
Start with one change today. Adjust your chair height or set a timer for breaks. Your body will thank you, and your quilting will improve when you’re comfortable and pain-free.
Remember, the best quilting setup is one you can use for hours without discomfort. Take care of your body, and it will take care of your quilting passion for years to come.
How often should I take breaks while quilting?
Take a 5-minute break every 30 minutes of quilting. Stand up, stretch, and move around to prevent stiffness and muscle fatigue.
What’s the ideal height for my quilting machine?
Your machine bed should be at elbow height when you’re seated with your shoulders relaxed. This usually means 26-30 inches from the floor for most people.
Can I use a regular dining chair for quilting?
Regular chairs work temporarily, but they lack proper lumbar support and height adjustment. A good office chair with adjustable features will be more comfortable for long quilting sessions.
Why do my shoulders hurt after quilting?
Shoulder pain usually comes from hunching forward, working at the wrong height, or tensing up while concentrating. Check your posture and machine position first.
Should I wear quilting gloves for better ergonomics?
Quilting gloves can help you grip fabric with less hand tension, which reduces strain up your arms to your shoulders. They’re especially helpful for machine quilting large projects.