Creating beautiful quilting feathers requires mastering curved lines using free-motion quilting techniques with proper machine setup and consistent hand movements.
You can achieve stunning feather patterns by practicing basic spine lines first, then adding curved plumes that flow naturally from the central stem.
What Makes Quilting Feathers So Special
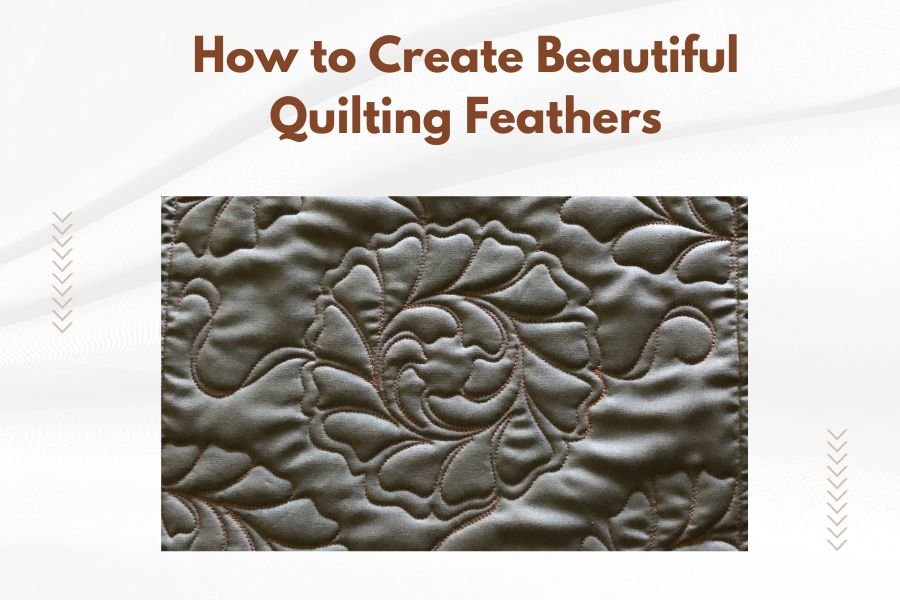
Feather designs transform ordinary quilts into heirloom pieces. These flowing patterns add elegance and movement that catches the eye from across the room.
I found that many quilters feel intimidated by feathers. But here’s the truth: they’re just curved lines connected to a spine. Once you see them that way, everything clicks.
Essential Tools for Feather Quilting
You need the right setup before starting any feather work. The wrong tools make this beautiful technique feel impossible.
Machine Requirements
Your sewing machine needs a free-motion quilting foot. This special foot allows fabric to move freely in all directions. Drop or cover the feed dogs too.
Set your stitch length to zero. You’ll control the stitch size with hand movement speed and machine pace.
Thread Selection
Choose thread that complements your fabric. Cotton thread works well for beginners because it’s forgiving. Polyester gives more sheen but requires steadier hands.
Use the same thread color in both the bobbin and top. This prevents color show-through on light fabrics.
Quilting Gloves
Rubber-tipped quilting gloves give you better fabric grip. Your hands won’t slip during long quilting sessions. They also reduce hand fatigue.
Understanding Feather Anatomy
Every feather has two main parts: the spine and the plumes. Think of a real bird feather. The center stem is the spine. The curved sections branching off are plumes.
The Spine Foundation
Start every feather with a clean spine line. This can be straight, curved, or wavy. The spine gives direction to your entire feather design.
Mark your spine lightly with a removable fabric marker. This guide keeps your feather balanced and flowing.
Plume Placement
Plumes alternate sides along the spine. One curves left, the next curves right. This creates the classic feather look we all recognize.
Keep plumes roughly the same size within each feather. Consistency makes the pattern look professional.
Basic Feather Quilting Steps
Ready to create your first feather? Follow these steps exactly. Don’t skip ahead or rush the process.
Step 1: Practice Lines on Paper
Before touching fabric, practice on paper. Draw spine lines, then add curved plumes. Your hand needs to learn these movements first.
Spend at least 30 minutes drawing feathers. This muscle memory transfers directly to your quilting machine.
Step 2: Set Up Your Machine
Install the free-motion foot. Drop the feed dogs. Thread your machine with matching thread colors.
Test your tension on fabric scraps. The stitches should look even on both sides without puckering.
Step 3: Start with the Spine
Begin quilting at one end of your marked spine. Move the fabric smoothly while maintaining steady machine speed. Don’t stop mid-spine.
Your first spine might wobble. That’s normal. Even wobbly spines can support beautiful plumes.
Step 4: Add the First Plume
At the spine’s end, curve away to create your first plume. Make a teardrop or leaf shape. Return to the spine by following the same path backward.
This echo line gives plumes their full, dimensional look.
Step 5: Continue Alternating Plumes
Move down the spine slightly. Curve out in the opposite direction for plume number two. Keep alternating sides as you work down the spine.
Each plume connects to the spine at a slightly different point. This prevents bunching and maintains flow.
Common Feather Quilting Mistakes
I researched common problems that trip up new feather quilters. Avoiding these issues saves hours of frustration.
Moving Too Fast
Speed kills feather beauty. Moving fabric too quickly creates uneven stitches and choppy curves. Slow, steady movements win every time.
Match your hand speed to your machine speed. When they’re synchronized, stitches look professional.
Inconsistent Plume Sizes
Plumes that vary wildly in size look messy. Try to keep them roughly similar within each feather design.
Some natural variation is good. It prevents the mechanical look that screams “machine made.”
Stopping Mid-Curve
Never stop your machine while quilting curves. This creates stitch buildup and bumpy lines. Plan your path and commit to smooth movement.
If you must stop, do it on straight spine sections where stitch buildup is less noticeable.
Advanced Feather Techniques
Once basic feathers feel comfortable, try these advanced variations. They add visual interest without massive difficulty increases.
Feather Wreaths
Create circular spine lines for feather wreaths. Start at any point and work around the circle. Plumes point outward from the center.
Feather wreaths work beautifully in quilt corners or as central medallions.
Double Feathers
Add a second row of plumes outside your first row. These secondary plumes fill space and create fuller-looking feathers.
Keep secondary plumes smaller than primary ones. This maintains the natural feather proportion.
Feather Cables
Connect multiple feathers end-to-end for cable designs. The spine curves and flows like a ribbon across your quilt surface.
Plan cable paths carefully. They should enhance your quilt’s overall design, not fight against it.
Troubleshooting Feather Problems
Even experienced quilters face feather challenges. Here are solutions to the most common issues.
Uneven Stitch Length
This happens when hand speed and machine speed don’t match. Practice coordinating these two movements on test fabric.
Some quilters find it helpful to hum or count while quilting. The rhythm helps coordinate movement.
Bumpy Curves
Bumpy curves usually mean you’re moving too fast or stopping mid-motion. Slow down and commit to smooth, continuous movement.
Think of drawing with a pencil that never lifts from paper. Your fabric movement should feel that smooth.
Thread Breaks
Frequent thread breaks often indicate tension problems or old thread. Check your machine’s tension settings and use fresh, quality thread.
Sometimes the needle needs changing too. Dull needles stress thread and cause breaks.
Design Planning for Feathers
Great feather quilting starts with good planning. Random feather placement usually looks scattered and unfinished.
Scale Considerations
Match feather size to your quilt’s proportions. Tiny feathers get lost on large quilts. Giant feathers overwhelm small projects.
I found that feathers spanning 3-6 inches work well for most bed-sized quilts. Wall hangings can handle smaller, more delicate feathers.
Spacing Guidelines
Leave adequate space around feathers. Crowded designs compete for attention and look busy. White space lets feathers breathe and shine.
Consider the quilt’s intended use too. Heavy quilting creates stiff fabric. Bed quilts need some flexibility for comfort.
Practice Strategies That Work
Consistent practice builds feather quilting confidence. But random practice wastes time. Focus your efforts for faster improvement.
Daily Short Sessions
Practice 15 minutes daily rather than long weekend sessions. Your hands and brain learn better with consistent, short practice periods.
Set up a practice sandwich that stays ready. Quick access removes barriers to regular practice.
Focus on One Element
Don’t practice entire feathers every time. Some sessions, focus only on smooth spines. Other sessions, work just on consistent plume curves.
Breaking complex skills into smaller parts accelerates learning. Your brain can focus on perfecting one element at a time.
Thread and Fabric Combinations
Different thread and fabric combinations create different feather effects. Understanding these relationships helps you choose the right materials.
| Thread Type | Best Fabric | Effect |
|---|---|---|
| Cotton | Cotton | Classic, even texture |
| Polyester | Cotton | Slight sheen, durable |
| Rayon | Cotton | High sheen, dramatic |
| Invisible | Prints | Texture without color |
Building Feather Confidence
Confidence comes from successful repetition. Start with simple projects that guarantee success, then gradually increase difficulty.
Begin with Small Projects
Practice feathers on pot holders or table runners first. Small projects feel less intimidating and finish quickly.
Success on small projects builds confidence for larger quilts. You’ll also develop personal techniques that work for your style.
Accept Imperfection
Handmade charm includes slight imperfections. Perfect machine precision often looks cold and lifeless. Embrace the human touch in your work.
Many quilters find their “mistakes” become their signature style elements. What feels wrong initially might become your trademark look.
Conclusion
Creating beautiful quilting feathers takes patience and practice, but the results are worth every effort. Start with basic spine-and-plume combinations, focus on smooth movements, and gradually build complexity as your confidence grows. Remember that even imperfect feathers add handmade charm to your quilts. With consistent practice and the right techniques, you’ll soon be adding elegant feather designs to all your quilting projects. The key is starting simple and building skills gradually rather than attempting complex designs too early.
How long does it take to master feather quilting?
Most quilters feel comfortable with basic feathers after 10-15 hours of focused practice spread over several weeks. Mastery comes with months of regular practice, but even early attempts add beautiful texture to quilts.
Can I quilt feathers without a free-motion foot?
Free-motion quilting feet are necessary for smooth feather curves. Regular presser feet don’t allow the fabric movement needed for curved designs. Invest in a free-motion foot before attempting feathers.
What’s the best way to mark feather designs on dark fabric?
Use white or light-colored removable markers on dark fabrics. Hera markers create pressed lines without color. Light tables help you trace patterns onto dark fabrics using removable markers.
Should feathers follow the quilt’s grain line?
Feathers can go in any direction regardless of grain line. The quilting itself stabilizes the fabric. Design placement should follow your quilt’s visual flow rather than grain direction.
How do I fix mistakes in feather quilting?
Minor wobbles and imperfections add character and rarely need fixing. For major mistakes, carefully remove stitches with a seam ripper, then re-quilt the area. Prevention through slower movement works better than correction.