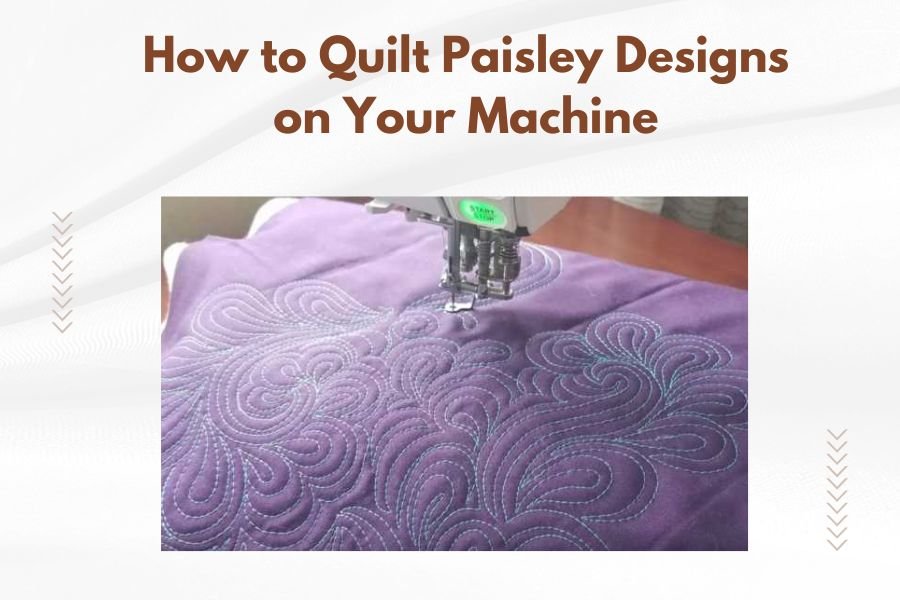
Machine quilting paisley designs requires using free-motion quilting techniques with proper thread tension and consistent hand movement patterns.
You’ll need to drop your feed dogs, attach a darning foot, and practice the teardrop paisley shape on scrap fabric before quilting your final project.
Essential Equipment for Machine Quilting Paisley Patterns
Getting the right tools makes paisley quilting so much easier. You don’t need fancy equipment, but a few key items will save you hours of frustration.
Your sewing machine needs free-motion capability. Most modern machines have this feature. You’ll drop the feed dogs and control fabric movement yourself.
Must-Have Machine Accessories
A darning foot or free-motion foot is your best friend here. This foot moves up and down with the needle, preventing fabric from lifting.
I found that quilting gloves help tremendously. They give you better grip on the fabric without leaving marks. Cotton or rubber-tipped gloves work great.
Thread and Needle Selection
Use cotton or polyester quilting thread. It’s stronger than regular sewing thread. Match your thread color to your fabric or use contrasting colors for bold paisley outlines.
Size 90/14 quilting needles work best. They’re sharp enough to pierce multiple fabric layers without creating large holes.
Setting Up Your Machine for Paisley Quilting
Proper machine setup prevents most paisley quilting problems. Take five minutes to adjust these settings before you start.
Feed Dog and Presser Foot Adjustments
Drop your feed dogs completely. They’re located under your presser foot. Check your manual if you can’t find the lever.
Attach your darning foot. Make sure it’s secure but not overtightened. The foot should move freely with your needle.
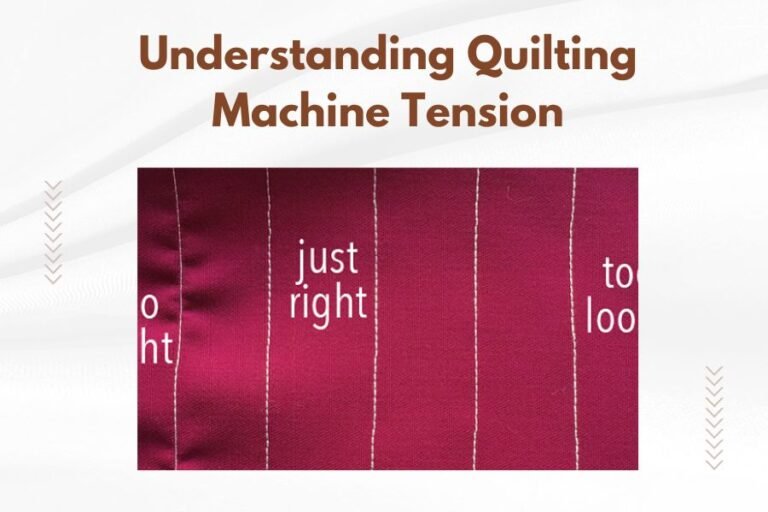
Tension and Stitch Settings
Set your stitch length to zero. You’ll control stitch length by moving the fabric. Start with normal thread tension, then adjust if needed.
Test your tension on scrap fabric first. Top thread showing on the back means tension is too tight. Bottom thread showing on top means it’s too loose.
Understanding Paisley Design Elements
Paisley shapes look complex, but they’re really just teardrops with decorative swirls. Breaking them down into simple parts makes quilting much easier.
Basic Paisley Shape Components
Every paisley has three main parts: the round bulb, the curved tail, and the pointed tip. Think of it like a fancy comma shape.
The bulb is your starting point. It’s the fattest part of the paisley. The tail curves gracefully from the bulb. The tip ends in a sharp point.
Traditional Paisley Proportions
Classic paisleys are about three times longer than they are wide. The bulb takes up roughly one-third of the total length.
You can make paisleys any size you want. Larger ones are easier for beginners. Start with paisleys about 4 inches long.
Planning Your Paisley Layout
Good planning prevents crowded or lopsided paisley arrangements. You want your design to flow naturally across your quilt.
Marking Your Design
Use water-soluble marking pens or quilting stencils. Light marks work best – you can always add more if needed.
Mark your paisley centers first, then add the curved outlines. Space them at least 2 inches apart for your first project.
Creating Flow and Movement
Paisleys look best when they seem to dance across your quilt. Point some left, some right. Vary their sizes slightly.
Group paisleys in odd numbers – three or five look more natural than two or four. This creates visual interest without looking forced.
Free-Motion Quilting Techniques for Paisleys
Free-motion quilting feels weird at first. You’re controlling everything – speed, direction, and stitch size. Practice makes this feel natural.
Body Position and Hand Placement
Sit up straight with your shoulders relaxed. Rest your arms lightly on the machine table. Don’t grip the fabric too tightly.
Place your hands in a triangle shape around the needle. This gives you the best control for curved lines.
Speed and Movement Coordination
Run your machine at medium speed – not too fast, not too slow. Move the fabric smoothly and consistently.
Think of it like driving a car. Steady speed with smooth steering gives the best results. Jerky movements create uneven stitches.
Step-by-Step Paisley Quilting Process
Let’s walk through quilting one perfect paisley. Take your time with each step.
Starting Your First Paisley
Begin at the bottom of the bulb. Lower your needle and presser foot. Take one stitch and pull the bobbin thread to the top.
Hold both threads as you start stitching. This prevents thread tangles underneath your quilt.
Creating the Bulb
Stitch a circle or oval shape for your bulb. Keep your machine running at steady speed. Move the fabric slowly for small stitches.
Don’t worry about perfection. Slightly wobbly lines add character to hand-quilted looks.
Forming the Curved Body
From the top of your bulb, curve gracefully toward the tail. Think of drawing a backwards “S” shape.
The curve should be smooth and gradual. Sharp turns create puckers in your fabric.
Finishing the Pointed Tail
Taper your paisley to a sharp point. This takes practice – don’t be discouraged if your first attempts look blunt.
End with several tiny stitches in place to lock your thread. Trim threads close to the fabric.
Adding Decorative Elements to Your Paisleys
Basic paisleys are beautiful, but decorative details make them stunning. Add these elements once you’re comfortable with the basic shape.
Internal Scroll Work
Quilt smaller swirls inside your paisley bulbs. These can be simple spirals or figure-eight shapes.
Keep internal details proportional to your paisley size. Tiny details get lost in large paisleys.
Echo Quilting Around Paisleys
Echo quilting creates beautiful texture around your paisleys. Stitch parallel lines following your paisley shape.
Space echo lines about 1/4 to 1/2 inch apart. Closer lines create more texture but take longer to complete.
Common Paisley Quilting Problems and Solutions
Every quilter faces challenges when learning paisley designs. Here are the most common issues and how to fix them.
Uneven Stitch Length
Inconsistent stitches usually mean you’re moving the fabric too fast or too slow for your machine speed.
Practice coordinating your hand and foot movements. It’s like learning to drive – awkward at first, then automatic.
Puckered Fabric
Puckers happen when fabric shifts during quilting. Make sure your quilt layers are properly basted before starting.
Loosen your thread tension slightly. Tight tension pulls fabric layers together unevenly.
Thread Breaking Issues
Old or cheap thread breaks easily. Use quality quilting thread and replace your needle after every 8 hours of quilting.
Check your needle for burrs or bent tips. A damaged needle can shred even good thread.
Practice Exercises for Paisley Mastery
Like learning piano, quilting paisleys requires regular practice. These exercises build muscle memory and confidence.
Basic Shape Drills
Practice drawing paisleys on paper first. This trains your brain and hand to work together.
Then practice on fabric scraps. Make 20 small paisleys in a row. Focus on consistency, not perfection.
Size Variation Exercises
Quilt paisleys in different sizes – tiny ones, medium ones, and large ones. Each size requires different muscle control.
Try quilting paisleys that gradually increase in size across your practice fabric. This teaches smooth size transitions.
Troubleshooting Advanced Paisley Techniques
Once you master basic paisleys, you might want to try more complex variations. Here’s how to handle advanced challenges.
Overlapping Paisley Designs
Overlapping paisleys create beautiful layered effects but require careful planning. Mark your complete design before quilting.
Quilt background paisleys first, then add overlapping ones on top. This prevents confusion about which lines to follow.
Paisley Border Treatments
Turning corners with paisley borders takes practice. Plan corner designs separately from straight border sections.
Consider using smaller paisleys at corners or creating mirror-image pairs that meet at corner points.
Finishing and Pressing Paisley Quilts
Your beautiful paisley quilting deserves proper finishing. These final steps protect your work and enhance its appearance.
Removing Marking Lines
Remove water-soluble marks according to manufacturer instructions. Test removal methods on fabric scraps first.
Some marks disappear with plain water. Others need gentle soap solutions. Never use hot water on marks – it can set them permanently.
Pressing Considerations
Press paisley quilts gently from the back. Use a pressing cloth to protect decorative threads.
Avoid dragging your iron across quilted surfaces. This can distort your carefully stitched curves.
| Paisley Size | Recommended Thread Weight | Needle Size | Ideal Spacing |
|---|---|---|---|
| Small (2-3 inches) | 50wt | 80/12 | 1-2 inches apart |
| Medium (3-5 inches) | 40wt | 90/14 | 2-3 inches apart |
| Large (5+ inches) | 30wt | 100/16 | 3-4 inches apart |
Conclusion
Machine quilting paisley designs transforms ordinary quilts into works of art. With the right setup, consistent practice, and patience with yourself, you’ll create stunning paisley patterns that rival professional quilters.
Remember that every expert quilter started as a beginner. Your first paisleys might look wobbly, and that’s perfectly normal. Focus on steady improvement rather than immediate perfection. Each paisley you quilt builds your skills and confidence.
Start with simple, large paisleys on practice fabric. Master the basic teardrop shape before adding decorative elements. Once you feel comfortable with individual paisleys, experiment with layouts, sizes, and echo quilting effects.
Most importantly, enjoy the process. Machine quilting paisleys is meditative and rewarding. Your unique style will develop naturally as you gain experience. Soon you’ll be creating beautiful paisley quilts that showcase your growing expertise.
What’s the easiest paisley size for beginners to start with?
Start with paisleys that are 4-5 inches long and about 2 inches wide at the bulb. This size gives you room for small mistakes while still being manageable to control. Tiny paisleys require more precision, while very large ones can be difficult to keep smooth and proportional.
How do I prevent my thread from breaking while quilting paisleys?
Use high-quality quilting thread and change your needle after every 8 hours of quilting time. Check that your thread tension isn’t too tight, and make sure your needle size matches your thread weight. Also verify that your needle path is clear and your machine timing is correct.
Can I quilt paisleys on a regular sewing machine without special features?
Yes, most sewing machines made in the last 20 years can handle free-motion quilting. You need the ability to drop feed dogs and use a darning foot. Check your manual for free-motion capabilities, or contact your machine manufacturer if you’re unsure.
Should I use contrasting or matching thread for paisley quilting?
Both approaches work beautifully but create different effects. Matching thread creates subtle texture that’s visible mainly through shadows and dimension. Contrasting thread makes your paisley designs pop as decorative elements. Choose based on whether you want your paisleys to blend in or stand out.
How long does it typically take to quilt one paisley design?
A simple 4-inch paisley takes about 2-3 minutes for experienced quilters, while beginners might need 5-10 minutes each. Complex paisleys with internal details can take 15-20 minutes. Your speed will increase significantly with practice, and working steadily is more important than working quickly.