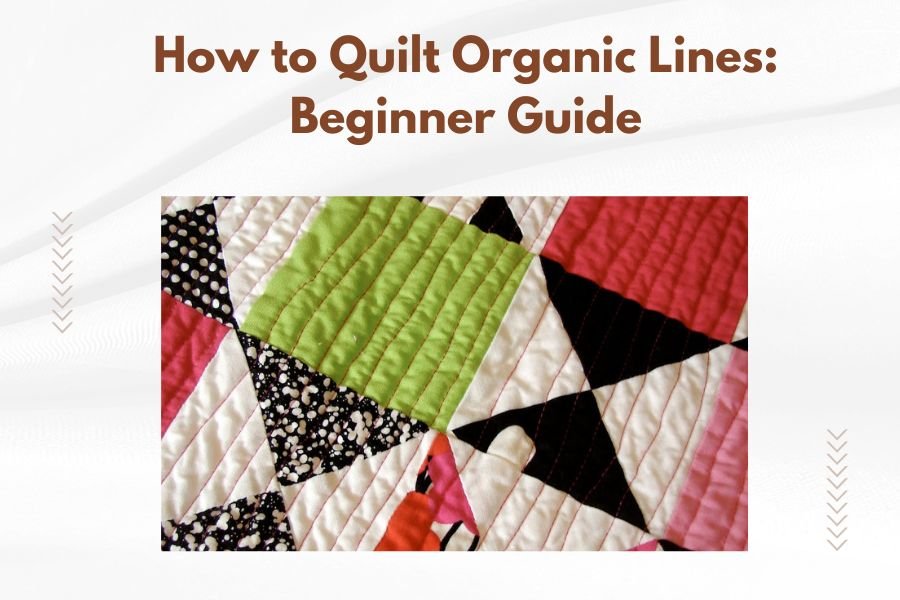
Quilting organic lines means creating free-flowing, curved stitching patterns that mimic nature’s shapes without rulers or templates.
You can master organic line quilting by starting with simple wavy motions and gradually building confidence through practice on fabric scraps.
What Are Organic Lines in Quilting
Organic lines look like things you see in nature. Think of flowing water, wind-blown grass, or tree branches. These lines curve and bend naturally without sharp corners or perfect circles.
When you quilt organic lines, you’re drawing with your sewing machine. Your needle becomes a pencil, and the fabric is your canvas. The best part? There’s no wrong way to do it.
Why Choose Organic Line Quilting
Organic quilting feels relaxing and creative. You don’t need to measure anything or follow strict patterns. Many quilters find this style less stressful than geometric designs.
Your quilts will have a soft, flowing look that’s hard to achieve with straight lines. Plus, small mistakes blend in naturally with organic patterns.
Essential Tools for Beginners
You need surprisingly few tools to start quilting organic lines. Let’s keep it simple and budget-friendly.
Your Sewing Machine Setup
Any sewing machine can handle organic line quilting. You’ll want to drop or cover your feed dogs. This lets you move the fabric freely in all directions.
Use a darning foot or free-motion quilting foot. These special feet hop up and down as you sew, preventing fabric from getting stuck.
Thread Selection Made Easy
Cotton thread works great for beginners. Choose colors that blend with your fabric or go bold with contrasting colors for dramatic effects.
I found that 40-weight thread gives the best results for most projects. It’s strong enough to hold but not so thick that it creates bulk.
Needle Choices That Matter
Use a size 90/14 quilting needle for most cotton fabrics. These needles have a slightly rounded point that glides through layers without snagging.
Change your needle after every 8-10 hours of quilting. Dull needles create uneven stitches and can damage your fabric.
Optional Tools That Help
Quilting gloves give you better grip on the fabric. They prevent your hands from slipping and reduce fatigue during long quilting sessions.
A quilting hoop or frame keeps your work flat and manageable. Start with a 12-inch hoop for small projects.
Setting Up Your Workspace
Your workspace affects your quilting success more than you might think. A few simple changes make a big difference.
Table Height and Position
Your sewing table should be at elbow height when you’re seated. This prevents shoulder strain and gives you better control.
Position your machine so you have space around it. You need room to move fabric smoothly in all directions.
Lighting Considerations
Good lighting prevents eye strain and helps you see your stitching clearly. Place a lamp to your left if you’re right-handed, or to your right if you’re left-handed.
Natural light works best, but LED desk lamps are great alternatives for evening quilting sessions.
Chair and Posture Tips
Use a chair with good back support. Your feet should touch the floor comfortably. Many quilters prefer chairs that swivel slightly for easier fabric movement.
Basic Techniques to Master First
Start with these simple movements before attempting complex designs. Think of this as learning your ABCs before writing stories.
Simple Wave Patterns
Gentle waves are perfect for beginners. Start at one edge and create soft, rolling hills across your fabric. Don’t worry about making them perfect.
Keep your stitching speed steady and moderate. Fast stitching often leads to wobbly lines, while too-slow stitching creates uneven tension.
The Meandering Technique
Meandering looks like a gently flowing river from above. The lines curve and loop without crossing themselves. This technique fills space beautifully.
Start anywhere and let your hands guide the fabric naturally. Don’t plan too far ahead – just move with the flow.
Echo Quilting Basics
Echo quilting follows the shape of something already on your quilt. You stitch lines that “echo” around applique shapes or pieced blocks.
Keep your echo lines about 1/4 inch apart. This spacing gives nice texture without overwhelming the design.
Practice Exercises for Smooth Motion
Use practice fabric – old sheets work perfectly. Set up your machine and practice moving fabric while stitching.
| Exercise | Duration | Focus Area |
|---|---|---|
| Gentle waves | 10 minutes | Smooth hand movement |
| Small circles | 10 minutes | Direction changes |
| Random meandering | 15 minutes | Relaxed flowing motion |
Step-by-Step Process for Your First Project
Let’s walk through creating your first organic line quilt together. We’ll take it slow and steady.
Preparing Your Quilt Sandwich
Layer your backing fabric face-down, batting in the middle, and quilt top face-up. Smooth out wrinkles as you go.
Pin or baste the layers together. I found that spray basting works quickly for small projects, while hand basting gives more control for larger quilts.
Starting Your First Lines
Begin quilting in the center of your project. This prevents fabric from bunching up as you work outward.
Lower your needle into the fabric and bring the bobbin thread to the top. Take a few tiny stitches in place to secure your thread.
Building Confidence with Simple Shapes
Start with large, gentle curves. Your hands will feel awkward at first – that’s completely normal. Everyone feels this way initially.
Focus on moving the fabric smoothly rather than creating perfect shapes. Organic quilting celebrates imperfection.
Common Beginner Mistakes to Avoid
Don’t grip the fabric too tightly. Your hands should guide gently, not wrestle with the material.
Avoid stopping and starting frequently. Try to keep your needle moving steadily for smoother lines.
Speed Control Tips
Match your hand speed to your stitching speed. Fast stitching needs quick hand movements, while slow stitching needs deliberate fabric movement.
Most beginners do better with moderate speeds for both stitching and hand movement.
Troubleshooting Common Issues
Every quilter faces challenges when learning organic line quilting. Here’s how to fix the most common problems.
Uneven Stitches and Tension Problems
Uneven stitches usually mean your fabric movement doesn’t match your stitching speed. Slow down and find a comfortable rhythm.
Check your thread tension if stitches look loose or puckered. Most machines need slight tension adjustments for free-motion quilting.
Thread Breaking Solutions
Thread breaks often happen when your needle is dull or you’re pulling the fabric too hard. Replace your needle and relax your grip.
Make sure your thread path is smooth from spool to needle. Twisted or caught thread causes breaks.
Fabric Bunching and Puckering
Fabric bunching usually means your quilt sandwich isn’t basted well enough. Take time to smooth and secure your layers properly.
Puckering often comes from pulling the fabric while quilting. Let the machine do the work – you just guide the direction.
Advanced Organic Patterns to Try
Once you feel comfortable with basic movements, these patterns add interest to your quilts.
Feather-Like Flowing Designs
Feather patterns combine curves with gentle points. Think of how feathers flow naturally from a central spine.
Start with a curved center line, then add gentle branches flowing outward. Each branch can have smaller offshoots.
Nature-Inspired Motifs
Look outside for inspiration. Tree branches, flower vines, and water ripples all make beautiful quilting patterns.
Don’t try to copy nature exactly. Capture the feeling and movement instead of perfect details.
Combining Different Organic Elements
Mix different organic patterns within the same quilt. Use dense quilting in some areas and open space in others for contrast.
Varying your quilting density creates texture and visual interest across your finished piece.
Caring for Your Organic Line Quilts
Your beautiful organic line quilting deserves proper care to last for years.
Washing and Storage Tips
Wash quilts in cool water on a gentle cycle. The organic stitching lines actually help the quilt maintain its shape during washing.
Store quilts flat when possible, or roll them around a large tube covered in muslin.
Conclusion
Quilting organic lines opens up a world of creative freedom in your quilting journey. You’ve learned that success comes from practice, patience, and embracing the natural imperfections that make organic quilting beautiful. Start with simple waves and meandering patterns, then gradually build your skills with more complex designs. Remember that every expert quilter started exactly where you are now – with curiosity and a willingness to learn. Your unique style will develop naturally as you practice these techniques and discover what feels right under your hands.
What’s the best fabric for practicing organic line quilting?
Cotton fabric works best for beginners because it’s stable and easy to handle. Use old bed sheets or inexpensive cotton for practice sessions before working on your good fabric.
How do I know if my quilting tension is correct?
Good tension creates stitches that look balanced on both sides of the quilt. The top and bobbin threads should meet in the middle of the fabric layers without pulling or puckering.
Can I quilt organic lines on a regular sewing machine?
Yes, most sewing machines can handle organic line quilting with the right foot and settings. You need to drop the feed dogs and use a darning or free-motion quilting foot.
How long should I practice before starting a real project?
Spend at least 2-3 hours practicing basic movements on scrap fabric before starting your first project. This builds muscle memory and confidence in your hand movements.
What should I do if my organic lines look too stiff or geometric?
Relax your grip and let your hands flow more naturally. Try closing your eyes briefly while quilting to break the habit of overthinking each movement and let your hands find their natural rhythm.