Pin basting keeps quilt layers secure during machine quilting by using safety pins placed 4-6 inches apart across the entire quilt surface.
This method works better than spray basting for beginners because it prevents fabric shifting and allows you to quilt with pin basting using any sewing machine.
What Is Pin Basting for Machine Quilting
Pin basting holds your quilt sandwich together while you stitch. You place safety pins through all three layers – top, batting, and backing – before quilting.
Think of it like pinning a pattern to fabric, but across your entire quilt. The pins stop layers from bunching or sliding during machine stitching.
I found that pin basting beats other methods for new quilters. It’s cheap, simple, and gives you full control over where each pin goes.
Why Choose Pin Basting Over Other Methods
Pin basting costs less than spray alternatives. A box of safety pins lasts for years of quilting projects.
You can remove and reposition pins as you quilt. Spray basting doesn’t give you this flexibility once it’s set.
Many quilting experts prefer pins for large projects because they hold better over time.
Supplies You Need for Pin Basting
Getting the right supplies makes pin basting much easier. Here’s what works best:
- Size 1 or 2 safety pins (about 1 inch long)
- Large flat surface like a dining table or floor
- Quilting rulers or measuring tape
- Scissors for trimming excess backing
- Masking tape to secure backing edges
Best Safety Pins for Quilting
Curved safety pins work better than straight ones. The curve helps you scoop through layers without lifting the quilt much.
Brass pins won’t rust on your quilt if you forget one. Nickel-plated steel pins cost less but can leave marks if left too long.
From what I read online, quilters use about 350-500 pins for a queen-size quilt.
Pin Size Guide
| Pin Size | Best For | Length |
|---|---|---|
| Size 0 | Thin batting | 3/4 inch |
| Size 1 | Medium batting | 1 inch |
| Size 2 | Thick batting | 1 1/4 inch |
Setting Up Your Quilt Layers
Start with a clean, flat surface bigger than your quilt. Your dining table works great for lap quilts. Use the floor for bed-size quilts.
Lay your backing fabric face-down first. Smooth out all wrinkles with your hands.
Securing the Backing Layer
Tape the backing edges to your surface. Pull it tight but don’t stretch the fabric out of shape.
The backing should be 2-3 inches larger than your quilt top on all sides. This extra fabric prevents the backing from pulling away during quilting.
Adding Batting and Quilt Top
Center your batting over the backing. Smooth it gently from the middle outward.
Place your quilt top face-up on the batting. Line up the center first, then work toward the edges.
Double-check that all layers lie flat. Any wrinkles now will show up in your finished quilt.
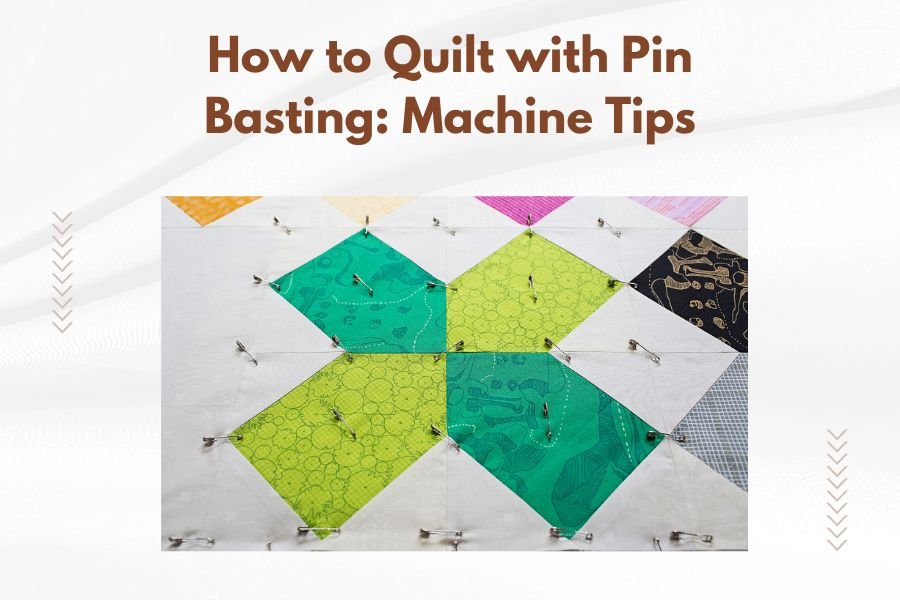
Pin Placement Strategy
Start pinning from the center and work outward. This keeps layers from shifting as you add more pins.
Place pins 4-6 inches apart in a grid pattern. Closer spacing works better for slippery fabrics or thick batting.
Where to Put Each Pin
Push each pin straight down through all layers. Scoop up about 1/8 inch of fabric on the needle tip before closing the pin.
Avoid pinning on planned quilting lines. You’ll just have to remove those pins when you reach them.
Keep pins at least 1 inch away from the quilt edges. This gives you room to trim and bind later.
Pin Direction Tips
Point all pin heads in the same direction. This makes removal faster during quilting.
I found online that many quilters point pins toward the quilt center. This way, you remove pins as you quilt outward.
Checking Your Pin Job
Gently lift sections of the quilt to test pin security. The layers shouldn’t shift or separate.
Add extra pins in problem areas where layers feel loose.
Machine Setup for Pin-Basted Quilts
Any sewing machine can quilt a pin-basted project. You don’t need special quilting features.
Use a walking foot if you have one. This foot feeds layers evenly and prevents puckering.
Needle and Thread Selection
Choose a universal needle size 80/12 or 90/14 for most quilting. Heavier threads need larger needles.
Cotton quilting thread works well for beginners. It’s forgiving and comes in many colors.
Tension and Stitch Settings
Start with your machine’s normal tension setting. Test on a sample sandwich first.
Use a slightly longer stitch length than normal sewing. About 2.5-3.0mm works for most quilting.
Quilting Techniques with Pin Basting
Straight-line quilting works best with pin basting. Try simple patterns like grids or diagonal lines.
Remove pins as you approach them. Don’t try to sew over pins – you’ll break needles.
Managing the Quilt Bulk
Roll up the sides of large quilts to fit through your machine. Use quilt clips to hold the rolls.
Support the quilt weight with a table or ironing board next to your machine.
Quilting Order Strategy
Quilt the center area first, then work toward edges. This prevents fabric from bunching up.
For grid patterns, quilt all lines in one direction first. Then go back and quilt perpendicular lines.
When to Remove Pins
Take out pins about 6 inches ahead of your needle. This gives you room to maneuver without hitting pins.
Some quilters remove all pins from a section before quilting it. Others pull pins as they go.
Common Pin Basting Problems
Puckering happens when pins are too far apart or layers weren’t smooth during basting.
If your backing shows tucks after quilting, the pins probably shifted during stitching.
Fixing Shifting Issues
Add more pins if layers keep moving. Dense pin placement prevents most shifting problems.
Check that your backing fabric isn’t stretching. Woven cotton backings work better than knits for beginners.
Dealing with Pin Marks
Small holes from pins usually disappear after washing. Gentle pressing can close them too.
Avoid leaving pins in finished areas too long. Remove them as soon as you finish quilting each section.
Time-Saving Pin Basting Tips
Use a spoon or pin tool to help close pins faster. These tools protect your fingers and speed up the process.
Work with a friend if possible. One person can hold layers while the other pins.
Batch Pinning Method
Open all your pins before starting. Closed pins go in one bowl, opened ones in another.
Pin an entire row at once, then go back and close all the pins. This rhythm saves time.
Ergonomic Considerations
Take breaks every 30 minutes to rest your hands and back. Pin basting can be hard on your body.
Work at a comfortable height. Your table should let you reach the quilt center without straining.
Alternative Basting Methods to Consider
Spray basting works faster for small projects. You just spray adhesive between layers instead of pinning.
Thread basting takes longer but leaves no holes. You hand-stitch large running stitches through all layers.
When Pin Basting Works Best
Pin basting suits beginners because it’s cheap and forgiving. You can fix mistakes easily.
Large quilts benefit from pin basting because the hold lasts longer than spray adhesives.
Research shows that pin basting works well for machine quilting dense patterns where you need secure layers.
Conclusion
Pin basting gives you solid control over your quilt layers during machine quilting. The method costs little, works with any sewing machine, and lets you fix problems as you go.
Start with simple straight-line quilting patterns while you learn to manage pinned quilts. Remember to remove pins ahead of your needle and support the quilt weight as you sew.
With practice, you’ll develop a rhythm for pin placement and removal that makes the whole process smooth. Your finished quilts will have flat, even layers that look professional.
How many safety pins do I need for a queen-size quilt?
You’ll need about 350-500 safety pins for a queen-size quilt, depending on your batting thickness and desired pin spacing. Buy extra pins so you don’t run short during basting.
Can I leave safety pins in my quilt overnight?
Yes, you can leave safety pins in your quilt for several days or weeks without problems. Just avoid leaving them in finished quilted sections for months, as they might leave permanent marks on some fabrics.
What’s the difference between curved and straight safety pins for quilting?
Curved safety pins follow the natural motion of your hand when pinning through quilt layers. They’re easier to use and cause less lifting of the quilt than straight pins, making the basting process faster and more comfortable.
Should I pin through seam allowances or avoid them?
You can pin through seam allowances without problems. The extra fabric layers actually help hold pins more securely. Just make sure the pin goes through all quilt layers, not just the seam bulk.
How do I fix puckering that happens after pin basting?
Remove quilting in the puckered area and add more pins with closer spacing. Check that your backing fabric isn’t stretched too tight and that all layers were smooth before you started pinning.