A squeaking quilting machine usually needs lubrication on its moving parts or has thread tension issues that create friction and noise.
You can stop most quilting machine squeaks by cleaning lint buildup, oiling the machine properly, and checking your thread path for tangles or incorrect threading.
Quick Fixes to Try Right Now
Before you panic about expensive repairs, try these simple solutions first. Most squeaking problems come from basic maintenance issues you can fix in minutes.
Turn off your machine and unplug it. Safety comes first when working on any sewing equipment.
Clean Out Lint and Debris
Lint buildup causes more quilting machine problems than almost anything else. When fabric fibers get stuck in moving parts, they create friction that sounds like squeaking.
Remove your needle plate and bobbin case. Use a small brush or compressed air to blow out every bit of lint you can see. Pay special attention to the feed dogs and bobbin area.
I found that many quilters skip this step during regular sewing. But research shows that cleaning your machine after every major project prevents most mechanical issues.
Check Your Threading
Incorrect threading puts stress on your machine’s tension discs. This stress often creates squeaking sounds as parts work harder than they should.
Remove all thread from your machine. Re-thread completely, following your manual’s exact path. Make sure thread goes through every guide and tension disc.
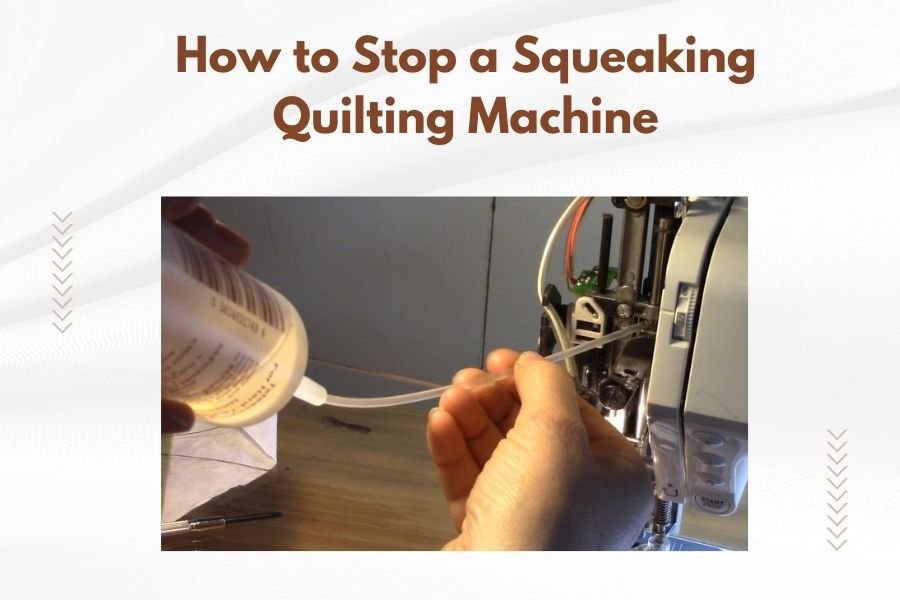
Oil Your Machine the Right Way
Most quilting machines need regular oiling to run quietly. Without proper lubrication, metal parts rub against each other and create that annoying squeak.
Find the Right Oil Points
Your machine manual shows exactly where to apply oil. Common spots include the hook race, needle bar, and presser bar lever.
Use only sewing machine oil. Never use household oils like WD-40 or cooking oil. These can damage your machine’s delicate parts.
How Much Oil to Use
One tiny drop per oil point is enough. Too much oil attracts lint and makes problems worse.
Apply oil, then run your machine slowly for a few minutes. This spreads the oil evenly through moving parts.
Wipe Away Excess Oil
After oiling, clean any excess from visible surfaces. Leftover oil will stain your fabric during quilting.
Tension Problems That Cause Squeaking
Wrong tension settings force your machine to work harder. This extra effort often shows up as squeaking or grinding sounds.
Test Your Upper Thread Tension
Thread your machine normally with contrasting thread colors in the bobbin and needle. Sew a test seam on scrap fabric.
Perfect tension shows both thread colors only on their respective fabric sides. If you see bobbin thread on top, your upper tension is too tight.
Adjust Bobbin Tension Carefully
Bobbin tension problems are trickier to fix. Most experts recommend leaving bobbin tension alone unless you really know what you’re doing.
If you must adjust it, make tiny changes. Turn the small screw on your bobbin case just 1/4 turn at a time.
Needle and Presser Foot Issues
A bent needle or loose presser foot can cause squeaking as parts don’t align properly during stitching.
Check Your Needle
Remove your needle and roll it across a flat surface. A bent needle won’t roll smoothly.
Replace needles regularly. Dull or damaged needles make your machine work harder and create more noise.
Use the Right Needle Size
Heavy quilting cotton needs a size 90/14 needle. Lighter fabrics work better with size 80/12 needles.
The wrong needle size puts extra stress on your machine’s timing and can cause squeaking.
Tighten Loose Screws
Vibration from regular use can loosen screws throughout your machine. Loose parts create noise as they move out of alignment.
Check visible screws with a small screwdriver. Tighten any that seem loose, but don’t overtighten.
When to Call a Professional
Some squeaking problems need expert attention. Don’t try to fix these issues yourself or you might cause expensive damage.
Timing Problems
If your machine skips stitches along with squeaking, the timing might be off. This happens when the hook and needle don’t meet at exactly the right moment.
Timing adjustments require special tools and expertise. Most repair shops can fix timing issues for $50 to $100.
Motor Problems
Squeaking that continues even when you’re not sewing might come from your motor. Motors need professional service or replacement.
I researched common motor issues and found that most happen after years of heavy use without proper maintenance.
Belt Replacement
Older machines use belts to transfer power from the motor to moving parts. Worn belts can slip and squeak.
Belt replacement is usually affordable and makes a huge difference in how quietly your machine runs.
Prevention Tips
Regular maintenance prevents most squeaking problems before they start. A little attention keeps your quilting machine running smoothly for years.
Monthly Cleaning Schedule
Clean out lint after every major quilting project. Oil your machine monthly if you quilt regularly.
Cover your machine when not in use. Dust and pet hair can get into moving parts and cause problems.
Use Quality Thread
Cheap thread breaks down and leaves more lint in your machine. It also puts extra stress on tension mechanisms.
Quality thread costs more upfront but saves money on repairs and creates better-looking quilts.
| Problem | Quick Fix | Time Needed |
|---|---|---|
| Lint buildup | Clean bobbin area | 5 minutes |
| Dry parts | Oil according to manual | 10 minutes |
| Wrong tension | Adjust upper tension | 15 minutes testing |
| Bent needle | Replace needle | 2 minutes |
Conclusion
A squeaking quilting machine doesn’t have to ruin your crafting time. Most noise problems come from simple maintenance issues you can fix yourself in just a few minutes.
Start with cleaning and oiling, then check your threading and needle. These basic steps solve about 80% of squeaking problems without spending money on repairs.
Remember that prevention works better than fixing problems after they start. Clean your machine regularly, use quality thread, and follow your manual’s maintenance schedule. Your quilting machine will reward you with years of quiet, smooth stitching.
Why does my quilting machine squeak only when I start sewing?
This usually means your needle or presser foot needs adjustment. Check that your needle is straight and properly inserted, and make sure your presser foot is tightened securely.
Can I use household oil instead of sewing machine oil?
No, never use household oils on your quilting machine. Regular oils are too thick and can gum up delicate parts. Only use oil specifically made for sewing machines.
How often should I oil my quilting machine?
Oil your machine every 8-10 hours of sewing time, or monthly if you quilt regularly. Heavy users might need to oil weekly, while occasional quilters can oil every few months.
What if cleaning and oiling don’t stop the squeaking?
If basic maintenance doesn’t help, you likely have a timing issue or worn internal parts. Take your machine to a qualified repair technician for professional diagnosis and service.
Should I oil my computerized quilting machine the same way?
Computerized machines still need regular oiling, but follow your specific manual carefully. Some electronic parts should never get oil, so only oil the mechanical points listed in your instructions.