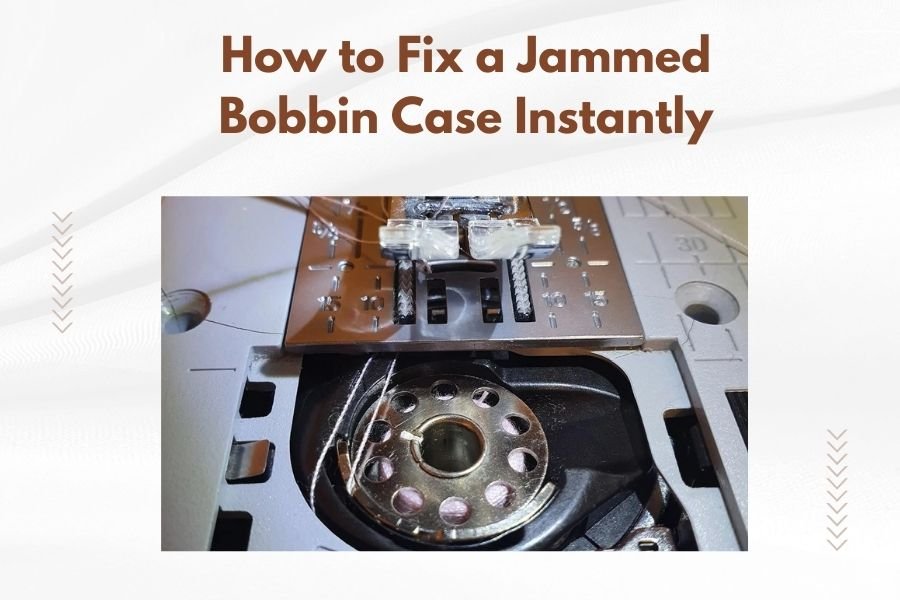
A jammed bobbin case happens when thread gets tangled around the bobbin or debris blocks the mechanism. You can fix it by removing the bobbin case, cleaning out thread tangles, and checking for lint buildup.
Most bobbin case jams occur from incorrect threading, wrong bobbin tension, or using low-quality thread that breaks easily.
Quick Steps to Fix Your Jammed Bobbin Case
When your bobbin case gets stuck, don’t panic. I found that most jams can be cleared in under five minutes with the right approach.
First, turn off your machine and unplug it. Safety comes first when working on any sewing equipment.
Remove the Bobbin and Case
Open your machine’s front cover or slide plate. You’ll see the bobbin sitting in its case.
Lift out the bobbin carefully. If it won’t budge, don’t force it. Look for visible thread wraps around the bobbin or case.
Next, remove the bobbin case itself. Most cases have a small latch or lever you can lift to pull the case out.
Clear Thread Tangles
Look closely at the bobbin case. Thread often wraps around the center post or gets caught in the tension spring.
Use small scissors or a seam ripper to cut away tangled threads. Work slowly so you don’t damage the case.
Check inside the bobbin area too. Thread can get wound around the hook mechanism.
Clean Out Lint and Debris
Lint loves to hide in bobbin areas. It mixes with thread and creates stubborn jams.
Use a small brush or compressed air to blow out dust and lint. Many machines come with a cleaning brush for this job.
Wipe down the bobbin case with a soft cloth. Make sure no fabric fibers stick to metal surfaces.
What Causes Bobbin Case Jams
Understanding why jams happen helps you prevent future problems. From what I researched, several common issues lead to bobbin troubles.
Wrong Bobbin Type
Not all bobbins fit every machine. Using the wrong size or style creates gaps where thread can slip and tangle.
Check your manual for the exact bobbin type. Metal and plastic bobbins aren’t always interchangeable.
Incorrect Threading
Threading your bobbin wrong sets you up for jams. The thread needs to follow a specific path through the tension mechanism.
Most bobbin cases have small arrows or diagrams showing the correct threading direction.
Poor Quality Thread
Cheap thread breaks more often and leaves behind fuzzy fibers. These fibers build up and cause mechanical problems.
Old thread also becomes brittle and snaps easily during sewing.
Wrong Thread Weight
Using thread that’s too thick for your bobbin tension creates extra strain. The mechanism works harder and thread can bunch up.
Step-by-Step Bobbin Case Cleaning
Regular cleaning prevents most bobbin jams. I found that a monthly deep clean keeps machines running smoothly.
Gather Your Tools
You’ll need these items for a thorough cleaning:
- Small brush or old toothbrush
- Compressed air can
- Soft cloth
- Small scissors
- Sewing machine oil (if recommended)
Deep Clean Process
Remove the bobbin case completely from your machine. Take it to good lighting where you can see clearly.
Brush out all visible lint and thread bits. Pay special attention to the tension spring area where debris likes to hide.
Use compressed air to blow out stubborn particles. Hold the can upright and use short bursts.
Check the Hook Assembly
The hook assembly sits behind the bobbin case. This curved metal piece needs to move freely.
Look for thread wrapped around the hook. Cut away any tangles you find.
Spin the hook gently with your finger. It should rotate smoothly without catching.
Testing Your Bobbin Case After Cleaning
Don’t assume everything works just because it looks clean. Testing prevents surprises during your next sewing project.
Reinstall Everything Correctly
Put the bobbin case back in its holder. Make sure it clicks into place securely.
Thread a fresh bobbin following your machine’s threading diagram. Use good quality thread for this test.
Run a Test Stitch
Use scrap fabric for your first few stitches. Start with a straight stitch at medium speed.
Watch the bobbin area as you sew. The thread should pull smoothly without bunching or skipping.
Check Stitch Quality
Good bobbin function shows in your stitches. The top and bottom threads should lock together evenly.
Loops on the bottom usually mean bobbin tension problems. Loops on top suggest the bobbin isn’t catching properly.
Preventing Future Bobbin Jams
Prevention beats repair every time. These simple habits keep your bobbin case working smoothly.
Use Quality Materials
Good thread costs more upfront but saves time and frustration later. Quality thread breaks less and produces less lint.
Buy thread from reputable brands that test their products. Avoid bargain thread that seems too cheap.
Wind Bobbins Properly
Wind bobbins at medium speed for even tension. Fast winding can stretch thread and create loose spots.
Stop winding when the bobbin is almost full. Overfilled bobbins cause thread to slip off and tangle.
Regular Maintenance Schedule
Clean your bobbin area after every few projects. Heavy sewing requires more frequent cleaning.
Many experts suggest cleaning every 8-10 hours of sewing time.
| Sewing Frequency | Cleaning Schedule | Deep Clean |
|---|---|---|
| Daily use | Weekly | Monthly |
| Weekend projects | Monthly | Every 3 months |
| Occasional use | Before each project | Every 6 months |
When to Replace Your Bobbin Case
Sometimes cleaning isn’t enough. Worn bobbin cases cause ongoing problems no matter how well you maintain them.
Signs of Wear
Look for scratches or nicks on the metal surface. These rough spots catch thread and create tangles.
Check the tension spring for damage. Bent or loose springs don’t hold thread properly.
Age and Usage
Heavy-use machines may need new bobbin cases every few years. Home sewers typically get much longer life from their cases.
If you notice frequent jams even after thorough cleaning, replacement might be the answer.
Troubleshooting Stubborn Jams
Some jams resist normal cleaning methods. These tough cases need extra patience and care.
Thread Wrapped Around Moving Parts
Sometimes thread winds tightly around the hook or other moving parts. Don’t yank on it.
Turn the hand wheel slowly to see how the parts move. This helps you understand where the thread is caught.
Cut the thread in small sections rather than trying to pull out long pieces.
Mechanical Issues
If cleaning doesn’t solve the problem, you might have mechanical damage. Look for bent parts or loose screws.
Don’t attempt complex repairs yourself. A qualified technician can assess internal damage safely.
Conclusion
Fixing a jammed bobbin case doesn’t have to ruin your sewing day. Most jams clear quickly with proper cleaning and thread removal. Remember to turn off your machine first, then systematically remove the bobbin, clean out tangles, and check for lint buildup. Regular maintenance prevents most problems, and using quality thread reduces jam frequency. When basic cleaning doesn’t work, don’t force anything. Sometimes professional help or replacement parts are the smartest solutions. Keep your bobbin area clean, use the right materials, and your machine will reward you with smooth, trouble-free sewing.
Why does my bobbin case keep jamming even after cleaning?
Frequent jams after cleaning usually indicate worn parts, incorrect bobbin type, or damaged thread tension mechanisms. Check that you’re using the exact bobbin specified for your machine model, and inspect the bobbin case for scratches or bent tension springs that might need replacement.
Can I oil my bobbin case to prevent jams?
Only oil your bobbin case if your machine manual specifically recommends it. Many modern machines have self-lubricating parts, and adding oil can actually attract more lint and debris. When oiling is recommended, use only sewing machine oil and apply sparingly to designated points.
What’s the difference between a drop-in bobbin and a front-loading bobbin case when it comes to jams?
Drop-in bobbins sit directly in the machine and are generally easier to clear when jammed. Front-loading cases require removal of the entire bobbin case assembly but often provide more precise tension control. Both types jam for similar reasons – poor threading, lint buildup, or wrong bobbin type.
How can I tell if my bobbin tension is causing jams?
Incorrect bobbin tension shows up as loose stitches, thread loops on fabric surfaces, or thread bunching in the bobbin area. Test tension by holding the threaded bobbin case – it should drop slowly when you jerk the thread gently. If it drops too fast or won’t drop at all, adjust the tension screw gradually.
Is it safe to use pliers or other tools to remove a stuck bobbin?
Avoid using pliers or metal tools on your bobbin case as they can scratch delicate surfaces and create permanent damage. Instead, use plastic tweezers, wooden tools, or your fingers to gently work stuck bobbins free. If the bobbin won’t budge with gentle pressure, focus on cutting away tangled threads first.