Thread tension inconsistencies happen when your machine’s upper and lower thread tensions are unbalanced, causing loose loops, tight stitches, or thread breaks.
The most common fixes include cleaning your tension discs, rethreading your machine properly, and adjusting tension settings gradually while testing on fabric scraps.
What Causes Thread Tension Problems?
Your quilting machine works like a carefully balanced dance between two threads. When something disrupts that balance, you get tension problems.
Think of it like a seesaw. If one side gets heavier, the whole thing tips. Same thing happens with your thread tension.
Dirty or Damaged Tension Discs
Lint and thread bits love to hide in your tension discs. Over time, this buildup stops the discs from gripping your thread evenly.
I found that most quilters don’t clean their tension discs nearly enough. You should check them every few projects.
Wrong Threading Path
Miss one guide or hook, and your tension goes haywire. Your thread needs to follow the exact path your manual shows.
Even experienced quilters sometimes rush through threading. Take your time with each step.
Poor Quality or Old Thread
Old thread gets weak and fuzzy. Cheap thread often has thick and thin spots that mess with tension.
Thread that’s been sitting around for years loses its strength. It might look fine but perform poorly.
How to Spot Tension Issues
Your stitches tell the story. Learning to read them helps you fix problems faster.
Upper Thread Too Tight
You’ll see the bobbin thread pulled up to the top of your fabric. The top thread looks straight and tight.
Your fabric might also pucker or gather along the seam line.
Upper Thread Too Loose
Loops of upper thread show on the bottom of your fabric. The stitches look messy and loose on top.
Sometimes the thread bunches up under your fabric in bird’s nest tangles.
Bobbin Thread Problems
If your bobbin tension is off, you might see tight puckering or loose loops on the bottom.
Bobbin tension issues are less common but can be trickier to fix.
Step-by-Step Tension Fixes
Start with the simple stuff first. Most tension problems have easy solutions.
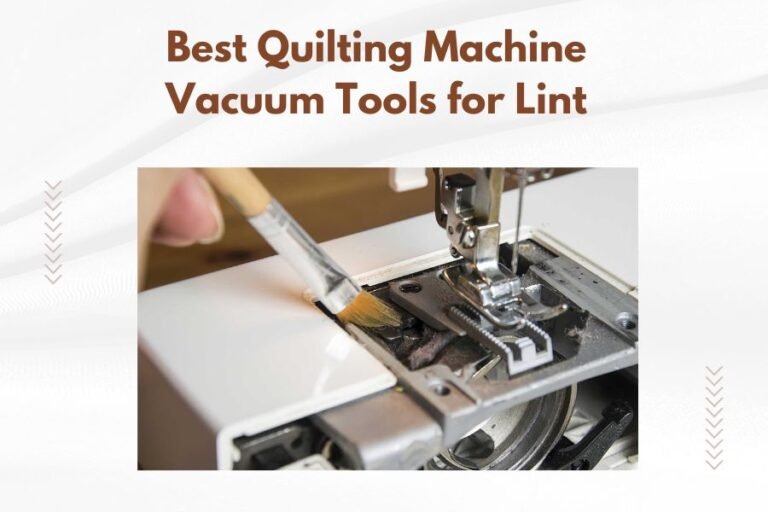
Clean Your Machine
Turn off your machine and remove the needle and thread. Use a small brush to clean out lint from the tension discs.
Pay special attention to the bobbin area. Lint loves to hide there and cause all sorts of problems.
What You’ll Need
- Small brush or compressed air
- Lint-free cloth
- Machine oil if recommended
- Good lighting
Rethread Everything
Pull out all your thread and start fresh. Follow your manual’s threading diagram step by step.
Make sure your presser foot is up when you thread the upper tension. This opens the tension discs so the thread sits properly.
Threading Checklist
- Presser foot up during threading
- Thread goes through every guide
- Thread snaps into the tension discs with a slight “ping”
- Bobbin winds in the right direction
Test Your Bobbin
Hold your bobbin case by the thread. It should drop slowly and smoothly. If it drops fast, the tension is too loose.
If it won’t drop at all, your bobbin tension is too tight.
Adjusting Tension Settings
Most machines have their best tension around the middle setting. Start there and make small changes.
Upper Thread Tension
Turn your dial one number at a time. Higher numbers make tension tighter. Lower numbers make it looser.
Always test on a scrap of the same fabric you’re quilting. Different fabrics need different tension settings.
Quick Tension Test
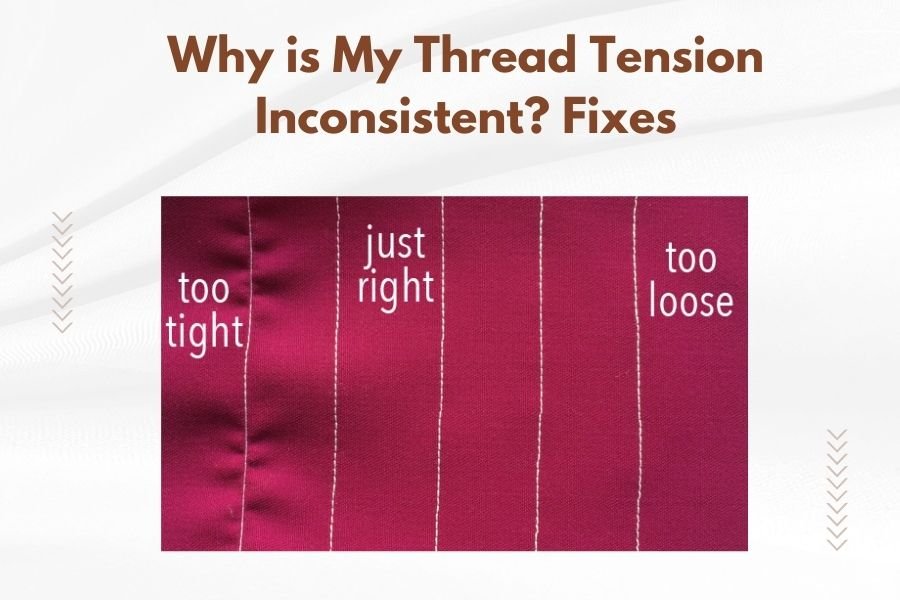
Sew a straight line on doubled fabric scraps. Pull gently on both sides. Perfect tension means the threads break at the seam line.
If the top thread breaks first, your upper tension is too tight. If the bobbin thread breaks first, your upper tension is too loose.
Bobbin Tension Adjustments
Only adjust bobbin tension if cleaning and rethreading don’t help. Turn the small screw on your bobbin case very slightly.
Remember “righty tighty, lefty loosey.” Make tiny turns – even a quarter turn makes a big difference.
Thread and Needle Combinations
Your thread and needle need to work together. Mismatched combinations cause tension headaches.
| Thread Weight | Needle Size | Best Uses |
|---|---|---|
| 50wt | 80/12 – 90/14 | General quilting |
| 40wt | 90/14 – 100/16 | Decorative stitching |
| 30wt | 100/16 – 110/18 | Bold quilting designs |
Thread Quality Matters
Good thread costs more upfront but saves you hours of frustration. Cheap thread often has uneven thickness that confuses your tension system.
I found that investing in quality thread from trusted brands makes a huge difference in stitch quality.
Fabric-Specific Tension Tips
Different fabrics pull on your thread differently. What works for cotton might not work for minky or silk.
Cotton Fabrics
Most cotton quilting fabrics work well with standard tension settings. Start with your machine’s default and adjust from there.
Stretchy Fabrics
Knits and stretchy fabrics often need slightly looser tension. The fabric’s stretch can make your stitches look too tight.
Thick or Multiple Layers
When quilting through batting and backing, you might need to loosen your tension slightly. The extra bulk affects how the threads interact.
When to Call for Help
Some tension problems need professional attention. Don’t feel bad about taking your machine to a repair shop.
Mechanical Issues
If cleaning and adjusting don’t help, you might have worn tension discs or damaged parts. A technician can spot these problems quickly.
Timing Problems
Sometimes what looks like tension trouble is actually timing issues. Your needle and bobbin hook need to meet at exactly the right moment.
Prevention Tips
Preventing tension problems is easier than fixing them. A little regular care goes a long way.
Regular Cleaning Schedule
Clean your machine after every few projects. Don’t wait until you have problems.
Pay attention to your bobbin area. That’s where most lint collects.
Quality Supplies
Good thread, fresh needles, and clean bobbins prevent most tension headaches. Change your needle after 8-10 hours of quilting.
Proper Storage
Keep your thread away from heat and direct sunlight. Store your machine covered to prevent dust buildup.
Conclusion
Thread tension problems feel scary, but they’re usually simple fixes. Start with cleaning and rethreading before making big adjustments. Most issues come from lint buildup or incorrect threading, not broken parts.
Remember to test every change on fabric scraps first. Keep notes about what settings work for different projects. With practice, you’ll spot and fix tension problems quickly.
Your quilting machine wants to make beautiful stitches. Give it clean parts, quality supplies, and proper threading, and it will reward you with consistent, lovely results.
Why does my thread keep breaking even after adjusting tension?
Thread breakage often happens from dull needles, poor thread quality, or incorrect needle size for your thread weight. Try a fresh needle one size larger and check if your thread path has any rough spots or burrs.
Should I adjust upper or bobbin tension first?
Always adjust upper tension first since it’s easier and fixes most problems. Only touch bobbin tension if upper adjustments don’t work and you’ve ruled out threading or cleaning issues.
How do I know if my tension discs are damaged?
Damaged tension discs often have rough edges, deep grooves, or won’t close properly. If cleaning doesn’t help and your thread won’t stay in the discs correctly, you likely need professional repair.
Can different thread brands affect tension settings?
Yes, different brands can have slightly different thicknesses even in the same weight category. You might need minor tension adjustments when switching between thread manufacturers or fiber types.
What’s the best way to test tension before starting a big project?
Make a sandwich of your exact fabrics and batting, then sew several test lines with different stitch lengths. Pull gently at the seam – perfect tension means both threads break evenly at the fabric line.