A faulty encoder wheel in your quilting machine causes uneven stitching, skipped stitches, and stitch regulation problems that make your quilting projects look messy and unprofessional.
You can fix most encoder wheel issues by cleaning debris from the wheel, checking for loose connections, or replacing the encoder sensor when it fails to read the wheel markings properly.
Your quilting machine’s stitch regulation system relies heavily on that little encoder wheel. When it stops working right, your beautiful quilt turns into a frustrating mess of uneven stitches.
I’ve researched this problem extensively and found that most quilters can fix encoder wheel issues themselves with basic tools and patience. Let me walk you through everything you need to know.
What Is an Encoder Wheel and Why Does It Matter
Think of the encoder wheel as your quilting machine’s speedometer. This small disc with precise markings tells your machine exactly how fast the fabric moves underneath the needle.
Your stitch regulation system reads these markings thousands of times per minute. When the encoder wheel gets dirty, damaged, or misaligned, your machine loses track of fabric movement.
The result? Stitches that look like a roller coaster instead of a straight line.
How Stitch Regulation Actually Works
Your quilting machine uses a sensor to read the encoder wheel markings. As you move the machine, the wheel spins and creates signals that tell the needle when to stitch.
Fast fabric movement means fewer stitches per inch. Slow movement triggers more stitches. This automatic adjustment keeps your stitch length consistent.
Common Signs Your Encoder Wheel Needs Attention
You’ll notice these problems when your encoder wheel starts failing:
- Stitches bunch up in some areas and spread out in others
- Your machine makes extra stitches when you pause
- Stitch regulation completely stops working
- The machine needle moves but doesn’t stitch consistently
- Error messages about stitch regulation appear on your display
Why These Problems Happen
Most encoder wheel issues come from everyday quilting. Fabric lint builds up on the wheel over time. Thread pieces can jam the sensor. Even tiny dust particles block the sensor’s ability to read the wheel markings clearly.
Sometimes the wheel itself gets knocked out of alignment during normal use. Other times, the sensor simply wears out after thousands of hours of quilting.
Tools You Need for the Fix
Gather these items before you start working on your encoder wheel:
- Compressed air canister
- Cotton swabs
- Rubbing alcohol (70% or higher)
- Small screwdriver set
- Flashlight or phone light
- Clean, lint-free cloth
- Tweezers
Safety First
Always unplug your quilting machine before working on internal parts. This protects both you and your expensive equipment.
Keep your workspace clean and well-lit. Encoder wheels have tiny parts that can easily get lost if dropped.
Step-by-Step Encoder Wheel Cleaning Process
Start with the simplest solution first. Most encoder wheel problems come from dirt and debris buildup.
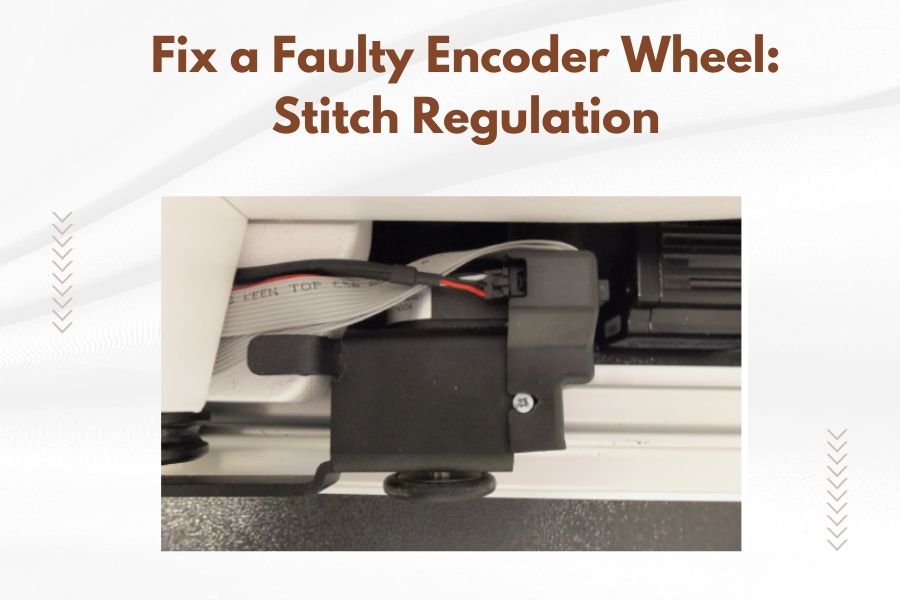
Locate Your Encoder Wheel
Check your quilting machine manual for the exact location. Most encoder wheels sit near the needle assembly or inside the machine head.
You might need to remove a cover panel to access the wheel. Take a photo before removing any screws so you remember how things go back together.
Remove the Protective Cover
Use your screwdriver to carefully remove screws holding the encoder wheel cover. Keep all screws in a small bowl so they don’t roll away.
Some covers snap off without screws. Gently press the release tabs and lift the cover straight up.
Clean the Encoder Wheel Surface
Use compressed air to blow away loose lint and debris. Hold the canister upright and use short bursts to avoid moisture buildup.
Dip a cotton swab in rubbing alcohol and gently clean the wheel surface. The markings on the wheel must be completely visible for proper sensor reading.
Don’t Forget the Sensor
The sensor that reads the encoder wheel also needs cleaning. Use a dry cotton swab to remove dust from the sensor opening.
Never use liquid cleaners directly on electronic sensors. Moisture can damage delicate components.
Checking for Mechanical Issues
If cleaning doesn’t solve the problem, look for physical damage or misalignment.
Inspect the Wheel for Damage
Look closely at the encoder wheel markings. Scratches, chips, or worn areas prevent accurate sensor readings.
Check that the wheel spins freely without wobbling. A bent or warped wheel needs replacement.
Test the Wheel Movement
Gently spin the encoder wheel with your finger. It should move smoothly without catching or grinding.
Listen for unusual noises that might indicate bearing problems or debris stuck in the mechanism.
Verify Proper Alignment
The encoder wheel must sit in the exact right position for the sensor to read it properly. Even small misalignments cause stitch regulation problems.
Check your manual for specific alignment procedures. Most wheels have adjustment screws that let you fine-tune the position.
Testing Your Sensor Function
Sometimes the encoder wheel looks perfect but the sensor that reads it has failed.
Visual Sensor Inspection
Shine your flashlight into the sensor opening. You should see a small light or electronic component inside.
Look for obvious damage like cracked housings or loose wires. These problems require professional repair or sensor replacement.
Simple Sensor Test
Many quilting machines have diagnostic modes that test sensor function. Check your manual for specific instructions on accessing these test modes.
Some machines display sensor readings on the screen during diagnostic tests. This helps you identify exactly which component has failed.
When to Replace the Encoder Wheel
Sometimes cleaning and adjustment aren’t enough. You’ll need a new encoder wheel if:
- The wheel markings are worn or damaged beyond cleaning
- The wheel wobbles or doesn’t spin smoothly
- Cracks appear in the wheel material
- The wheel has come loose from its mounting shaft
Finding Replacement Parts
Contact your quilting machine manufacturer first. They can provide exact replacement parts that match your machine model.
Bring your old encoder wheel to a local sewing machine repair shop if manufacturer parts aren’t available. They often have compatible replacements or can order them for you.
Installation Tips
Take photos during disassembly so you remember how everything fits together. Encoder wheels must be installed in exactly the right position.
Don’t force parts that don’t fit easily. Encoder wheels are precision components that should slide into place smoothly.
Preventive Maintenance for Long-Term Success
Regular maintenance prevents most encoder wheel problems before they start.
Monthly Cleaning Schedule
Clean your encoder wheel area monthly if you quilt regularly. Weekly cleaning works better for heavy users.
Use compressed air to remove lint buildup before it gets packed into the mechanism. This simple step prevents most stitch regulation problems.
Proper Machine Storage
Cover your quilting machine when not in use. Dust and lint accumulation slows down between quilting sessions.
Store your machine in a clean, dry area away from direct sunlight and temperature extremes.
Professional Service Intervals
Have your quilting machine professionally serviced annually. Technicians can spot encoder wheel problems before they affect your quilting.
Professional cleaning reaches areas you can’t access safely at home. This deep cleaning extends encoder wheel life significantly.
Troubleshooting Persistent Problems
Some encoder wheel issues require more advanced solutions.
Intermittent Stitch Regulation Failures
If your stitch regulation works sometimes but not others, check for loose connections. Vibration during quilting can loosen electrical connections over time.
Temperature changes also affect electronic components. Cold machines may need warm-up time for sensors to work properly.
Software and Firmware Issues
Modern quilting machines use software to process encoder wheel signals. Outdated firmware can cause stitch regulation problems even when the hardware works perfectly.
Check with your manufacturer about firmware updates. Many issues get resolved through software updates rather than hardware repairs.
Cost Considerations and Budget Planning
Understanding repair costs helps you make smart decisions about fixing versus replacing equipment.
| Repair Type | Typical Cost Range | DIY Difficulty |
|---|---|---|
| Cleaning and alignment | $0-20 | Easy |
| Encoder wheel replacement | $50-150 | Moderate |
| Sensor replacement | $100-300 | Difficult |
| Professional service | $150-400 | N/A |
When Professional Help Makes Sense
Complex electronic problems need professional diagnosis. Attempting advanced repairs yourself can void warranties and cause additional damage.
If your quilting machine is still under warranty, contact the manufacturer before attempting any repairs. DIY fixes might void your coverage.
Conclusion
Fixing a faulty encoder wheel doesn’t have to end your quilting projects or break your budget. Most problems come from simple dirt and debris buildup that you can clean yourself in about 30 minutes.
Start with basic cleaning and work your way up to more complex solutions. Many quilters find that regular maintenance prevents encoder wheel problems entirely. When you do need professional help, you’ll have the knowledge to communicate clearly about the problem and avoid unnecessary repairs.
Remember that your encoder wheel is a precision component that makes consistent, beautiful stitching possible. Taking care of it means taking care of your quilting results.
Can I use my quilting machine without stitch regulation if the encoder wheel fails?
Yes, most quilting machines work in manual mode without stitch regulation. You’ll need to control your quilting speed manually to maintain consistent stitch length, but you can finish projects while waiting for repairs.
How often should I clean my encoder wheel area?
Clean monthly for regular quilting or weekly for heavy use. If you notice lint building up quickly in your machine, increase cleaning frequency. Prevention is much easier than fixing stitch regulation problems.
Will using different thread types affect my encoder wheel?
Fuzzy or low-quality threads create more lint that can clog encoder wheel sensors. High-quality threads produce less debris, but any thread will eventually create some lint buildup that needs regular cleaning.
Can I damage my encoder wheel by quilting too fast?
Normal quilting speeds won’t damage encoder wheels, but extremely fast movement can overwhelm the sensor’s ability to read wheel markings accurately. This causes stitch regulation errors rather than physical damage.
What’s the lifespan of a typical encoder wheel in a home quilting machine?
With proper maintenance, encoder wheels can last 10-15 years or longer in home quilting machines. Commercial quilting operations may need replacement every 3-5 years due to much heavier use and faster wear.