A faulty foot sensor on your quilting machine typically shows up as erratic presser foot behavior, failure to lift automatically, or error messages appearing on your display.
Most foot sensor problems stem from dirt buildup, loose connections, or calibration issues that you can often fix yourself with basic cleaning and adjustment steps.
What Is a Foot Sensor and Why It Matters
Your quilting machine’s foot sensor acts like the eyes and ears of your presser foot system. It tells your machine when the foot is up, down, or somewhere in between.
Think of it as a tiny traffic controller. When you’re quilting, it makes sure your foot pressure stays just right. When you need to pivot or change threads, it knows to lift automatically.
Without a working sensor, your machine becomes confused. It might press too hard on delicate fabrics or refuse to lift when you need it most.
Common Signs Your Foot Sensor Is Acting Up
Obvious Warning Signs
Your machine will usually tell you something’s wrong before it completely fails. Watch for these red flags:
- Presser foot won’t lift automatically
- Foot pressure feels inconsistent while quilting
- Error codes mentioning “foot” or “sensor”
- Strange clicking or grinding sounds near the presser foot
- Machine stops mid-stitch for no clear reason
Subtle Performance Issues
Sometimes the problems show up more quietly. You might notice your stitches looking uneven or your fabric puckering where it shouldn’t.
Does your thread keep breaking? That could be your foot sensor causing tension problems you can’t see.
The Fabric Test
Try quilting the same fabric at the same settings. If your results vary dramatically between attempts, your sensor might be giving mixed signals to your machine.
Quick Diagnostic Steps Before You Panic
The Five-Minute Visual Check
Start with the basics. Turn off your machine and look closely at the presser foot area.
Do you see lint, thread bits, or fabric dust around the sensor? Even tiny particles can mess with sensitive electronics.
Check if anything looks bent, cracked, or out of place. Sometimes the fix is simpler than you think.
The Manual Override Test
Most quilting machines let you control the presser foot manually. Try lifting and lowering it using your machine’s buttons.
Does it respond smoothly? If manual control works fine but automatic doesn’t, you’ve narrowed down the problem.
Listen While You Test
Pay attention to sounds during your manual test. Healthy foot mechanisms move quietly. Grinding, clicking, or whining sounds point to mechanical issues.
Step-by-Step Cleaning Process
Gather Your Cleaning Supplies
You don’t need fancy tools. Grab these common items:
- Soft brush (old toothbrush works great)
- Cotton swabs
- Compressed air can
- Lint-free cloth
- Your machine’s manual
Safe Cleaning Steps
Always unplug your machine first. This protects both you and your electronics.
Remove the presser foot according to your manual. Each machine has its own method, so don’t guess.
Use compressed air to blow out loose debris. Work from different angles to get everything.
Detail Cleaning the Sensor Area
Gently brush around the sensor with your soft brush. Don’t press hard – sensors are delicate.
Use cotton swabs to clean tight spaces. If you see stubborn buildup, barely dampen the swab with water.
Let everything dry completely before reassembling. Moisture and electronics don’t mix well.
Calibration and Adjustment Fixes
Finding Your Calibration Menu
Modern quilting machines usually have calibration options in their settings menu. The exact location varies by brand and model.
Look for terms like “foot calibration,” “sensor adjustment,” or “presser foot settings.”
Running Automatic Calibration
Many machines can recalibrate themselves. This process teaches your sensor to recognize proper up and down positions again.
Follow your machine’s prompts carefully. The calibration usually takes a few minutes and involves several automatic cycles.
Manual Adjustment Options
Some machines let you fine-tune sensor sensitivity manually. This helps if your automatic calibration doesn’t quite solve the problem.
Start with small adjustments. Big changes can create new problems.
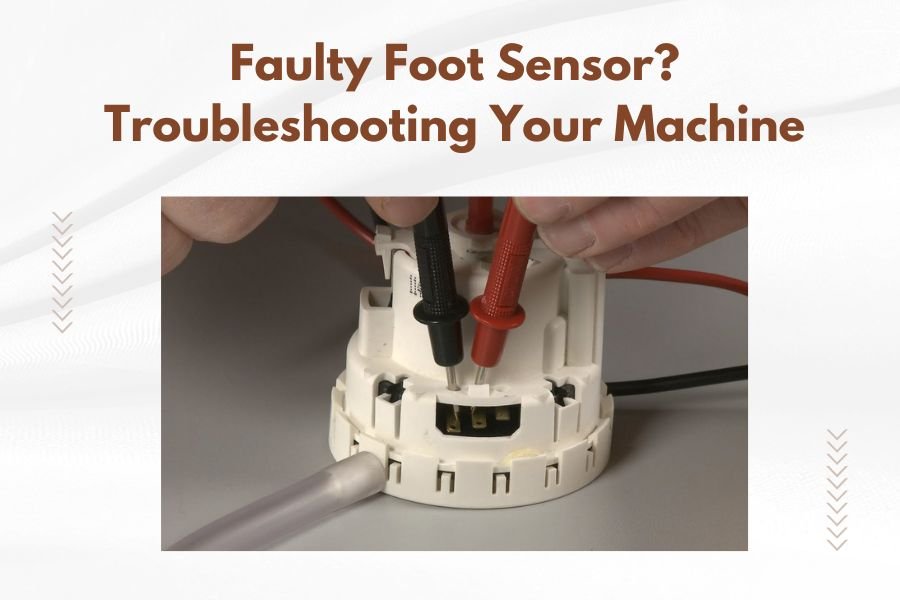
Checking Electrical Connections
Safety First Approach
Only attempt electrical checks if you’re comfortable with basic electronics. When in doubt, call a professional.
Make sure your machine is unplugged before touching any connections.
Visual Connection Inspection
Look for loose plugs or connectors near the presser foot mechanism. They should fit snugly without gaps.
Check wire conditions too. Cracked, bent, or frayed wires can cause intermittent sensor problems.
The Gentle Wiggle Test
With your machine still unplugged, gently wiggle visible connectors. They shouldn’t move easily or feel loose.
If something shifts when you barely touch it, you’ve likely found your problem.
When Professional Help Makes Sense
Clear Signs You Need Expert Service
Some problems go beyond basic troubleshooting. Call a technician if you notice:
- Burning smells from the presser foot area
- Visible damage to sensor components
- Multiple error codes appearing together
- Your cleaning and calibration attempts made things worse
Cost vs. Repair Considerations
Sensor replacement costs vary widely. Research shows that simple sensor issues often cost $100-200 to fix professionally, while complex electronic problems can reach $400-500.
Compare repair estimates to your machine’s current value. Sometimes replacement makes more financial sense.
Warranty Check First
Before paying for repairs, check your warranty status. Many manufacturers cover sensor problems for several years after purchase.
Prevention Tips for Future Problems
Regular Maintenance Schedule
Clean your presser foot area after every major quilting project. This prevents buildup that causes sensor problems.
Monthly deep cleaning works well for regular quilters. Weekly cleaning helps if you quilt daily.
Smart Quilting Habits
Choose quality threads that produce less lint. Cheap threads often shed more, creating sensor problems.
Keep your quilting area clean too. Dusty rooms lead to dusty machines.
Storage and Environmental Factors
Store your machine in a clean, dry place. Cover it when not in use to prevent dust accumulation.
Extreme temperature changes can affect sensor calibration. Try to maintain stable conditions in your quilting space.
Troubleshooting Different Machine Brands
Common Brand-Specific Issues
Different manufacturers use different sensor technologies. What works for one brand might not work for another.
Some brands are known for sensor sensitivity to dust. Others have issues with calibration drift over time.
| Machine Type | Common Sensor Issue | First Fix to Try |
|---|---|---|
| Computer-controlled | Calibration drift | Auto-calibration reset |
| Mechanical | Dirt buildup | Thorough cleaning |
| Hybrid systems | Connection issues | Check all plugs |
Model-Specific Resources
Your machine’s manual often includes troubleshooting flowcharts. These guides target your exact model’s common problems.
Online user forums for your machine brand can provide real-world solutions from other quilters.
Conclusion
Foot sensor problems don’t have to end your quilting sessions. Most issues come down to simple cleaning, calibration, or connection fixes you can handle yourself.
Start with the easiest solutions first – cleaning and calibration solve the majority of sensor problems. Save the complex electrical troubleshooting for persistent issues that simple fixes don’t resolve.
Remember that regular maintenance prevents most sensor problems before they start. A few minutes of cleaning after each project saves hours of troubleshooting later.
Why won’t my presser foot lift even after cleaning the sensor?
This usually points to a mechanical problem rather than a sensor issue. Check if your presser foot lever moves freely by hand, and look for bent or broken parts in the lifting mechanism.
Can I damage my machine by attempting sensor calibration myself?
Built-in calibration routines are designed to be safe for users. Just follow your manual’s instructions exactly and don’t force anything that doesn’t move easily during the process.
How often should I clean my foot sensor area?
Clean the sensor area every 8-10 hours of quilting time, or whenever you notice lint buildup around the presser foot. Heavy quilting or using fuzzy fabrics may require more frequent cleaning.
What’s the difference between a sensor problem and a presser foot mechanical failure?
Sensor issues typically involve inconsistent behavior or error messages, while mechanical failures show obvious physical problems like stuck parts, grinding sounds, or complete inability to move the foot manually.
Should I use any lubricants on my foot sensor or surrounding mechanisms?
Never lubricate sensor components directly. Some mechanical parts may need specific oils, but check your manual first – many modern machines use sealed components that don’t require user lubrication.