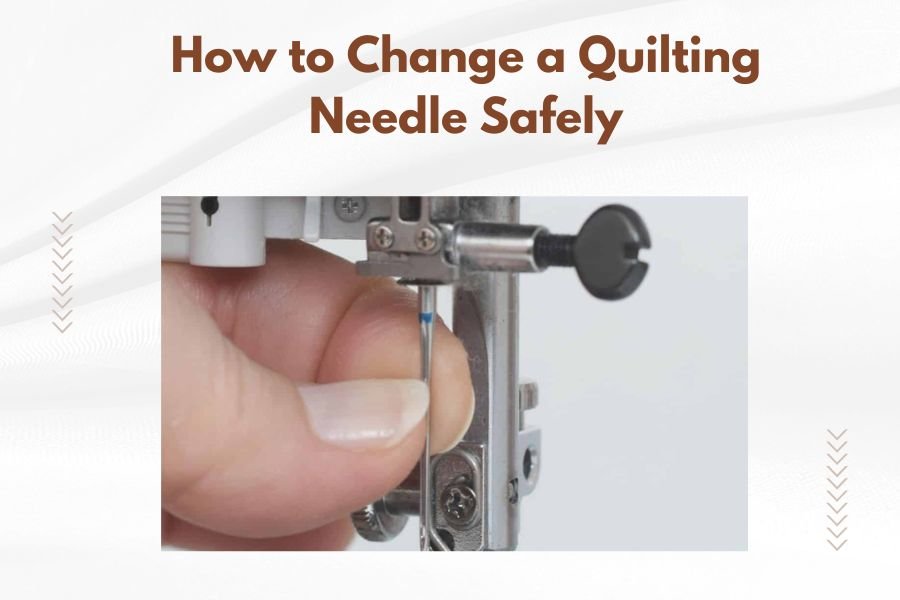
Changing a quilting needle safely requires turning off your machine, raising the needle to its highest position, and loosening the needle screw with proper tools.
Always remove the old needle by pulling it straight down, then insert the new quilting needle with the flat side facing back until it stops completely.
Why Quilting Needles Need Regular Changes
Your quilting needle works harder than you think. Every stitch puts stress on that tiny piece of metal. After hours of pushing through multiple fabric layers, batting, and backing, even the best needle starts to dull.
A dull needle creates problems you don’t want. Thread breaks, skipped stitches, and fabric puckering all point to needle trouble. I found from quilting experts that most needles should be changed after 8-10 hours of active quilting time.
Signs Your Quilting Needle Needs Replacement
Listen to your machine. If it sounds different or works harder than usual, check your needle first. You’ll hear a popping sound when the needle struggles through fabric.
Look at your stitches too. Uneven tension, loops on top, or thread shredding usually means needle problems. Sometimes you’ll see tiny pulls in your fabric where a damaged needle tip caught the threads.
Thread Breakage Patterns
When thread breaks repeatedly in the same spot, your needle might be the culprit. A burr or bent tip can catch thread and snap it every few stitches.
Fabric Damage Warning Signs
Small holes or snags in your quilt top signal needle trouble. A sharp needle should slide through fabric cleanly without leaving marks.
Essential Safety Steps Before Starting
Safety comes first when working with quilting machines. These machines pack serious power, and needles are sharp enough to cause real injury.
Turn off your machine completely. Don’t just pause or stop – use the main power switch. This prevents accidental starts while your fingers are near the needle area.
Proper Machine Positioning
Position your needle at its highest point before starting. Use your hand wheel to turn the machine manually until the needle rises completely. This gives you the best access and prevents the needle from dropping unexpectedly.
Remove your foot from the pedal. Better yet, unplug the foot pedal entirely while changing needles. I learned this tip from machine repair experts who see too many finger injuries from accidental pedal bumps.
Workspace Preparation
Clear your work area of fabric scraps and tools. You need good lighting and clean space to work safely. Keep your new needle package handy but away from the machine area.
Tools You’ll Need for Safe Needle Changes
The right tools make needle changes safer and easier. Most quilting machines come with basic tools, but you might want to upgrade for better control.
A proper screwdriver that fits your needle screw is essential. Using the wrong size tool can strip the screw or slip and cause injury.
Recommended Tool List
- Small screwdriver (usually included with your machine)
- Needle-nose pliers for stubborn needles
- Good lighting or magnifying glass
- Clean cloth for handling needles
- Container for used needles
Alternative Tool Options
Some quilters prefer needle insertion tools or magnetic holders. These accessories can help if you have arthritis or grip strength issues.
Step-by-Step Needle Removal Process
Removing your old needle requires patience and the right technique. Rushing this step often leads to problems or injuries.
Locate the needle screw on your machine. This small screw holds the needle in place. Most machines have the screw on the front or right side of the needle clamp.
Loosening the Needle Screw
Turn the screw counterclockwise to loosen it. Don’t remove it completely – just loosen it enough to release the needle. Keep track of how many turns it takes so you can tighten it properly later.
Support the needle with your other hand while loosening the screw. This prevents the needle from falling and potentially getting lost or causing damage.
Dealing with Stuck Needles
Sometimes needles get stuck from thread buildup or fabric residue. Gentle wiggling usually helps. If the needle won’t budge, clean around the needle clamp area first.
Proper Needle Disposal
Used needles are still sharp and dangerous. Wrap them in tape or put them in a small container. Never throw loose needles in the trash where they can hurt someone.
Installing Your New Quilting Needle
Installing a new needle correctly prevents most stitching problems. The key is getting the needle fully seated and properly oriented.
Check your new needle before installation. Look for any damage from shipping or handling. A bent or damaged needle will only cause problems.
Correct Needle Orientation
Every quilting needle has a flat side and a round side. The flat side must face toward the back of your machine. This orientation allows the hook timing to work properly.
Insert the needle as far as it will go. Push it up firmly until it stops completely. A partially inserted needle will cause timing problems and poor stitches.
Tightening the Needle Screw
Tighten the needle screw firmly but don’t overdo it. Too much pressure can damage the screw threads or crack the needle clamp. Hand-tight plus a quarter turn usually works well.
Testing Your New Needle Installation
Testing confirms your needle installation was successful. A few simple checks can prevent hours of quilting frustration later.
Thread your machine with regular quilting thread. Use a thread color that contrasts with your test fabric so you can see the stitches clearly.
Initial Stitch Test
Test on fabric scraps similar to your actual project. Use the same number of layers and batting type. This gives you the most accurate test results.
Sew slowly at first. Watch for any unusual sounds, thread breaks, or stitch problems. A properly installed needle should sew smoothly from the first stitch.
Stitch Quality Checklist
Check both sides of your test fabric. Look for even stitches, proper thread tension, and no fabric puckering. The stitches should look identical to your previous good quilting.
| Test Area | What to Look For | Problem Indicators |
|---|---|---|
| Top Stitches | Even, consistent appearance | Loops, gaps, or irregularity |
| Bottom Stitches | Smooth thread lay | Bunching or loose threads |
| Fabric Surface | No puckering or pulls | Holes, snags, or distortion |
Common Needle Change Mistakes to Avoid
Even experienced quilters make needle change mistakes. Learning from common errors saves time and prevents damage to your machine or project.
The biggest mistake is not fully inserting the needle. A needle that’s not pushed all the way up will cause timing problems and poor stitches.
Wrong Needle Orientation Issues
Installing the needle backwards or sideways causes immediate problems. Your machine might not stitch at all, or you’ll get terrible stitch quality.
I found from machine repair shops that wrong needle orientation is the most common installation error. Always double-check the flat side placement before tightening.
Over-tightening Problems
Cranking down too hard on the needle screw can crack the needle clamp or strip the screw threads. These repairs are expensive and usually not covered under warranty.
Using Damaged Needles
Never try to straighten a bent needle or use one with a damaged tip. Damaged needles can break during sewing and potentially damage your machine’s timing.
Choosing the Right Quilting Needle Type
Different quilting projects need different needle types. Using the wrong needle creates unnecessary problems and poor results.
Quilting needles come in various sizes and point styles. The size number indicates the needle diameter – larger numbers mean thicker needles.
Needle Size Selection Guide
For most cotton quilting, size 80/12 or 90/14 needles work well. Heavier fabrics or multiple layers might need size 100/16 needles for better penetration.
Lightweight fabrics and delicate threads work better with smaller needles like size 70/10. The goal is using the smallest needle that handles your fabric and thread combination.
Specialty Needle Options
Metallic threads often need special metallic needles with larger eyes and different coatings. These needles reduce thread breakage and improve stitch quality.
Maintaining Your Quilting Needles
Proper needle maintenance extends their life and improves your quilting results. Simple care steps make a big difference in needle performance.
Keep unused needles in their original packaging until needed. This protects the points and prevents damage from handling.
Storage Best Practices
Store needles in a dry place away from magnetic items. Magnetized needles can cause thread tension problems and attract metal particles.
Label your needle packages with the date you opened them. This helps you track needle age and replacement schedules.
Cleaning Around the Needle Area
Regular cleaning prevents buildup that can interfere with needle changes. Use a small brush to remove lint and thread particles from the needle clamp area.
Troubleshooting Post-Installation Problems
Sometimes problems appear after installing a new needle. Quick troubleshooting can identify whether the issue is needle-related or something else.
Thread breakage right after a needle change often means installation problems. Check that the needle is fully inserted and properly oriented.
Stitch Quality Issues
Poor stitches with a new needle might indicate tension problems or wrong needle size. Test with different thread types to isolate the cause.
Skipped stitches usually mean the needle isn’t reaching the hook properly. This often happens when the needle isn’t pushed up completely during installation.
Unusual Machine Noises
New noises after needle changes need immediate attention. Stop quilting and check the needle installation before continuing.
When to Seek Professional Help
Some needle-related problems require professional service. Knowing when to stop and get help prevents expensive damage.
If you can’t remove a stuck or broken needle, don’t force it. Machine repair shops have specialized tools for these situations.
Timing Problems
Persistent stitch problems after correct needle installation might indicate timing issues. These require professional adjustment and shouldn’t be attempted at home.
Conclusion
Changing quilting needles safely protects both you and your machine while ensuring beautiful stitches. The key steps are turning off your machine, positioning the needle correctly, and using proper tools throughout the process.
Remember that needle changes are routine maintenance, not emergency repairs. Regular changes based on usage time and stitch quality keep your quilting projects looking their best. With practice, you’ll change needles quickly and confidently, making it just another part of your quilting routine.
How often should I change my quilting needle?
Change your quilting needle every 8-10 hours of active sewing time, or immediately if you notice thread breakage, skipped stitches, or popping sounds from your machine.
Can I use regular sewing needles in my quilting machine?
Regular sewing needles can work for basic quilting, but quilting needles have a stronger shaft and better point design for penetrating multiple fabric layers consistently.
What happens if I install the needle backwards?
A backwards needle will cause poor stitches, skipped stitches, or prevent your machine from stitching entirely because the hook timing won’t align properly with the needle.
Why does my new needle keep breaking?
Needle breakage usually results from using the wrong needle size for your fabric, sewing too fast, or hitting pins while quilting. Check your needle size and sewing technique.
Is it normal for the needle screw to be tight?
Yes, needle screws should be snug to prevent the needle from loosening during sewing, but avoid over-tightening which can damage the screw threads or needle clamp.