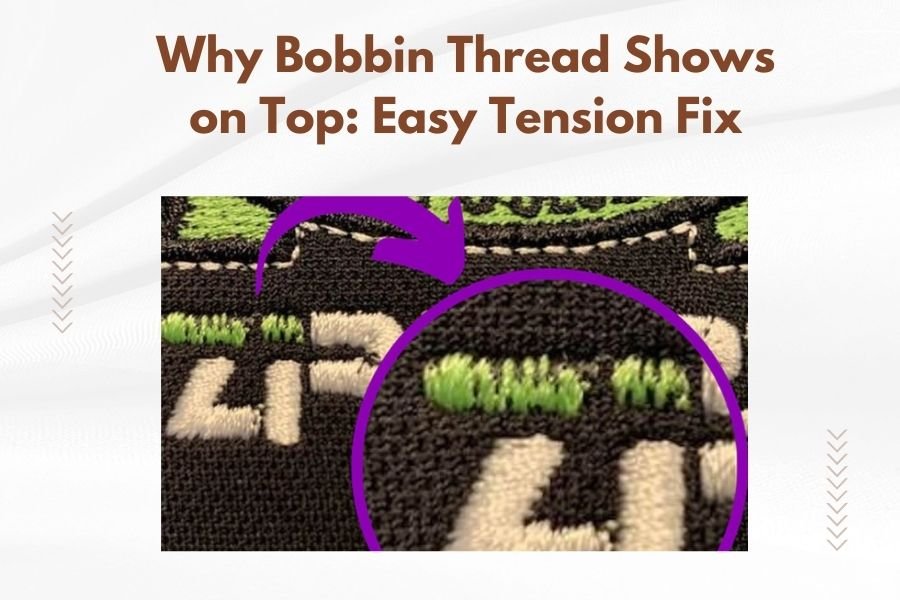
Bobbin thread shows on top when your upper thread tension is too tight or your bobbin tension is too loose, creating an imbalance that pulls the lower thread upward through your fabric.
The quickest fix is to reduce your upper tension by 1-2 numbers on your tension dial, then test stitch on scrap fabric to check the balance.
What Causes Bobbin Thread to Show on Top
Think of thread tension like a tug-of-war game. When one side pulls harder than the other, the rope moves toward the stronger side. That’s exactly what happens in your sewing machine.
Your upper thread and bobbin thread should meet perfectly in the middle of your fabric layers. When this balance gets disrupted, you’ll see the bobbin thread pulled up to the top surface.
Upper Tension Problems
Most bobbin thread visibility issues come from upper tension being set too high. When your upper thread pulls too hard, it yanks the bobbin thread right through your fabric.
I found that many sewers accidentally bump their tension dial without noticing. Check your tension setting before you start any project.
Bobbin Tension Issues
Sometimes your bobbin case tension becomes too loose. This lets the bobbin thread flow too freely, making it easy for the upper thread to pull it upward.
Bobbin tension changes are less common but can happen if someone adjusted your bobbin case or if it’s worn out.
Quick Tension Fix Steps
Ready to fix this problem? Let’s walk through the solution step by step. This process takes about 5 minutes and works for most tension issues.
Step 1: Check Your Current Settings
Look at your tension dial. Most machines work best between 3-5. If yours is set higher than 5, that’s likely your problem.
Write down your current setting before making changes. This helps you go back if needed.
Step 2: Lower Upper Tension
Turn your tension dial down by 1-2 numbers. If you were at 6, try 4. If you were at 4, try 2.
Don’t worry about going too low on your first adjustment. We’ll fine-tune it next.
Step 3: Test Stitch
Grab two pieces of scrap fabric that match your project material. Use the same thread and needle you plan to use.
Sew a straight line about 4 inches long. Check both sides of your fabric.
What Good Tension Looks Like
Perfect tension means you see only the upper thread on top and only the bobbin thread on the bottom. The threads lock together inside the fabric layers.
You shouldn’t see any loops or puckering on either side.
What Bad Tension Looks Like
If you still see bobbin thread on top, your upper tension needs to go down more. If you now see upper thread on the bottom, you went too far.
Step 4: Fine-Tune the Setting
Make small adjustments until your test stitches look perfect. Most fixes need only 1-2 number changes from your starting point.
Take your time here. Getting tension right makes all your future sewing look professional.
Other Common Causes to Check
Sometimes tension isn’t the only problem. These other issues can also cause bobbin thread to show on top.
Threading Problems
Incorrect threading creates fake tension problems. If your thread skips a guide or sits wrong in the tension discs, it won’t flow properly.
Rethread your entire machine, including the bobbin. Follow your manual’s threading diagram exactly.
Upper Thread Path
Check every thread guide from your spool to your needle. The thread should sit snugly in each guide without being forced.
Make sure your presser foot is up while threading. This opens the tension discs so thread slides in properly.
Bobbin Installation
Your bobbin might be installed backward or not seated properly in its case. Most bobbins should unwind counterclockwise when you pull the thread.
Remove and reinstall your bobbin, making sure it drops in smoothly and the thread pulls in the right direction.
Wrong Thread Weight
Using different weight threads on top and bottom confuses your tension system. Your machine expects similar thread weights to balance properly.
Match your upper and bobbin thread weights. If you’re using 40-weight thread on top, use 40-weight in your bobbin too.
Needle Issues
Bent, dull, or wrong-size needles cause erratic stitching that looks like tension problems.
Replace your needle if you’ve been sewing for more than 8 hours or if you hit pins. Use the right needle size for your thread and fabric weight.
Machine-Specific Solutions
Different sewing machines handle tension in slightly different ways. Here’s what I found works best for common machine types.
Mechanical Machines
Older mechanical machines usually have simple numbered tension dials. These respond well to the basic tension adjustment steps above.
Start with small changes and test frequently. Mechanical machines are very predictable once you understand their sweet spot.
Computerized Machines
Modern computerized machines often have automatic tension systems. You might need to override the automatic setting to fix bobbin thread showing.
Look for a manual tension override in your settings menu. Some machines call this “tension compensation” or “fine-tuning.”
Serger Machines
Sergers use multiple threads with separate tension controls. Bobbin thread showing usually means your needle thread tension is too tight.
Adjust only the needle thread tension first. Leave your looper tensions alone unless you’re sure they need changing.
When to Adjust Bobbin Tension
Most sewers should never adjust bobbin tension. Upper tension changes fix 90% of thread visibility problems.
Only consider bobbin tension adjustment if you’ve tried everything else and you’re comfortable working on your machine.
Testing Bobbin Tension
Hold your bobbin case by the thread with the bobbin inside. The case should drop slowly when you jerk the thread gently.
If it drops like a rock, tension is too loose. If it won’t drop at all, tension is too tight.
Bobbin Tension Adjustment
Find the tiny screw on your bobbin case. Turn it clockwise to tighten, counterclockwise to loosen. Make very small turns – less than a quarter turn at a time.
Test after each micro-adjustment. Bobbin tension is extremely sensitive to small changes.
Preventing Future Tension Problems
Good sewing habits prevent most tension issues before they start. These simple steps keep your stitches looking great.
Regular Maintenance
Clean your machine after every few projects. Lint buildup in your tension assembly causes erratic thread flow.
Oil your machine according to your manual’s schedule. Proper lubrication keeps all moving parts working smoothly.
Quality Thread and Storage
Cheap thread breaks easily and creates inconsistent tension. Invest in good thread from reputable brands.
Store thread away from sunlight and humidity. Old thread becomes brittle and doesn’t flow smoothly through your machine.
Proper Setup Habits
Always raise your presser foot when threading. This simple step prevents 80% of threading-related tension problems.
Hold your thread tails when you start stitching. This prevents the threads from getting pulled into your machine and creating bird’s nests.
Troubleshooting Persistent Problems
Still seeing bobbin thread on top after trying these fixes? Here are some advanced troubleshooting steps.
Fabric and Project Considerations
Very thick or very thin fabrics sometimes need special tension settings. Heavy denim might need higher tension, while silk might need lower tension.
Quilting with multiple fabric layers often requires slight tension adjustments from your normal setting.
When to Call for Service
If nothing works, your machine might need professional service. Worn tension springs or damaged tension assemblies require expert repair.
Don’t keep forcing adjustments if basic fixes don’t work. Professional service costs less than damaging your machine with excessive adjustments.
Conclusion
Bobbin thread showing on top is frustrating, but it’s usually an easy fix. Start by lowering your upper tension by 1-2 numbers and test on scrap fabric. Most problems resolve with this simple adjustment.
Remember that good sewing habits prevent most tension issues. Keep your machine clean, use quality thread, and always thread with your presser foot up. When you understand how tension works, you can fix problems quickly and get back to enjoying your sewing projects.
Why does my bobbin thread keep showing even after adjusting tension?
You might have threading problems or need a new needle. Rethread your entire machine with the presser foot up, install a fresh needle, and make sure your thread weights match between upper and bobbin threads.
Can using different thread brands cause bobbin thread to show on top?
Yes, mixing thread brands can create tension issues because different manufacturers use slightly different thread weights and textures. Stick with the same brand and weight for both upper and bobbin threads when possible.
How do I know if my bobbin case tension needs professional adjustment?
If your bobbin case won’t hold thread properly during the drop test, or if the tiny tension screw turns freely without creating resistance, your bobbin case likely needs professional repair or replacement.
Should tension settings be different for quilting versus regular sewing?
Quilting through multiple layers often requires slightly lower upper tension than regular sewing. Start with your normal setting minus 1, then adjust based on how your stitches look through all the quilt layers.
What’s the most common mistake people make when fixing tension problems?
People often make too many adjustments at once or adjust bobbin tension when they should only change upper tension. Make one small change, test it, then decide if you need further adjustments.