Hook timing adjustment involves aligning your sewing machine’s hook with the needle to create perfect stitches without skipping or tension issues.
You’ll need to adjust hook timing when your machine produces loose stitches, thread breaks, or skips stitches despite proper threading and needle condition.
Have you ever wondered why your quilting machine suddenly starts acting up? One day it’s humming along perfectly, and the next day your stitches look like a toddler’s first attempt at drawing.
The culprit might be your hook timing. Think of it as the heartbeat of your machine – when it’s off, everything else suffers.
What Is Hook Timing and Why Does It Matter?
Hook timing controls when your machine’s hook catches the upper thread from the needle. This split-second dance happens hundreds of times per minute.
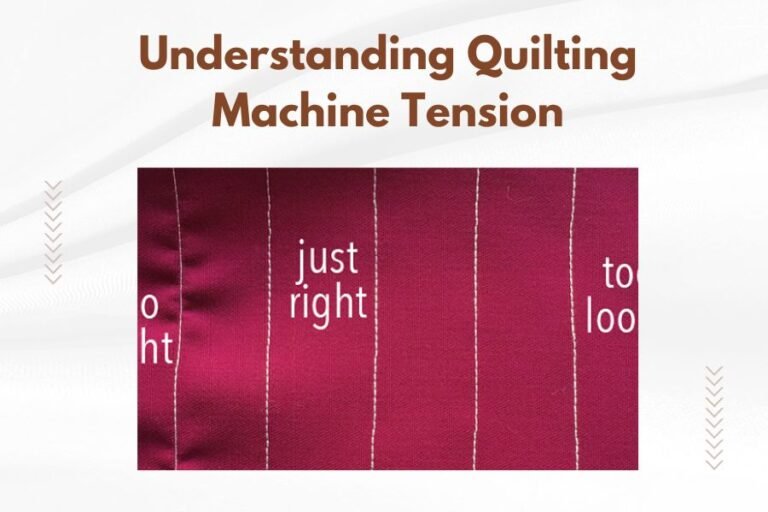
When the timing is perfect, your machine creates beautiful, even stitches. When it’s off by even a tiny bit, you get frustrated fast.
I found from sewing machine technicians that timing issues cause about 60% of stitch quality problems. That’s a big deal when you’re working on a special quilt project.
Signs Your Hook Timing Needs Adjustment
Your machine will tell you when something’s wrong. You just need to know how to listen.
Skipped Stitches
This is the most common red flag. Your machine seems to “forget” to make a stitch here and there.
The hook isn’t catching the thread loop at the right moment. It’s like trying to catch a baseball with your eyes closed.
Thread Breaks Constantly
When timing is off, your thread gets yanked and twisted in ways it shouldn’t. The result? Snap!
You’ll find yourself re-threading more than actually sewing. Sound familiar?
Loose or Uneven Stitches
Some stitches look perfect while others look sloppy. This inconsistency screams timing problems.
The hook might be catching the thread sometimes but not others.
Bottom Thread Loops
You see loops of bobbin thread on top of your fabric. The hook timing is likely too early or too late.
Tools You’ll Need for Timing Adjustment
Good news – you don’t need a whole workshop. Here’s what I found works best:
- Small screwdriver set
- Needle-nose pliers
- Magnifying glass or good lighting
- Timing gauge or ruler
- Service manual for your machine
- Patience (this one’s free but priceless)
Safety First – When NOT to Adjust Timing
Let’s be honest here. Some jobs are better left to professionals.
Brand New Machines Under Warranty
Don’t touch anything! Call your dealer instead. You could void your warranty faster than you can say “oops.”
Complex Electronic Machines
Modern computerized machines have sensors and circuits everywhere. One wrong move could turn your quilting buddy into expensive decoration.
When You’re Not Comfortable
Trust your gut. If this feels too scary, find a good repair shop. Better safe than sorry.
Step-by-Step Hook Timing Adjustment
Ready to dive in? Take your time with each step. Rushing leads to mistakes.
Step 1: Power Down and Prepare
Unplug your machine completely. Remove the needle, presser foot, and throat plate.
You want clear access to the hook assembly. Think of this as giving your machine a check-up.
Step 2: Locate the Timing Marks
Most machines have small marks or dots on the handwheel and motor housing. These show you the exact needle position.
Your manual will show you exactly where to look. Each brand puts them in slightly different spots.
Step 3: Position the Needle Correctly
Turn your handwheel until the needle is at its lowest point. Then raise it about 1/8 inch (3mm).
This is when the hook should start catching the thread loop. Timing is everything here.
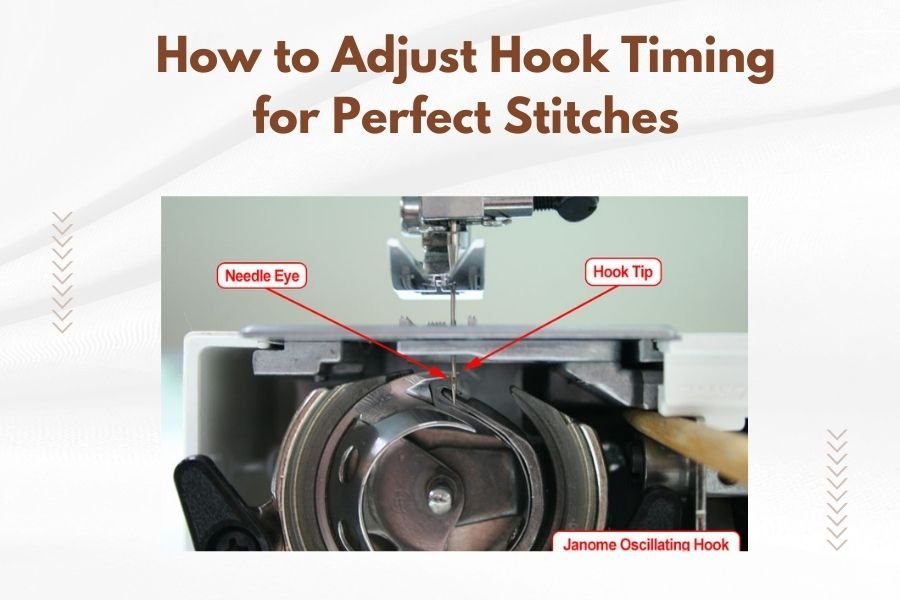
Step 4: Check Current Hook Position
Look at your hook assembly. The hook point should be just behind the needle – almost touching but not quite.
If it’s way off, you’ll need to make adjustments.
Step 5: Loosen the Hook Assembly
Find the screw or clamp holding your hook in place. Loosen it just enough so the hook can move.
Don’t remove it completely – you’ll spend forever trying to get everything back together.
Step 6: Adjust the Hook Position
Gently move the hook until its point aligns properly with the needle. Make tiny adjustments.
We’re talking about movements smaller than the thickness of a thread. Patience is your friend here.
Step 7: Tighten and Test
Once you’re happy with the position, tighten the assembly screw firmly. Don’t overtighten – you could strip the threads.
Replace your throat plate and test with some scrap fabric.
Common Timing Adjustment Mistakes
I’ve researched the most frequent errors people make. Learn from others’ mistakes!
Moving Too Fast
This isn’t a race. Small adjustments make big differences.
Many people try to fix everything in one big movement. That usually makes things worse.
Ignoring the Manual
Your machine’s manual has specific instructions for your model. Generic advice only goes so far.
Each brand has its own quirks and special procedures.
Not Testing Properly
One good stitch doesn’t mean you’re done. Sew several inches of straight stitching at different speeds.
Test both forward and reverse stitching too.
Forgetting About Needle Position
The needle must be in exactly the right spot when you check timing. Even a little off throws everything.
Testing Your Timing Adjustment
How do you know if you got it right? Your stitches will tell you.
The Straight Stitch Test
Use medium-weight cotton fabric and regular thread. Sew a straight line about 6 inches long.
Perfect timing creates even stitches with no skips or loops.
The Speed Test
Try sewing at different speeds. Good timing works whether you’re crawling or flying.
If stitches look good slow but bad fast, you might need fine-tuning.
The Thread Test
Switch to different thread weights and types. Your timing should handle cotton, polyester, and silk equally well.
What Good Stitches Look Like
Top and bottom threads should interlock in the middle of your fabric layers. No loops, no gaps, no drama.
The stitches should look identical whether you’re going fast or slow.
Troubleshooting Persistent Problems
Sometimes timing adjustment doesn’t solve everything. Here’s what else might be wrong.
Needle Issues
A bent or dull needle can mimic timing problems. Always start with a fresh needle.
Wrong needle size for your thread and fabric causes issues too.
Thread Tension Problems
Perfect timing won’t fix bad tension. Check your upper and lower tension settings.
Clean thread paths and check for thread caught in tension discs.
Feed Dog Alignment
If your feed dogs are out of alignment, even perfect hook timing won’t help much.
This usually needs professional attention.
Preventing Future Timing Issues
An ounce of prevention beats a pound of cure. Here’s how to keep your timing steady.
Regular Maintenance
Clean your machine after every few projects. Oil it according to your manual’s schedule.
Dust and lint can gradually throw timing off.
Gentle Handling
Don’t yank fabric through your machine. Let the feed dogs do their job.
Forcing things can knock timing out of whack.
Professional Servicing
Get your machine professionally serviced once a year if you use it regularly.
Technicians catch small problems before they become big headaches.
When to Call a Professional
Sometimes you need backup. There’s no shame in getting help.
Multiple Failed Attempts
If you’ve tried adjusting timing several times without success, stop. You might be missing something.
A fresh set of eyes often spots what you missed.
Other Mechanical Issues
Timing problems sometimes come with friends – bent shafts, worn gears, or loose parts.
These need professional diagnosis and repair.
Finding a Good Repair Shop
Ask other quilters for recommendations. Check reviews online.
A good shop will explain what they found and what they fixed.
Cost Considerations
Professional timing adjustment usually runs $75-150, depending on your machine and location.
Compare that to the cost of a new machine if you accidentally damage something important.
| Repair Type | Typical Cost | Time Required |
|---|---|---|
| Basic timing adjustment | $75-100 | 1-2 hours |
| Timing plus cleaning | $100-150 | 2-3 hours |
| Complex timing repair | $150-300 | 3-5 hours |
Conclusion
Hook timing adjustment isn’t rocket science, but it does require patience and attention to detail. Start by checking if timing is really your problem – many stitch issues come from simpler causes like dull needles or tension problems.
If you decide to adjust timing yourself, work slowly and follow your machine’s manual exactly. Test thoroughly before declaring victory. Remember, there’s no shame in calling a professional if things get complicated. Your quilting projects deserve perfectly timed stitches, whether you achieve them yourself or get expert help.
Can I adjust hook timing on any sewing machine?
Not all machines allow user timing adjustments. Many modern electronic and computerized machines require special tools and procedures that only trained technicians should handle. Check your manual or contact your dealer first.
How often should hook timing be adjusted?
Properly maintained machines rarely need timing adjustments. Most home sewers never need to touch their timing if they use their machine gently and keep it clean. Heavy use or rough handling increases the likelihood of timing drift.
What’s the difference between hook timing and needle timing?
Hook timing refers to when the rotary hook catches the thread loop, while needle timing involves the needle bar’s up-and-down movement coordination. Both must work together perfectly, but hook timing is what most people mean when discussing timing adjustments.
Will timing adjustment fix all my stitch problems?
No, timing adjustment only fixes issues caused by hook-to-needle coordination problems. Thread tension, feed dog issues, bent needles, or worn parts require different solutions. Always eliminate simpler causes before tackling timing.
How do I know if my timing adjustment was successful?
Successful timing adjustment eliminates skipped stitches, reduces thread breaks, and creates consistent stitch formation at all speeds. Test with various thread weights and fabric types to confirm the adjustment works across different sewing conditions.