A ruler foot allows you to create straight lines and geometric patterns by guiding your sewing machine with acrylic rulers during quilting.
Using ruler foot techniques transforms basic machine quilting into professional-looking designs with consistent spacing and sharp angles.
What Is a Ruler Foot and Why Do You Need One?
Think of a ruler foot as your quilting GPS. It’s a special presser foot that sits higher than regular feet, creating space for thick acrylic rulers.
The foot has a clear bottom and sits about 1/4 inch above your fabric. This gap lets you slide quilting rulers underneath while stitching.
You guide the ruler with your hands while moving the quilt. The needle follows the ruler’s edge, creating perfect straight lines every time.
How Ruler Feet Work
Your ruler foot acts like a fence. The foot’s edge rides along your acrylic ruler while the needle stitches.
You control both the ruler and fabric movement. This gives you power over every stitch placement.
Most quilters find this method more accurate than trying to eyeball straight lines or geometric shapes.
Types of Ruler Feet Available
Not all ruler feet are created equal. I found that different machines need specific foot styles.
Closed-Toe Ruler Feet
These feet have metal or plastic around the needle opening. They work well for beginners because they’re more stable.
The closed design prevents rulers from slipping under the foot accidentally. This reduces mistakes while you’re learning.
Open-Toe Ruler Feet
Open-toe versions give you better visibility around the needle. You can see exactly where you’re stitching.
Advanced quilters often prefer these for detailed work. The trade-off is less stability for new users.
Adjustable Height Ruler Feet
Some feet let you change the height above your fabric. This works for different ruler thicknesses.
I researched and found these work best when you use various ruler brands with different thicknesses.
Essential Rulers for Machine Quilting
Your ruler collection determines what designs you can create. Start with basics and add specialty shapes later.
Straight Edge Rulers
Every quilter needs at least one long straight ruler. A 12-inch or 18-inch ruler handles most projects.
Look for rulers with grip strips on the bottom. These prevent sliding during stitching.
Curve Rulers
Curved rulers create flowing lines and organic shapes. Start with gentle curves before trying tight spirals.
French curves and arc templates give you graceful swooping lines that look hand-drawn.
Circle and Arc Templates
Perfect circles are nearly impossible to stitch freehand. Circle templates solve this problem instantly.
Nested circle sets give you multiple size options. You can create flower petals, bubbles, or geometric medallions.
Square and Rectangle Rulers
Geometric shapes add structure to your quilting designs. Squares work great for background fill patterns.
Rectangle rulers help you create brick patterns or elongated geometric elements.
Setting Up Your Machine for Ruler Work
Proper machine setup prevents frustration and broken needles. Take time to adjust everything correctly.
Lowering Your Feed Dogs
Feed dogs must be lowered or covered for ruler work. You control fabric movement, not the machine.
Check your manual for the feed dog control. Some machines have a switch, others use a cover plate.
Adjusting Presser Foot Pressure
Reduce presser foot pressure if your machine allows it. This makes moving the quilt easier.
Too much pressure creates drag. Too little pressure causes skipped stitches.
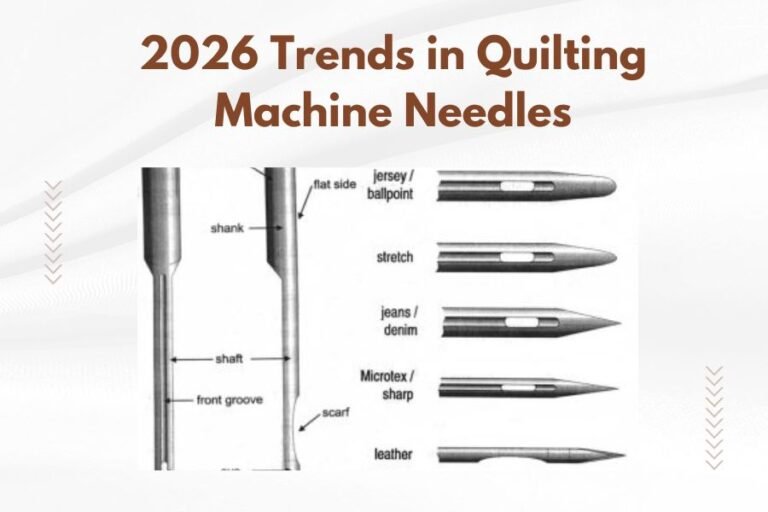
Thread and Needle Selection
Use a sharp needle designed for quilting. Size 90/14 works for most cotton threads and fabrics.
High-quality thread reduces breaks and tension problems. Cotton or polyester both work well.
Stitch Length Settings
Set your stitch length to zero. You control stitch length by how fast you move the fabric.
Consistent hand movement creates even stitches. Practice makes this feel natural.
Basic Ruler Foot Techniques
Start with simple techniques before attempting complex designs. Master the basics first.
Hand Positioning
Place both hands on your ruler, never on the fabric alone. Keep fingers away from the needle area.
Your hands should grip the ruler firmly but not so tight that movement becomes jerky.
Movement Speed
Move your hands steadily while running the machine at medium speed. Find a rhythm that works for you.
Fast machine speed with slow hand movement creates tiny stitches. Slow machine speed with fast movement makes long stitches.
Starting and Stopping
Always start with your needle down. This prevents the fabric from shifting when you begin stitching.
Stop with the needle down too. This keeps everything stable while you reposition rulers or hands.
Common Ruler Foot Problems and Solutions
Every quilter faces challenges when learning ruler work. Here’s how to fix common issues.
Rulers Slipping During Stitching
Slippery rulers create crooked lines. Add grip strips or dots to the ruler bottom.
Clean your rulers regularly. Lint and oil buildup reduces grip.
Uneven Stitch Length
Jerky hand movements cause uneven stitches. Practice smooth, consistent motion.
I found that quilters often move too fast when starting. Slow down and focus on steadiness.
Broken Needles
Hitting the ruler with your needle breaks needles instantly. Keep the ruler foot against the ruler edge.
Check your ruler foot height. Too low causes needle strikes.
Skipped Stitches
Moving too fast or using old needles causes skipped stitches. Replace your needle and slow down.
Check thread tension too. Loose tension sometimes causes skipping.
Advanced Ruler Foot Tips
Once you master basics, these advanced tips will improve your results.
Combining Multiple Rulers
Use two rulers together for complex shapes. Hold one stationary while moving the other.
This technique creates intersecting lines and geometric patterns impossible with single rulers.
Creating Echo Lines
Echo quilting repeats a shape at regular intervals. Use rulers to keep spacing consistent.
Mark your ruler with tape at your desired spacing. This gives you a reference point.
Mixing Ruler Work with Free Motion
Combine ruler sections with freehand areas. Switch your presser foot when changing techniques.
This mix creates designs with both structured and organic elements.
| Technique | Best For | Skill Level |
|---|---|---|
| Straight lines | Backgrounds, borders | Beginner |
| Gentle curves | Organic designs | Intermediate |
| Complex geometric | Modern quilts | Advanced |
| Echo quilting | Highlighting motifs | Intermediate |
Practicing Ruler Foot Skills
Practice builds confidence and muscle memory. Start with simple exercises before tackling your quilt.
Paper Practice
Practice on paper first. Thread your machine with an old needle and stitch on paper.
This lets you see your stitch quality without wasting fabric. Plus, mistakes don’t matter.
Sample Sandwiches
Make practice quilt sandwiches with scraps. Layer batting between fabric pieces.
Practice feels more realistic with actual quilting layers. Save good samples for reference.
Progressive Skill Building
Start with straight lines, then gentle curves, then complex shapes. Don’t skip steps.
Each skill builds on the previous one. Rushing leads to bad habits.
Maintaining Your Ruler Foot
Proper maintenance keeps your ruler foot working smoothly for years.
Cleaning
Remove lint from around the foot regularly. Use a small brush or compressed air.
Clean rulers with mild soap and water. Dry completely before storing.
Storage
Store rulers flat or hanging vertically. Stacking can cause warping over time.
Keep your ruler foot in a safe place where it won’t get damaged.
Choosing the Right Projects
Not every quilt needs ruler work. Choose projects that benefit from precise geometric elements.
Modern quilts often showcase ruler work beautifully. Traditional quilts might need just accent areas.
Start with smaller projects like table runners or wall hangings. Large quilts can feel overwhelming initially.
Conclusion
Ruler foot quilting opens up a world of precise, professional-looking designs. With the right foot, rulers, and techniques, you can create stunning geometric patterns that would be impossible to achieve freehand.
Remember to start simple and build your skills gradually. Practice on scraps before working on your actual quilts. Most importantly, be patient with yourself as you develop the coordination between machine speed and hand movement.
The investment in a quality ruler foot and basic rulers pays off quickly. Your quilting will look more polished and intentional. Plus, you’ll have fun exploring the endless design possibilities that ruler work provides.
Can I use any acrylic ruler with my ruler foot?
No, you need quilting-specific rulers with grip strips or textured bottoms. Regular craft rulers will slip during stitching. Look for rulers designed specifically for longarm or domestic machine quilting.
Why does my ruler foot height matter so much?
The wrong height causes either needle strikes on the ruler or gaps that make ruler guidance impossible. Your ruler should slide smoothly under the foot with just slight contact on top.
How do I prevent my hands from getting tired during long ruler sessions?
Take frequent breaks and don’t grip the rulers too tightly. Consider rulers with ergonomic handles for longer sessions. Building up your stamina gradually helps prevent fatigue and cramping.
What’s the difference between ruler work and templates?
Templates are cut-out shapes you trace around, while rulers are solid edges you follow with your machine. Ruler work happens during the quilting process, while templates are usually used during piecing or applique.
Can I do ruler work on a regular sewing machine or do I need a longarm?
You can absolutely do ruler work on a regular domestic machine. You’ll need a ruler foot designed for your specific machine brand and model. The main limitation is throat space for maneuvering larger quilts.