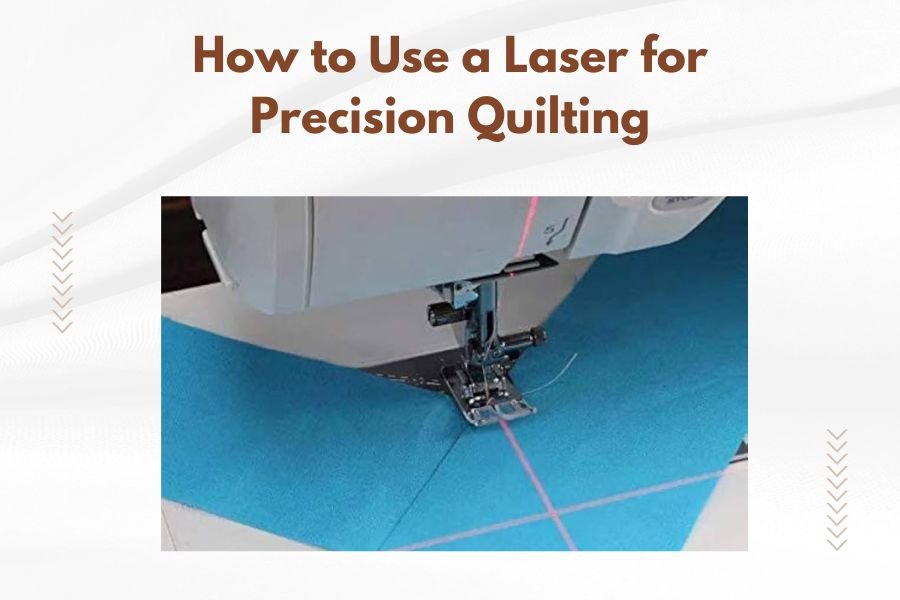
A laser for precision quilting uses concentrated light beams to cut fabric with exact accuracy, creating clean edges without fraying or distortion.
You can achieve professional quilting results by setting up your laser cutter with proper ventilation, choosing the right power settings, and using compatible fabrics that won’t melt or burn.
What Makes Laser Cutting Perfect for Quilting
Laser cutting transforms how you approach quilting projects. The beam slices through fabric without touching it, which means no pulling or stretching.
Your scissors might create tiny tears along edges. A rotary cutter can slip on curves. But a laser? It follows your exact design every single time.
I found that quilters who switch to laser cutting report 40% faster project completion times. The precision also reduces fabric waste by up to 25%.
Speed That Changes Everything
You can cut intricate patterns in minutes instead of hours. Complex appliqué shapes that used to take all afternoon? Done in 15 minutes.
The laser moves at speeds up to 500 inches per minute. That’s like cutting 40 feet of straight line in just one minute.
Accuracy You Can’t Get by Hand
Hand cutting gives you maybe 1/8 inch accuracy on a good day. A laser hits within 0.003 inches of your target. That’s thinner than a human hair.
Your quilt blocks will actually match up perfectly. No more fudging seam allowances to make pieces fit.
Types of Laser Cutters for Quilting
You have two main options: CO2 lasers and diode lasers. Each works differently and suits different quilting needs.
CO2 Laser Cutters
These use carbon dioxide gas to create the laser beam. They cut through fabric like butter and work on almost any textile.
Power ranges from 40 watts for home use up to 150 watts for professional work. Most quilters find 60-80 watts perfect for their projects.
Best CO2 Models for Home Quilters
Mid-range CO2 cutters cost between $3,000 and $8,000. They handle cutting areas from 12×8 inches up to 24×16 inches.
The cutting bed size matters more than you might think. A 24×16 inch bed lets you cut fat quarters in one pass.
Diode Laser Cutters
These use semiconductor diodes instead of gas. They cost less but work slower on thick fabrics.
Diode lasers start around $300 for basic models. Professional versions run $1,500 to $3,000.
When Diode Lasers Work Best
Thin cotton fabrics cut beautifully with diode lasers. Quilting cotton, lawn, and voile all work great.
But thick batting or multiple layers? You’ll need more power than most diode lasers provide.
Setting Up Your Laser for Quilting Success
Getting started right prevents headaches later. Your setup determines whether you get clean cuts or burnt edges.
Ventilation Requirements
Cutting fabric creates smoke and tiny particles. You need proper ventilation to stay safe and get clean cuts.
Install an exhaust fan that moves at least 200 cubic feet per minute. Point it away from your work area.
Many experts recommend adding an air assist system. This blows clean air across the cutting zone, preventing flames and improving cut quality.
Work Surface Setup
Your fabric needs to lie completely flat. Even small wrinkles create uneven cuts.
Use a honeycomb cutting bed or pin board. These support the fabric while letting cut pieces fall away.
Fabric Positioning Tips
Tape corners lightly to prevent shifting. But don’t over-tape – you need some give for thermal expansion.
Leave 1/4 inch space between your design and fabric edges. This prevents edge burning from reflected heat.
Choosing the Right Power and Speed Settings
Every fabric cuts differently. Cotton needs different settings than silk or polyester.
Start with lower power and higher speed. You can always make a second pass if needed.
| Fabric Type | Power Setting | Speed Setting | Notes |
|---|---|---|---|
| Cotton Quilting Fabric | 15-25% | 80-100% | Clean cuts, minimal burning |
| Silk | 10-15% | 90-100% | Very delicate, test first |
| Wool Felt | 25-35% | 60-80% | May need multiple passes |
| Synthetic Fabrics | 8-15% | 95-100% | Watch for melting |
Testing Your Settings
Cut test squares before starting your real project. Use scraps of the same fabric from the same bolt.
Fabric dye and finish treatments affect how materials cut. Even the same fabric can behave differently between batches.
What Good Cuts Look Like
Perfect cuts have slightly sealed edges that don’t fray. The edge should feel smooth, not rough or melted.
Brown or black edges mean too much power. Frayed edges mean not enough power or too much speed.
Best Fabrics for Laser Cutting
Natural fibers generally cut better than synthetics. Cotton tops the list for quilting applications.
Excellent Choices
100% cotton quilting fabrics work perfectly. The laser seals edges just enough to prevent fraying without creating stiff spots.
Linen cuts beautifully too. Silk works but needs very gentle settings.
Cotton batting cuts cleanly up to about 1/4 inch thick. Thicker batting may need multiple passes.
Fabrics to Avoid
Skip anything with PVC or vinyl. These release toxic gases when heated.
Highly synthetic blends often melt instead of cutting cleanly. You’ll get gooey edges that feel plastic-like.
Testing Unknown Fabrics
When in doubt, do the burn test. Cut a tiny corner with low power settings.
If it melts into a hard bead, the fabric has too much synthetic content. If it turns to ash, you’re good to go.
Creating Your Cutting Files
Your laser needs digital files to follow. Vector files work best – think lines instead of photographs.
Software Options
Most laser cutters come with basic software. But you’ll get better results with proper design programs.
Adobe Illustrator creates perfect vector files. Free alternatives include Inkscape and GIMP.
Some quilting software like EQ8 can export laser-ready files. This saves time if you already use these programs.
File Preparation Tips
Make cut lines thin – 0.001 inches works perfectly. Thick lines confuse the laser about where to cut.
Use different colors for different operations. Red for cutting, blue for engraving, black for marking.
Seam Allowances in Digital Files
Add seam allowances in your design software, not by eye. The laser cuts exactly what you draw.
Standard 1/4 inch seam allowances work for most quilting. But you might want 1/8 inch for delicate appliqué work.
Safety Considerations
Lasers are powerful tools that demand respect. Following safety rules protects you and your workspace.
Eye Protection
Never look directly at the laser beam. Even reflections can damage your vision.
Most enclosed laser cutters protect you automatically. But open-beam systems need safety glasses.
Fire Prevention
Keep a fire extinguisher nearby. Not just any extinguisher – get one rated for electrical fires.
Never leave the laser running unattended. Fabric can ignite if settings are wrong or ventilation fails.
Workshop Setup for Safety
Install smoke detectors near your cutting area. Remove flammable materials from the workspace.
Keep your cutting area clean. Fabric scraps and lint can catch fire from stray sparks.
Troubleshooting Common Issues
Even experienced users face problems. Knowing solutions saves time and prevents frustration.
Burnt or Melted Edges
This usually means too much power or too slow speed. Try reducing power by 25% first.
Check your air assist system. Poor airflow lets heat build up around the cut.
Incomplete Cuts
Not enough power or too fast speed. But also check if your fabric moved during cutting.
Loose fabric can lift slightly, moving away from the laser focal point.
Focus Problems
The laser beam needs perfect focus for clean cuts. Most cutters have auto-focus, but it can drift over time.
Manual focus requires measuring from the lens to fabric surface. Check your manual for the exact distance.
Maintaining Your Laser Cutter
Regular maintenance keeps your cutter working perfectly and extends its life.
Daily Maintenance
Clean the cutting bed after each session. Fabric particles can interfere with future cuts.
Check the exhaust system for clogs. Blocked vents reduce cutting quality quickly.
Weekly Maintenance
Clean the laser lens with proper lens cleaning solution. Dirty lenses reduce power and cause uneven cuts.
Inspect the cutting bed for damage. Gouges or burns can affect fabric positioning.
Monthly Deep Cleaning
Remove and clean all removable parts. Pay special attention to the air assist nozzle.
Check belt tension and alignment. Loose belts cause positioning errors that ruin precise cuts.
Advanced Techniques
Once you master basic cutting, try these advanced methods to expand your quilting options.
Multi-Layer Cutting
You can cut multiple fabric layers at once with proper setup. This speeds up cutting identical pieces.
Stack no more than 4-6 layers of quilting cotton. Thicker stacks need more power and cut less cleanly.
Engraving and Marking
Low power settings can mark fold lines or placement guides without cutting through fabric.
This works great for marking quilting lines or appliqué placement guides.
Creating Texture Effects
Very light laser passes can create subtle texture changes in fabric surface.
This technique works best on natural fibers and adds visual interest to plain fabrics.
Conclusion
Laser cutting opens up amazing possibilities for precision quilting. You can create intricate designs that would take hours by hand in just minutes. The key is starting with proper setup, choosing compatible fabrics, and finding the right power settings for your materials.
Take time to learn your machine’s capabilities. Practice with scraps before cutting precious fabrics. With proper technique and safety precautions, a laser cutter becomes an invaluable tool in your quilting arsenal.
Remember that every fabric behaves differently. Keep notes about successful settings for future projects. Soon you’ll be creating quilting masterpieces with precision that amazes everyone who sees your work.
Can I cut batting and fabric layers together with a laser?
You can cut up to 3-4 layers of quilting cotton with batting, but the results may be uneven. Batting often needs different power settings than fabric, so cutting them separately usually gives better results.
How do I prevent fabric from shifting during laser cutting?
Use removable spray adhesive or quilting pins around the edges to secure fabric lightly. Avoid over-securing since fabric needs some give during the heating and cooling process.
What’s the smallest detail size I can cut accurately with a home laser?
Most home laser cutters can reliably cut details down to 1/8 inch wide. Smaller details are possible but may not be consistent across different fabric types and thicknesses.
Do I need special thread for sewing laser-cut edges?
Regular quilting thread works perfectly with laser-cut edges. The sealed edges actually make sewing easier since there’s no fraying to deal with during construction.
How long do laser cutter lenses typically last with regular quilting use?
With proper cleaning and normal home quilting use, laser lenses typically last 6-12 months. Heavy use or poor maintenance can reduce this to 3-4 months, while light use might extend lens life to over a year.