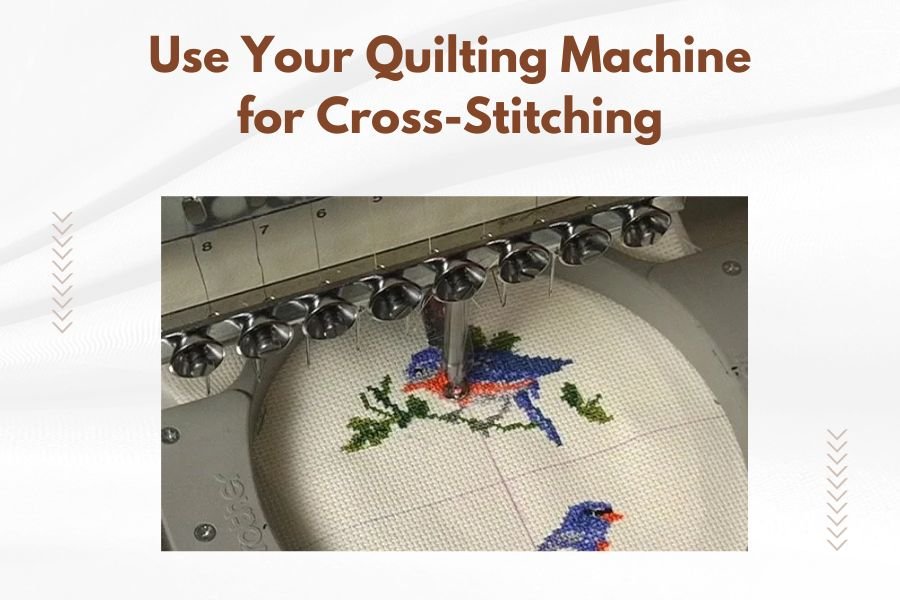
Yes, you can use your quilting machine for cross-stitching by adjusting the stitch settings and using the right attachments.
Your quilting machine needs specific needle types, tension adjustments, and stitch length modifications to create clean cross-stitch patterns on fabric.
What Makes Cross-Stitching Different on a Quilting Machine
Cross-stitching on a quilting machine works differently than hand stitching. Your machine creates the X-pattern through programmed stitches instead of individual crosses.
Most modern quilting machines have decorative stitch options that mimic cross-stitch appearance. The machine moves the fabric automatically while the needle creates the pattern.
Machine vs Hand Cross-Stitching Speed
Machine cross-stitching cuts your project time by 75% compared to hand stitching. A design that takes 8 hours by hand can finish in 2 hours on your quilting machine.
The trade-off comes in detail control. Hand stitching gives you perfect placement for each cross. Machine stitching works better for larger areas and repetitive patterns.
Essential Equipment for Machine Cross-Stitching
Needle Selection
Use a size 90/14 universal needle for most cross-stitch projects. This needle size creates clean holes without damaging your fabric.
Switch to an embroidery needle (size 75/11) for delicate fabrics like silk or fine cotton. The special scarf design prevents thread shredding.
When to Use Different Needle Types
Ballpoint needles work best on stretchy fabrics. They push fibers aside instead of cutting through them.
Sharp needles handle tightly woven fabrics better. They create precise entry points for clean stitch formation.
Thread Requirements
Cotton embroidery thread gives the most authentic cross-stitch look. Use 40-weight thread for standard projects.
Rayon thread adds shine and color depth. It works well for decorative cross-stitch borders on quilts.
| Thread Type | Best Use | Weight |
|---|---|---|
| Cotton | Traditional look | 40-weight |
| Rayon | Decorative shine | 40-weight |
| Polyester | Durability | 40-weight |
Setting Up Your Quilting Machine
Tension Adjustments
Start with normal tension settings (usually 4 on most machines). Test on fabric scraps before starting your main project.
Loosen the top tension slightly if your bobbin thread shows on the fabric surface. Tighten it if the top thread appears loose or loopy.
Signs Your Tension Needs Adjustment
Puckered fabric means your tension is too tight. The fabric gets pulled into the stitches.
Loose, messy stitches indicate tension that’s too loose. The threads don’t lock properly between fabric layers.
Stitch Length and Width Settings
Set your stitch length between 2.5 and 3.5mm for cross-stitch patterns. This creates properly proportioned crosses.
Adjust stitch width based on your design size. Smaller patterns need 3-4mm width. Larger decorative borders can use 6-8mm width.
Choosing the Right Fabrics
Best Fabric Types for Machine Cross-Stitching
Even-weave fabrics work best because they have consistent thread spacing. This helps your machine create uniform crosses.
Cotton quilting fabric gives good results for beginners. The stable weave doesn’t shift during stitching.
Fabric Count Considerations
14-count Aida cloth works well for machine cross-stitching. The holes are large enough for your needle but not so big that stitches look sparse.
Avoid fabrics with loose weaves. Your machine’s feed dogs can catch and distort the threads.
Stabilizer Options
Use tear-away stabilizer for most cross-stitch projects. It supports the fabric during stitching and removes cleanly.
Water-soluble stabilizer works well on delicate fabrics. You can wash it away without pulling or tearing.
Step-by-Step Machine Cross-Stitching Process
Preparation Steps
Mark your design placement with removable fabric markers. This prevents crooked or off-center patterns.
Hoop your fabric with stabilizer underneath. Keep the fabric taut but not stretched. Overstretching distorts your finished design.
Testing Your Settings
Always test stitch on fabric scraps first. Use the same fabric and stabilizer as your main project.
Check that your crosses look even and properly formed. Adjust settings before starting your actual design.
Stitching Technique
Start stitching from the center of your design and work outward. This prevents fabric shifting that could throw off your pattern alignment.
Keep steady speed while stitching. Sudden speed changes can create uneven stitch formation.
Handling Direction Changes
Stop with your needle down when changing directions. This keeps your stitches aligned properly.
Lift your presser foot slightly when pivoting around tight corners. This reduces fabric drag and puckering.
Common Challenges and Solutions
Uneven Cross Formation
Check your machine’s timing if crosses look lopsided. From what I read, timing issues cause the needle and bobbin hook to work out of sync.
Clean lint from your bobbin area. Built-up debris can affect stitch quality.
Thread Breakage Issues
Use fresh thread for best results. Old thread becomes brittle and breaks easily during fast machine stitching.
Check your needle for burrs or damage. A damaged needle can cut your thread during stitching.
Fabric Distortion Problems
Reduce your presser foot pressure if fabric gets pushed around during stitching. Too much pressure can distort lightweight fabrics.
Use a walking foot for multiple fabric layers. It feeds all layers evenly through the machine.
Design Ideas and Applications
Border Designs
Cross-stitch borders add beautiful detail to quilt edges. Program repetitive patterns that your machine can stitch continuously.
Try simple geometric patterns first. Diamonds, zigzags, and simple florals work well for beginners.
Corner Treatments
Plan your corner turns carefully. Some machines have automatic corner features that help maintain pattern continuity.
Practice corner techniques on scraps before working on your finished quilt.
Block Decoration
Add cross-stitch centers to plain quilt blocks. This creates visual interest without complex piecing.
Keep designs proportional to your block size. Large patterns can overwhelm small blocks.
Maintenance and Care
Cleaning Your Machine After Cross-Stitching
Remove lint buildup more frequently when doing decorative stitching. Dense patterns create more debris than straight seaming.
Oil your machine according to manufacturer schedules. Decorative stitching puts extra stress on moving parts.
Needle Replacement Schedule
Change needles every 6-8 hours of decorative stitching. Dense patterns dull needles faster than regular sewing.
Watch for skipped stitches or popping sounds. These signs indicate a dull or damaged needle.
Advanced Techniques
Multi-Color Cross-Stitching
Plan color changes at natural stopping points in your design. This minimizes thread ends and color bleeding.
Use different thread weights to create texture variation. Combine 30-weight and 50-weight threads in the same design.
Layered Cross-Stitch Effects
Stitch base patterns first, then add accent colors on top. This creates depth and visual interest.
Use contrasting thread colors to make certain design elements pop forward.
Conclusion
Your quilting machine opens up exciting possibilities for cross-stitching projects. With the right settings, needles, and techniques, you can create beautiful cross-stitch designs much faster than hand stitching.
Start with simple patterns and gradually work up to more complex designs. Practice on scraps, keep your machine maintained, and don’t be afraid to experiment with different threads and fabrics.
Remember that machine cross-stitching gives you speed and consistency, while hand stitching offers precision control. Choose the method that best fits your project needs and timeline.
Can all quilting machines do cross-stitch patterns?
Most modern quilting machines have decorative stitches that create cross-stitch effects, but older or basic models may not. Check your machine’s stitch selection to see if cross-stitch or similar decorative patterns are available.
What’s the best stabilizer for machine cross-stitching on quilts?
Tear-away stabilizer works best for most quilt cross-stitching projects. It provides good support during stitching and removes cleanly without damaging your quilt layers or batting.
How do I prevent fabric puckering during machine cross-stitching?
Use proper stabilizer, adjust your tension settings, and avoid stretching fabric too tight in the hoop. Also, reduce presser foot pressure for lightweight fabrics and maintain steady stitching speed.
Can I use regular sewing thread for cross-stitching on my quilting machine?
Regular polyester thread works, but cotton embroidery thread gives better results. Embroidery thread has the right weight and sheen to mimic traditional hand cross-stitching appearance.
How often should I change needles when doing machine cross-stitching?
Change needles every 6-8 hours of decorative stitching, or sooner if you notice skipped stitches or popping sounds. Dense cross-stitch patterns dull needles faster than regular straight stitching.