Quilting perfect bubbles on your machine requires setting your thread tension to medium-low and using a bubble quilting foot or darning foot for consistent stitch formation.
The key is maintaining steady fabric movement while creating overlapping circular motions at a consistent speed to achieve uniform bubble shapes.
What Are Bubble Quilts and Why Make Them?
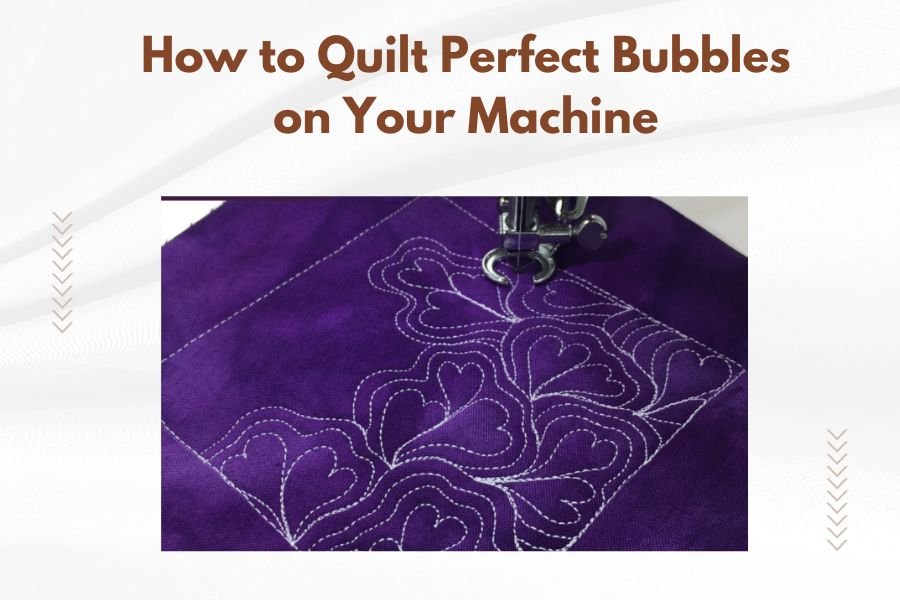
Bubble quilting creates raised, puffy sections that look like soap bubbles floating across your fabric. Each bubble sits higher than the surrounding area, giving your quilt amazing texture and dimension.
You make bubbles by stitching around circular areas, leaving the centers unstitched. The batting inside these circles puffs up naturally. It’s like creating tiny pillows all over your quilt.
Benefits of Machine Bubble Quilting
Machine quilting saves you hours compared to hand quilting. You can finish a full-size quilt in days instead of months.
Your bubbles will be more uniform when you use a machine. Hand quilting often creates uneven bubble sizes, which can look messy.
Essential Tools for Perfect Machine Bubbles
The right tools make bubble quilting much easier. I found that having proper equipment prevents most beginner mistakes.
Quilting Foot Options
A darning foot works best for bubble quilting. It lets you move the fabric freely in all directions.
If you don’t have a darning foot, try a walking foot. It feeds all fabric layers evenly, preventing bunching.
Free Motion vs Walking Foot
Free motion quilting gives you complete control over bubble size and placement. You guide the fabric manually.
Walking foot quilting is easier for beginners. The machine feeds the fabric automatically, so you focus on steering.
Thread Selection
Cotton thread works best for bubble quilting. It has enough grip to hold the fabric layers together securely.
Polyester thread can work too, but it’s more slippery. Your stitches might not hold as well over time.
Thread Weight Matters
Use 40-weight thread for most bubble quilting. It’s strong enough to hold but won’t create thick, bulky seams.
Avoid heavy threads like 12-weight. They can make your bubbles look stiff and artificial.
Preparing Your Quilt Sandwich
Your quilt sandwich needs proper preparation for good bubbles. Sloppy prep work leads to puckered, uneven results.
Batting Selection
Medium-loft batting creates the best bubbles. It puffs up nicely but doesn’t get too thick.
High-loft batting might seem better, but it’s hard to control. Your bubbles could end up looking like mountains instead of gentle curves.
Cotton vs Polyester Batting
Cotton batting holds its shape well and creates smooth bubbles. It doesn’t shift around much during quilting.
Polyester batting is bouncier and creates more dramatic bubbles. But it can be harder to control for beginners.
Basting Techniques
Spray basting works great for bubble quilts. It holds everything in place without pins getting in your way.
If you prefer pin basting, use safety pins every 3-4 inches. Remove them as you quilt to avoid snagging.
Machine Settings for Perfect Bubbles
Your machine settings can make or break your bubble quilting project. Small adjustments make huge differences.
Tension Adjustments
Set your thread tension slightly lower than normal. This lets the fabric layers move more freely.
Start at about 3.5 if your normal tension is 4.5. Test on a scrap first to find your sweet spot.
Testing Tension Settings
Make a small test sandwich with the same fabrics and batting you’ll use. Practice your bubble technique on this first.
Look for balanced stitches with no thread showing through from the back. Adjust up or down as needed.
Stitch Length and Speed
Keep your stitches consistent and not too small. About 10-12 stitches per inch works well.
Quilt at medium speed. Going too fast makes it hard to control your bubble shapes.
Step-by-Step Bubble Quilting Process
Follow these steps exactly for consistent results. I found this method works best after trying several approaches.
Planning Your Bubble Layout
Mark your bubble centers with a water-soluble pen. Space them evenly across your quilt top.
Plan for bubbles about 2-3 inches apart. Closer spacing can make your quilt look too busy.
Creating Templates
Cut circle templates from cardboard in different sizes. This helps keep your bubbles consistent.
Make templates in 2-inch, 3-inch, and 4-inch diameters. Mix sizes for visual interest.
Starting Your First Bubble
Begin quilting about 1/4 inch outside your marked circle. Don’t start exactly on the line.
Stitch slowly around the circle, keeping your distance from the center consistent.
Maintaining Consistent Speed
Move the fabric at the same speed you’re stitching. This prevents uneven stitch lengths.
If you move the fabric too fast, your stitches will be too long. Too slow, and they bunch up.
Completing the Circle
Overlap your starting point by about 1/2 inch. This secures the circle completely.
Backstitch a few times or tie off your threads. You don’t want circles coming undone later.
Advanced Bubble Techniques
Once you master basic bubbles, try these advanced techniques to add more interest to your quilts.
Varying Bubble Sizes
Mix small, medium, and large bubbles in the same quilt. This creates a more natural, organic look.
Group similar sizes together, then transition to different sizes. Random placement usually looks messy.
Creating Bubble Clusters
Make groups of 3-5 bubbles close together. Leave more space between clusters.
This technique mimics how real soap bubbles cluster together naturally.
Double-Ring Bubbles
Stitch two concentric circles for each bubble. The inner circle should be about half the diameter of the outer one.
This creates bubbles with more defined edges and extra dimension.
Troubleshooting Common Problems
Every quilter runs into problems with bubble quilting. Here’s how to fix the most common issues.
Flat or Collapsed Bubbles
If your bubbles look flat, your batting might be too thin. Try medium-loft batting instead of low-loft.
Check your quilting circles too. If they’re stitched too close to the center, the bubble can’t puff up properly.
Fixing Existing Flat Bubbles
You can sometimes save flat bubbles by carefully removing some of the inner stitching. Use a seam ripper very carefully.
Add more batting through a small opening if needed, then restitch the area.
Uneven Bubble Heights
Inconsistent batting thickness causes uneven bubble heights. Make sure your batting lies flat before basting.
Your stitching circles might be different distances from the centers. Use templates to stay consistent.
Preventing Height Variations
| Problem | Solution |
|---|---|
| Batting bunched up | Smooth batting carefully before basting |
| Inconsistent circle sizes | Use cardboard templates |
| Varying stitch distances | Mark guidelines with removable pen |
| Thread tension issues | Test on scraps first |
Puckering Around Bubbles
Puckering usually means your thread tension is too tight. Lower the tension and try again.
Sometimes the fabric isn’t moving smoothly under the foot. Make sure your machine is clean and oiled.
Finishing Your Bubble Quilt
The finishing steps are just as important as the quilting itself. Don’t rush this part.
Pressing and Blocking
Don’t press your bubble quilt with a hot iron. The heat can flatten your beautiful bubbles.
If you must press, use a cool iron and press very lightly around the bubbles, not on top of them.
Steam Blocking Alternative
Hold a steam iron about 6 inches above your quilt. Let the steam settle into the fabric without touching it.
This relaxes the fibers without flattening your bubbles.
Binding Considerations
Use a slightly wider binding than normal. Bubble quilts are thicker than regular quilts.
Cut your binding strips 2.75 inches wide instead of the usual 2.5 inches.
Conclusion
Bubble quilting on your machine creates stunning textured quilts that everyone will admire. The key is proper preparation, consistent technique, and patience with the learning process.
Start with simple, evenly spaced bubbles to build your skills. Once you’re comfortable with the basic technique, experiment with different sizes and arrangements.
Remember that every quilter develops their own style over time. What matters most is that you enjoy the process and feel proud of your finished quilt.
What’s the best batting thickness for bubble quilting?
Medium-loft batting works best for bubble quilting because it creates nice puffiness without being too thick to handle. Low-loft batting won’t give you enough bubble height, while high-loft can be difficult to control and may create overly dramatic bubbles.
Can I use a regular presser foot for bubble quilting?
While a darning foot or walking foot works better, you can use a regular presser foot for bubble quilting. You’ll need to work more slowly and carefully guide the fabric. The results may not be as smooth, but it’s possible for beginners who don’t have specialized feet yet.
How far apart should I space my quilting bubbles?
Space your bubbles 2-3 inches apart from center to center for the best visual effect. Closer spacing can make your quilt look crowded, while wider spacing might make the bubbles look disconnected. You can vary this slightly for artistic effect, but consistency usually looks more professional.
Why do my bubble quilts pucker around the stitched circles?
Puckering around bubbles usually happens when your thread tension is too tight or when you’re pulling the fabric while stitching. Lower your thread tension slightly and let the machine feed the fabric naturally without forcing it. Also check that your needle isn’t too large for your thread weight.
How do I fix bubbles that didn’t puff up properly?
If your bubbles are too flat, you can carefully remove some inner stitching with a seam ripper and add a small piece of batting through the opening. Then restitch the area. Prevention is easier though – make sure you’re stitching far enough from the bubble center and using adequate batting thickness.