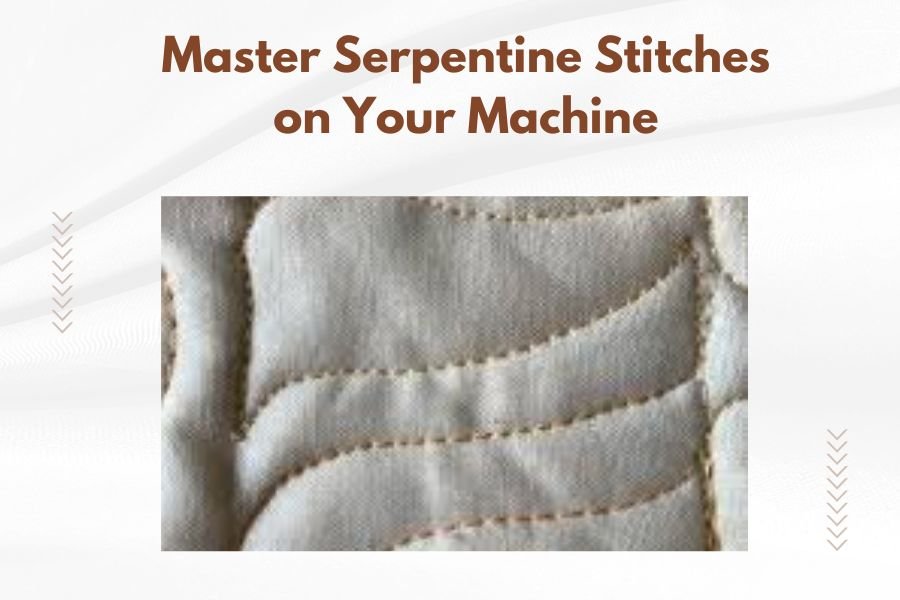
Serpentine stitches are decorative zigzag patterns that create wavy, snake-like lines on fabric using your sewing machine’s built-in stitch functions.
You can master serpentine stitches by adjusting your machine’s stitch width and length settings while maintaining steady fabric feeding for smooth, consistent curves.
What Are Serpentine Stitches
Think of serpentine stitches as the graceful cousin of basic zigzag stitches. They flow across fabric like gentle waves or a snake’s movement.
Most modern sewing machines include serpentine stitch options. You’ll find them listed as decorative stitches, often numbered between 10-25 depending on your machine model.
Common Serpentine Stitch Variations
Your machine likely offers several serpentine patterns. Here are the most popular types:
- Simple serpentine – basic wavy line
- Multi-serpentine – multiple waves stacked together
- Serpentine zigzag – combines traditional zigzag with curves
- Decorative serpentine – includes additional flourishes
Essential Machine Settings for Perfect Serpentines
Getting your settings right makes the difference between beautiful curves and messy lines. Start with these baseline settings.
Stitch Width Settings
Begin with a medium width setting around 3-4mm. This gives you visible curves without overwhelming thin fabrics.
Wider settings work great for bold decorative effects on thick fabrics like denim or canvas. Narrow widths suit delicate fabrics and subtle detailing.
Stitch Length Adjustments
Your stitch length controls how stretched or compressed the serpentine appears. Shorter lengths create tight, frequent curves. Longer lengths produce flowing, relaxed waves.
I found that most quilters prefer medium-length settings between 2-3mm for balanced results.
Testing Your Settings
Always test on fabric scraps first. Use the same fabric type and weight as your main project.
Stitch a 6-inch sample line. Does it look smooth? Are the curves even? Adjust width or length until you’re happy with the result.
Choosing the Right Thread and Needle
Your thread choice affects both appearance and stitch quality. Decorative threads make serpentines pop, while matching threads create subtle texture.
Best Thread Types for Serpentine Stitches
- Cotton thread – smooth stitching, good for beginners
- Polyester thread – strong and colorfast
- Rayon thread – adds beautiful sheen
- Metallic thread – creates sparkly effects (use metallic needles)
Needle Selection Guide
Universal needles work for most projects. Use size 80/12 for medium-weight fabrics, 70/10 for lightweight materials.
Switch to metallic needles when using metallic threads. They have larger eyes and special coatings that prevent thread shredding.
Fabric Preparation Steps
Proper fabric prep prevents puckering and ensures smooth stitch formation. These steps take extra time but save frustration later.
Stabilizing Your Fabric
Use tear-away stabilizer for woven fabrics. Cut-away stabilizer works better for knits and stretchy materials.
Place stabilizer under your fabric before stitching. This prevents the fabric from shifting during the serpentine formation.
Hooping vs. Free-Hand Techniques
Embroidery hoops keep fabric taut for precise serpentines. Position your fabric smoothly without over-stretching.
Free-hand stitching gives more flexibility but requires steady hands and consistent fabric feeding.
Step-by-Step Serpentine Stitching Process
Ready to create your first serpentine? Follow these steps for success every time.
Machine Setup
Select your serpentine stitch from the decorative stitch menu. Set width to 3mm and length to 2.5mm for your first attempt.
Thread your machine with quality thread. Wind a matching or coordinating bobbin.
Starting Your First Serpentine
Position your fabric under the presser foot. Lower the foot and needle.
Hold your fabric lightly but don’t pull or push. Let the feed dogs do the work.
Press the foot pedal gently. Start slow until you see the serpentine pattern forming correctly.
Maintaining Consistent Speed
Steady, moderate speed produces the best serpentines. Racing through creates uneven curves and tension problems.
Watch the stitch formation as you sew. You should see smooth, flowing curves without gaps or bunching.
Troubleshooting Common Serpentine Problems
Even experienced sewers face serpentine challenges. Here’s how to fix the most common issues.
Fixing Uneven or Skipped Stitches
Uneven stitches usually mean tension problems. Check your thread path and rethread completely.
Try a fresh needle. Dull or bent needles cause skipped stitches and irregular patterns.
| Problem | Likely Cause | Quick Fix |
|---|---|---|
| Puckered fabric | Too much tension | Reduce upper tension, add stabilizer |
| Loose stitches | Too little tension | Increase tension gradually |
| Thread breaking | Wrong needle or old thread | Change needle, use fresh thread |
Preventing Fabric Puckering
Puckering happens when fabric gets pulled or stretched during stitching. Use proper stabilizer and avoid pulling fabric through the machine.
Reduce presser foot pressure if your machine allows it. This helps fabric feed more naturally.
Creative Applications for Serpentine Stitches
Serpentines aren’t just pretty decorations. They serve practical and artistic purposes in many projects.
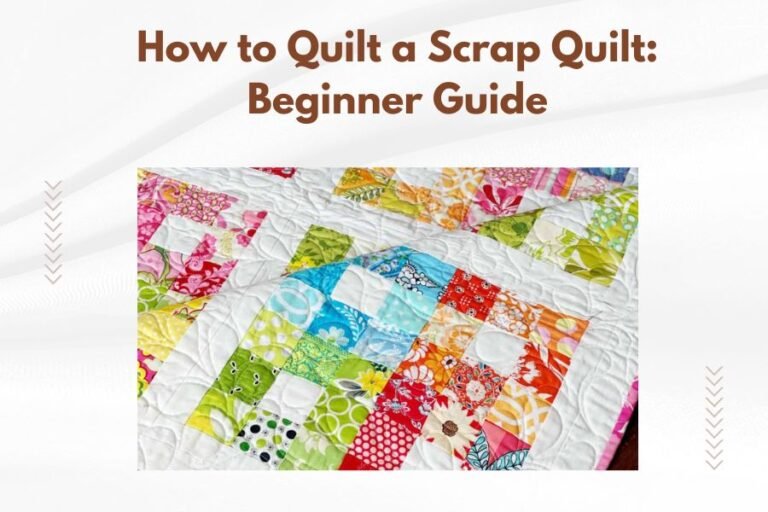
Quilting Applications
Use serpentines for border decorations on quilts. They add movement and interest without overwhelming the main design.
Try serpentines for echo quilting around appliques. The flowing lines complement curved shapes beautifully.
Garment Construction Uses
Serpentines make excellent hems on casual garments. They’re especially nice on children’s clothes and informal tops.
Use contrasting thread for bold decorative effects on pockets, cuffs, or seam lines.
Home Decor Projects
Add serpentines to curtain edges, pillow borders, or table runner hems. They bring a handmade, artisanal look to home accessories.
Combine different serpentine widths for layered effects. Stitch a narrow serpentine inside a wider one for added dimension.
Advanced Serpentine Techniques
Once you master basic serpentines, try these advanced methods for professional-looking results.
Layering Multiple Serpentines
Create complex patterns by stitching multiple serpentine lines. Use different colors or stitch widths for visual variety.
Space your lines evenly for organized patterns. Or vary spacing for organic, flowing designs.
Combining with Other Decorative Stitches
Mix serpentines with straight decorative stitches or simple zigzags. This creates unique, custom patterns.
Try stitching a serpentine, then adding small decorative stitches between the curves.
Machine-Specific Tips
Different machine brands handle serpentines slightly differently. Here’s what I found works best for popular models.
Brother Machine Settings
Brother machines typically number serpentines in the 20-30 range. Start with stitch #23 for a classic serpentine.
Brother’s automatic tension works well for most serpentines. Only adjust if you see obvious problems.
Singer Machine Adjustments
Singer machines often require slightly higher tension for clean serpentines. Start with normal tension, then increase gradually if needed.
Use Singer’s stitch guide to find serpentine options. They’re usually in the decorative stitch section.
Bernina and High-End Machine Features
Premium machines offer serpentine variations and customization options. Explore pattern elongation and width adjustment features.
Many high-end machines let you mirror or repeat serpentines automatically.
Maintenance for Better Serpentine Results
Clean machines stitch better serpentines. Regular maintenance prevents many common problems.
Cleaning Your Machine
Remove lint from the bobbin area after every project. Lint buildup affects tension and stitch formation.
Oil your machine according to the manual. Well-lubricated machines run smoother and create more even stitches.
When to Replace Needles
Change needles after every major project or 8 hours of sewing. Dull needles create problems you might blame on machine settings.
Keep different needle types on hand. Universal, metallic, and stretch needles each serve specific purposes.
Conclusion
Mastering serpentine stitches opens up a world of creative possibilities for your sewing projects. With the right settings, proper preparation, and a little practice, you’ll create beautiful flowing lines that add professional polish to everything you make.
Remember to start with simple settings and basic techniques. Test on scraps, maintain your machine, and don’t be afraid to experiment with different threads and fabrics. Soon you’ll be incorporating serpentines confidently into quilts, garments, and home decor projects.
What’s the difference between serpentine and regular zigzag stitches?
Serpentine stitches create flowing, curved lines that look like gentle waves, while zigzag stitches form sharp, angular back-and-forth patterns. Serpentines are purely decorative, whereas zigzags serve both functional and decorative purposes.
Can I use serpentine stitches on stretchy fabrics like knits?
Yes, serpentines work well on knits when you use the right stabilizer and needle. Choose a ballpoint or stretch needle and cut-away stabilizer to prevent distortion. Test your settings on fabric scraps first.
Why do my serpentine stitches look different from the manual pictures?
Stitch appearance varies based on fabric type, thread weight, and machine settings. Thick fabrics and heavy threads create bolder patterns, while thin materials and fine threads produce delicate lines. Adjust width and length to match your desired look.
How do I fix serpentines that keep jamming my machine?
Thread jams during serpentine stitching usually indicate tension problems or incorrect threading. Rethread your machine completely, check the bobbin winding, and reduce upper tension slightly. Make sure you’re using the correct presser foot for decorative stitches.
Can I create custom serpentine patterns on computerized machines?
Many computerized machines allow serpentine customization through pattern elongation, width adjustment, and mirroring functions. Some high-end models let you combine serpentines with other stitches to create unique patterns. Check your machine’s manual for specific customization options.