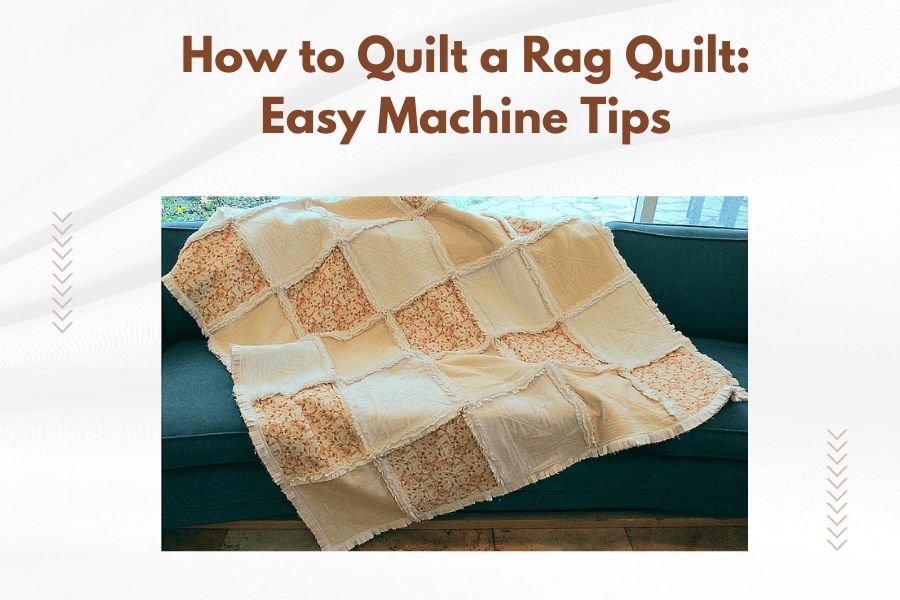
A rag quilt is sewn with raw seam edges exposed on the front, creating a cozy frayed look after washing.
Machine quilting a rag quilt involves sewing fabric squares together with seams facing outward, then clipping every half-inch before washing to create the signature fringed texture.
What Makes Rag Quilts Special
Rag quilts flip traditional quilting on its head. Instead of hiding seams, you show them off. The raw edges create soft, fluffy fringe that gets better with every wash.
I found that many quilters love rag quilts because they’re forgiving. Wonky cuts? No problem. Uneven stitching? It adds character. The messy, lived-in look is the whole point.
Essential Materials You’ll Need
Cotton flannel works best for rag quilts. It frays beautifully and feels incredibly soft. You can mix cotton and flannel, but stick to similar weights.
Fabric Requirements
For a throw-size quilt (about 60×80 inches), you’ll need roughly 4-5 yards total. Cut your fabric into squares – 6×6 inches is perfect for beginners.
Don’t worry about perfect measurements. Rag quilts are meant to be rustic and relaxed.
Tools and Supplies
- Sewing machine with new universal needle
- Rotary cutter and mat
- Sharp fabric scissors for clipping
- All-purpose thread in neutral color
- Safety pins or quilting clips
Cutting Your Fabric Squares
Speed up cutting by stacking 4-6 fabric layers. Use your rotary cutter for clean, straight lines. Remember, slight variations actually make rag quilts more interesting.
Planning Your Layout
Arrange squares on the floor before sewing. Take a photo with your phone so you remember the pattern. I found that alternating light and dark squares creates nice visual balance.
Pre-Washing Considerations
Some quilters pre-wash fabric to prevent shrinking. Others skip this step since rag quilts look better slightly puckered. Your choice depends on your final vision.
Machine Quilting Techniques
Your sewing machine is your best friend here. Set it to a straight stitch with medium length. You’ll be sewing lots of seams, so make sure you’re comfortable.
Seam Construction Method
Place two squares wrong sides together. Yes, wrong sides – this is backwards from regular sewing. Sew with a half-inch seam allowance.
The seam will show on the right side of your quilt. This creates the signature rag quilt look when you clip and wash it.
Building Rows
Sew squares into rows first, then connect the rows. This assembly-line approach saves time and keeps your squares aligned.
Chain Piecing Tip
Feed square pairs through your machine without lifting the presser foot between pieces. Cut threads later. This technique speeds up the process significantly.
Professional Assembly Tips
Work on a large, flat surface. Your dining room table works perfectly. Keep squares organized in small piles to avoid mix-ups.
Joining Rows Together
Pin rows at seam intersections before sewing. This helps squares line up better. Don’t stress about perfection – small gaps add to the homemade charm.
Handling Bulk
As your quilt grows, it gets heavy. Roll the finished portion and secure with clips. This keeps fabric out of your way while sewing.
Machine Adjustments
You might need to adjust thread tension slightly when sewing through multiple fabric layers. Test on scraps first.
The Magic of Clipping Seams
Here’s where the real work begins. Every seam needs clips every half-inch. Sharp scissors make this job much easier.
Clipping Technique
Cut perpendicular to the seam line. Stop about an eighth-inch from the stitching. You want to cut through both seam allowances without cutting the actual seam.
This step takes time. Put on a good movie or podcast. Some quilters invite friends over for “clipping parties.”
Corner Considerations
At corners where four squares meet, you’ll have thick seam intersections. Clip carefully around these areas. The bulk will flatten after washing.
Safety While Clipping
Take breaks to rest your hands. Repetitive cutting can cause strain. Sharp scissors require less pressure and reduce fatigue.
Washing and Finishing
The first wash transforms your quilt. Use warm water and regular detergent. The agitation creates beautiful frayed edges.
First Wash Guidelines
Wash alone the first time. Loose threads will fill your lint trap. Some quilters add tennis balls to increase agitation and fluffiness.
Expect some shrinkage and puckering. This is normal and desirable for rag quilts.
Drying Process
Tumble dry on medium heat. The heat and movement help create the signature frayed texture. Remove while slightly damp to prevent over-drying.
Ongoing Care
Rag quilts actually improve with washing. The fringe gets softer and more developed over time. Machine wash and dry normally.
Common Troubleshooting Issues
Every quilter faces challenges. Here are solutions to typical rag quilt problems I found through research and quilting communities.
Uneven Fraying
Some fabrics fray more than others. Cotton flannel frays beautifully, while tightly woven cotton needs more washing to develop good fringe.
Seam Separation
If seams come apart, you clipped too close to the stitching line. Reinforce with additional stitching before the next wash.
| Problem | Cause | Solution |
|---|---|---|
| Minimal fraying | Tight weave fabric | Add extra wash cycles |
| Seam failure | Clips too close | Restitch and clip further away |
| Excessive lint | Normal for first wash | Clean lint trap frequently |
Design Variations to Try
Once you master basic rag quilts, experiment with different approaches. I came across many creative variations in quilting forums.
Color Placement Ideas
Try diagonal color flows or random scrappy looks. Both approaches work beautifully with the relaxed rag quilt style.
Size Modifications
Baby quilts work great with 4-inch squares. Large bed quilts might use 8-inch squares to reduce seam clipping time.
Conclusion
Rag quilts offer the perfect introduction to machine quilting. The forgiving technique welcomes beginners while creating beautifully functional results. Your first rag quilt might not be perfect, but it will be loved.
The combination of simple construction and cozy results makes rag quilts satisfying projects. Every wash makes them softer and more beautiful. Start with a small throw size to learn the technique, then move on to larger projects as your confidence grows.
What’s the best fabric for beginners making rag quilts?
Cotton flannel works best for first-time rag quilters because it frays easily and feels incredibly soft. Choose medium-weight flannel in coordinating colors for the most success.
How long does it take to clip all the seams on a rag quilt?
Clipping takes about 3-4 hours for a throw-size quilt, depending on your speed. Many quilters spread this task over several evenings while watching television.
Can I use batting in a rag quilt?
Traditional rag quilts don’t need batting since the raw seam allowances create warmth and texture. Adding batting makes the quilt too bulky for proper fraying.
Why aren’t my seam edges fraying enough after washing?
Tightly woven fabrics need multiple wash cycles to develop good fringe. Try washing 2-3 additional times, or switch to looser weave cotton flannel for better results.
Should I backstitch at the beginning and end of seams?
Yes, always backstitch to secure seam ends. The clipping and washing process puts stress on seams, so proper reinforcement prevents unraveling beyond the intended fringe area.