Master quilting swirls on your sewing machine by adjusting your machine’s speed, using a darning foot, and moving your fabric in smooth circular motions while keeping consistent hand movements.
Start with simple spiral patterns and gradually build up to complex swirl designs as your free-motion quilting skills improve through regular practice sessions.
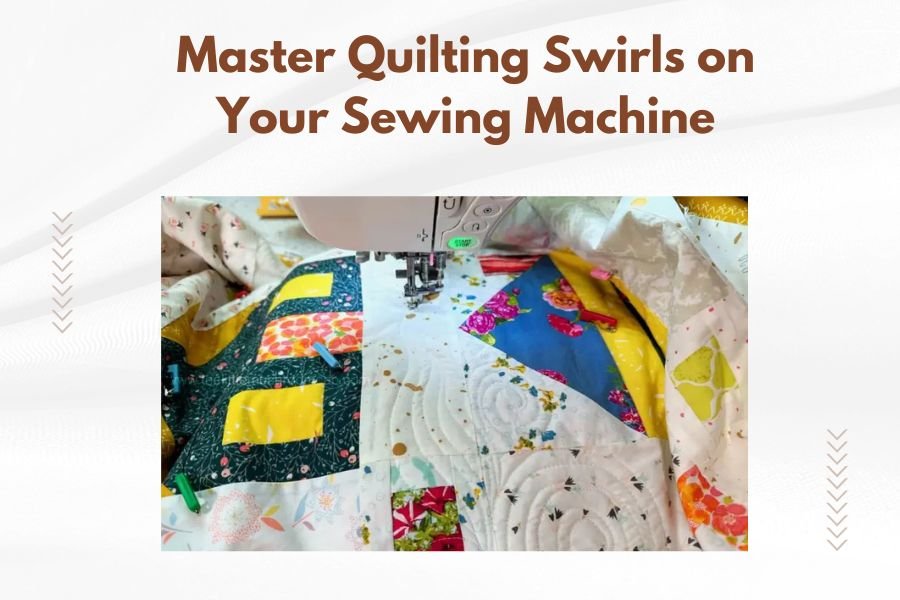
Understanding Free-Motion Quilting Swirls
Free-motion quilting swirls create beautiful flowing patterns that add texture and visual interest to your quilts. You control the fabric movement while your machine creates even stitches. Think of it like drawing with thread.
This technique requires dropping your feed dogs and using a special foot. Your hands become the guide, moving fabric in any direction you choose.
What Makes Swirls Special
Swirls work well as background fills or standalone design elements. They’re forgiving for beginners because slight imperfections look natural and intentional.
The curved lines create movement across your quilt surface. They can be tight and dense or loose and airy, depending on your design goals.
Essential Equipment for Quilting Swirls
Choosing the Right Foot
A darning foot or free-motion foot is your best friend for swirl quilting. These feet have a spring action that hops up and down with each stitch.
Some quilters prefer an open-toe darning foot for better visibility. Others like closed-toe versions for more control. Try both if you can.
Darning Foot Types
- Open-toe: Better visibility of stitching line
- Closed-toe: More fabric control and stability
- Spring-loaded: Automatically adjusts to fabric thickness
- Fixed height: Consistent pressure on fabric
Thread Selection
Cotton thread works well for most quilting projects. Choose colors that blend with your fabric or contrast for dramatic effect.
Polyester thread offers more stretch and durability. It’s great for quilts that will see heavy use or frequent washing.
Thread Weight Considerations
40-weight thread is the standard choice for quilting swirls. It’s thick enough to see clearly but won’t overwhelm your design.
50-weight thread creates finer lines and works well for detailed swirls. Use it when you want subtle texture without bold thread lines.
Machine Setup for Perfect Swirls
Adjusting Your Feed Dogs
Drop or cover your feed dogs before starting. These metal teeth normally move fabric forward, but you need full control for swirl patterns.
Check your manual if you’re unsure how to drop them. Some machines have a lever, others require removing a cover plate.
Tension Settings
Start with your machine’s normal tension setting. Make test stitches on practice fabric before working on your actual quilt.
If your top thread shows on the back, loosen the top tension slightly. If bobbin thread shows on top, tighten the top tension.
Speed Control Tips
Run your machine at medium speed when learning. Too fast makes control difficult. Too slow creates uneven stitches.
Keep your stitching speed consistent with your hand movements. This balance takes practice but creates the most even results.
Basic Swirl Techniques
Starting Your First Swirl
Place your hands on either side of the needle, forming a circle with your fingers. This gives you the best fabric control.
Start stitching and slowly move the fabric in a small circle. Keep your movements smooth and steady. Don’t jerk or stop suddenly.
Hand Positioning
Your hands should stay relaxed but firm. Tense hands lead to shaky lines and sore muscles after long quilting sessions.
Keep your fingers spread for better fabric control. Think of your hands as a quilting hoop that moves with the fabric.
Creating Consistent Curves
Focus on smooth, flowing movements rather than perfect circles. Natural variations make your swirls more interesting and organic looking.
Practice makes these movements feel natural. Start with large swirls and gradually work toward smaller, tighter curves as your confidence grows.
Spiral Technique
Begin at the center of your swirl and work outward in a spiral pattern. This approach helps maintain consistent spacing between lines.
You can also start from the outside and spiral inward. Try both methods to see which feels more comfortable for you.
Advanced Swirl Patterns
Interlocking Swirls
Create swirls that connect and overlap for complex-looking designs. Start one swirl, then begin the next where the first one ends.
This technique fills large areas beautifully. The connected pattern creates unity across your quilt surface.
Planning Your Pattern
Sketch your swirl pattern on paper first. This helps you plan the flow and connection points between individual swirls.
Mark key points on your quilt top with removable fabric markers. These guides keep your pattern consistent and balanced.
Feathered Swirls
Add small curved lines extending from your main swirl. These “feathers” create texture and visual complexity.
Work the main swirl first, then go back and add feather details. This two-step process keeps your base pattern consistent.
Feather Spacing
Keep feathers roughly the same size and spacing for the best look. Slight variations are fine and add to the handmade charm.
Echo the curve of your main swirl in each feather. This repetition creates harmony in your overall design.
Common Problems and Solutions
Uneven Stitch Length
This happens when your hand speed doesn’t match your machine speed. Practice coordinating these two movements on scrap fabric.
Consistent practice builds muscle memory. Set aside time for regular practice sessions, even just 15 minutes helps.
Speed Control Practice
Try stitching straight lines first to get comfortable with speed control. Then move to gentle curves before attempting full swirls.
Use your machine’s speed control if it has one. This feature limits maximum speed and helps maintain consistency.
Puckering Issues
Fabric puckering usually means you’re moving the fabric too slowly for your stitching speed. Speed up your hand movements slightly.
Check that you’re not pulling or pushing the fabric too hard. Let the fabric glide smoothly under the foot.
Fabric Handling
Support the weight of your quilt so it doesn’t pull against your stitching area. Use a table or quilting frame extension if possible.
Roll or fold excess fabric to keep it manageable. Large quilts can be heavy and awkward to maneuver around your machine.
Practice Exercises
Daily Warm-Up Routines
Spend five minutes drawing circles and spirals with your machine before starting your actual quilting. This warm-up improves your control and consistency.
Use different sized circles in your practice. Large circles build confidence, while small ones develop precision control.
| Exercise Type | Duration | Skill Level | Focus Area |
|---|---|---|---|
| Large spirals | 5 minutes | Beginner | Basic control |
| Connected swirls | 10 minutes | Intermediate | Pattern flow |
| Feathered designs | 15 minutes | Advanced | Detail work |
| Mixed patterns | 20 minutes | Expert | Creative flow |
Progressive Skill Building
Master simple swirls before moving to complex patterns. Each skill builds on the previous one, so don’t rush the learning process.
Keep samples of your practice work. Looking back shows your progress and motivates continued improvement.
Troubleshooting During Practice
If your swirls look wobbly, slow down your movements. Rushing leads to jerky, uneven curves that look unprofessional.
Thread breaks during practice usually mean your tension is too tight or you’re moving the fabric too quickly for the machine to keep up.
Finishing Techniques
Securing Your Stitches
End each swirl section by taking several tiny stitches in place. This secures your thread without obvious knots or thread tails.
Bring thread tails to the back and tie them off if your machine doesn’t have an automatic thread cutting feature.
Clean Thread Management
Trim excess thread tails close to the fabric surface. Long tails can show through light-colored fabrics or catch during use.
Check your work regularly for missed thread tails. It’s easier to catch and fix them during quilting than afterward.
Quality Assessment
Step back and evaluate your swirl patterns from a distance. Small imperfections that seem obvious up close often disappear in the overall design.
Look for areas where the pattern feels unbalanced or too sparse. You can always add more swirls to fill empty spaces.
Conclusion
Mastering quilting swirls takes time and practice, but the results are worth the effort. Start with basic spirals and gradually work up to more complex patterns as your skills develop. Remember that slight imperfections add character to handmade quilts.
Keep practicing regularly, even if it’s just for a few minutes each day. Your muscle memory will improve, and soon these flowing patterns will feel natural and effortless. The key is patience with yourself and consistent practice time.
How long does it take to learn quilting swirls?
Most quilters feel comfortable with basic swirls after 2-3 weeks of regular practice. Complex patterns may take 2-3 months to master, depending on how often you practice and your previous free-motion quilting experience.
Can I quilt swirls on a basic sewing machine?
Yes, any sewing machine that allows you to drop the feed dogs can handle swirl quilting. You’ll need a darning foot, but most machines work fine for this technique. High-end machines offer more features but aren’t required.
What’s the best thread for quilting swirls on dark fabrics?
Metallic or light-colored cotton threads show beautifully on dark fabrics. Silver and gold metallics add elegance, while white or cream cotton creates classic contrast. Test your choice on fabric scraps first.
Should I mark my swirl pattern before quilting?
Beginners often benefit from light marking with removable fabric markers. As your skills improve, you’ll likely prefer the freedom of unmarked, spontaneous swirls. Both approaches create beautiful results.
How do I fix uneven swirls after quilting?
You can add more quilting lines to balance uneven areas or incorporate the irregularities into your overall design. Sometimes what looks like a mistake becomes an interesting design element when viewed as part of the whole quilt.