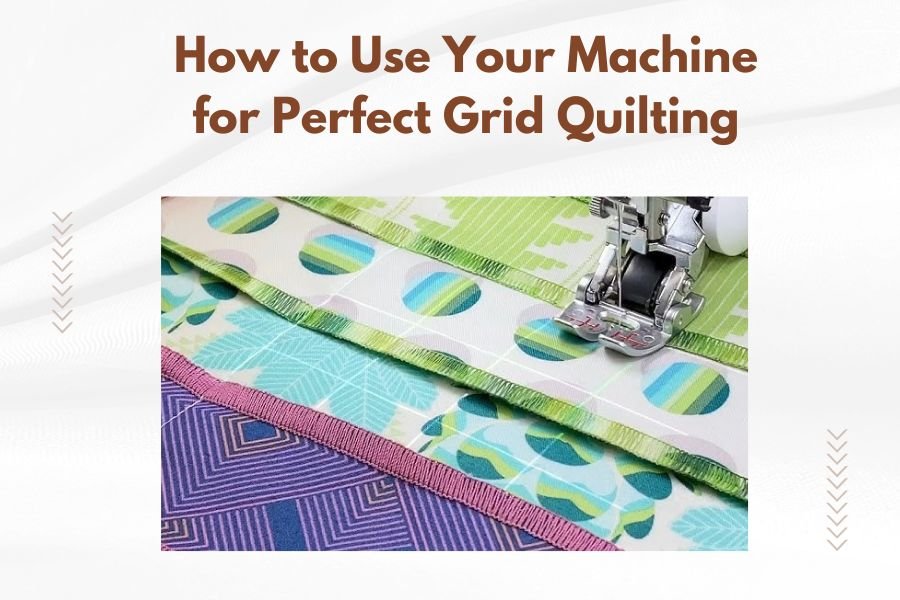
Perfect grid quilting requires setting your machine’s walking foot, adjusting stitch length to 2.5-3mm, and using quilting rulers or templates for straight, evenly-spaced lines.
Your quilting machine can create flawless grid patterns when you use the right foot, maintain consistent speed, and follow a systematic stitching approach from center outward.
Setting Up Your Machine for Grid Success
Getting your machine ready is the foundation of beautiful grid quilting. You want everything dialed in before you touch that fabric.
Choose the Right Foot
Your walking foot is your best friend here. It feeds all fabric layers evenly, preventing puckering and shifting. I found that most quilting problems start with using the wrong foot.
Some machines come with a quilting foot that works well too. Check your manual to see what works best for your specific model.
Adjust Your Stitch Settings
Set your stitch length between 2.5 and 3mm. This creates strong, visible stitches without being too dense. Longer stitches can come apart over time.
Keep your tension at normal settings first. You can adjust later if needed, but most grid quilting works fine with standard tension.
Thread Selection Made Simple
Cotton thread works great for beginners. It’s forgiving and blends well with most fabrics. Polyester thread is stronger but can be trickier to work with.
Match your thread weight to your project. 40-weight thread is perfect for most grid quilting. It’s strong enough to hold but won’t overpower your design.
Planning Your Grid Layout
Smart planning saves time and prevents mistakes. You don’t want to get halfway through and realize your grid is crooked.
Measuring and Marking Your Grid
Start by deciding your grid size. Common sizes are 1-inch, 2-inch, or 3-inch squares. Smaller grids take longer but create more texture.
Use a quilting ruler and washable fabric marker to mark your lines. Work from the center outward. This keeps everything centered and balanced.
Creating Reference Points
Mark your center point first. Then measure and mark your main horizontal and vertical lines. These become your guides for all other lines.
Double-check your measurements. A small error at the start becomes a big problem later. Take your time here.
Using Quilting Templates
Templates make marking faster and more accurate. You can buy plastic grid templates or make your own with cardboard.
Place the template on your quilt and trace around it. Move it systematically across your quilt surface.
Mastering the Stitching Process
Now comes the fun part. Your machine setup is done, your grid is marked, and you’re ready to stitch.
Starting Your First Line
Begin at the center of your quilt. This keeps your fabric from shifting unevenly as you work outward.
Lower your needle into the fabric and take a few stitches in place to lock your thread. Then follow your marked line at a steady, moderate pace.
Maintaining Consistent Speed
Slow and steady wins the race here. Fast stitching often leads to wavy lines and tension problems. Think of it like driving on ice – smooth and controlled.
I found through research that most quilting experts recommend a pace where you can easily follow your marked lines without rushing.
Handling Fabric Bulk
Large quilts get heavy and awkward. Roll the sides you’re not working on and secure them with clips. This reduces drag on your machine.
Support the weight of your quilt with a table or extension board. Don’t let it hang and pull while you’re stitching.
Troubleshooting Common Grid Problems
Even experienced quilters run into issues. Here’s how to fix the most common problems quickly.
Fixing Wavy or Crooked Lines
Wavy lines usually mean you’re going too fast or your fabric isn’t supported properly. Slow down and make sure your quilt can move freely.
Crooked lines often happen when you stop looking at your marked guidelines. Keep your eyes on the line ahead, not on your needle.
Solving Thread Tension Issues
If your top thread shows on the back, loosen your top tension slightly. If your bobbin thread shows on top, tighten your top tension a bit.
Make test stitches on scraps first. Small adjustments work better than big changes.
Dealing with Skipped Stitches
Skipped stitches often mean your needle is dull or the wrong type. Use a quilting needle designed for multiple fabric layers.
Change your needle every 8-10 hours of quilting. A fresh needle prevents many problems before they start.
Advanced Grid Techniques
Ready to take your grid quilting up a notch? These techniques add visual interest without much extra work.
Creating Diagonal Grid Patterns
Diagonal grids look more complex but follow the same basic process. Mark your lines at 45-degree angles instead of straight horizontal and vertical.
Use a quilting ruler with angle markings to keep your diagonals consistent. The effect creates diamonds instead of squares.
Varying Grid Sizes for Interest
Try mixing different grid sizes in one quilt. Use smaller grids in busy areas and larger grids where you want the fabric to show.
This technique works especially well with modern quilt designs where asymmetry is part of the appeal.
Adding Echo Lines
Echo lines are additional lines stitched parallel to your main grid. They add depth and texture without changing your basic grid structure.
Stitch your main grid first, then add echo lines about 1/4 inch away from selected grid lines.
Finishing Your Grid Quilting Project
You’re almost done, but these final steps make the difference between amateur and professional-looking results.
Securing Your Thread Ends
Pull all loose threads to the back of your quilt. Tie them off or weave them through the batting to secure them.
Don’t skip this step. Loose threads can unravel over time and ruin your beautiful grid work.
Pressing and Final Touches
Light pressing can help your grid lines lay flat and look crisp. Use a pressing cloth to protect your fabric and threads.
Steam works better than dry heat for quilted projects. The moisture helps relax the fibers without flattening your quilting too much.
Quality Check Your Work
Look over your entire quilt for any missed spots or loose threads. It’s easier to fix small issues now than later.
Check that your grid lines are evenly spaced and your stitching looks consistent throughout the project.
| Grid Size | Best For | Time Required |
|---|---|---|
| 1 inch | Small projects, heavy texture | Longest |
| 2 inch | Medium quilts, balanced look | Moderate |
| 3 inch | Large quilts, subtle texture | Fastest |
Conclusion
Grid quilting transforms ordinary quilts into textured masterpieces when you use the right techniques. Your walking foot, proper stitch settings, and systematic approach from center outward create professional results every time. Remember that consistent speed and good planning prevent most problems before they start. With practice, you’ll develop the rhythm and confidence to tackle any grid quilting project, from simple squares to complex diagonal patterns.
What’s the best grid size for a beginner quilter?
Start with 2-inch or 3-inch grids for your first projects. These sizes are forgiving, work up quickly, and let you focus on technique rather than precision marking.
Can I do grid quilting without marking the lines first?
Yes, experienced quilters often use quilting rulers or templates as guides while stitching. But marking your lines first gives much better results when you’re learning the technique.
Why does my thread keep breaking during grid quilting?
Thread breaks usually happen from old or poor-quality thread, wrong needle size, or machine tension that’s too tight. Try a fresh quilting needle and high-quality cotton thread first.
How do I quilt grids on very large quilts?
Roll or fold the areas you’re not working on and use clips to secure them. A quilting extension table helps support the weight and makes maneuvering much easier.
Should I backstitch at the beginning and end of each grid line?
Instead of backstitching, take several tiny stitches in place to lock your threads. This creates a cleaner look and reduces bulk at line intersections.