Trapunto quilting on your machine creates raised, dimensional designs by adding extra batting or stuffing between layers before quilting around the shapes.
You can master trapunto quilting techniques using any home sewing machine with the right preparation, materials, and step-by-step approach.
What Is Trapunto Quilting?
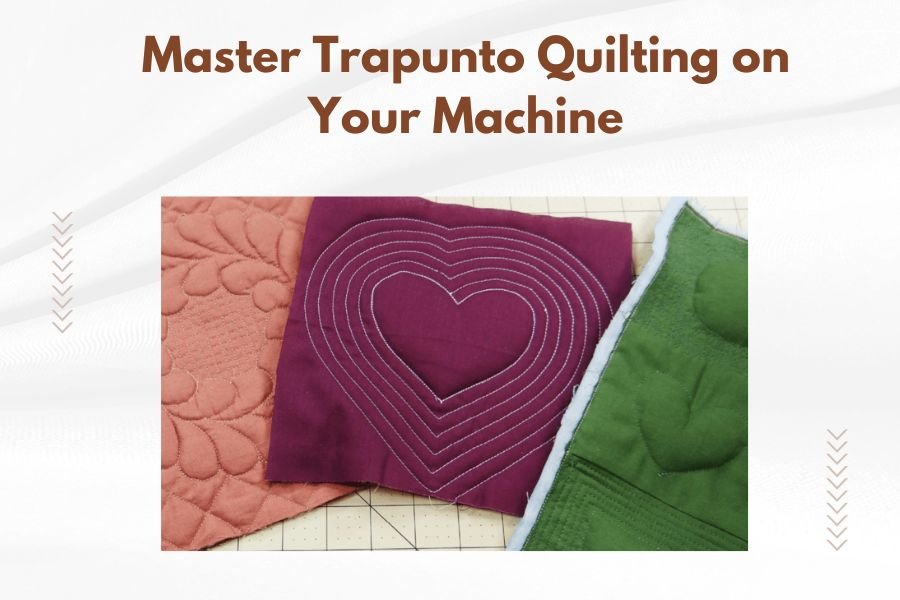
Trapunto is an Italian quilting technique that creates raised, sculptural effects on fabric. The word means “to quilt” in Italian. You make it by layering extra batting or loose stuffing in specific areas, then quilting around those sections.
Think of it like creating hills and valleys on your quilt surface. The stuffed areas puff up while the quilted areas stay flat. This contrast makes beautiful texture and visual interest.
Traditional vs. Machine Trapunto
Traditional trapunto required hand-stitching everything. That took forever. Machine trapunto gives you the same gorgeous results in much less time.
You can use your regular sewing machine. No special equipment needed. Just some patience and practice.
Essential Supplies for Machine Trapunto
Fabric Choices
Pick fabrics that show texture well. Solid colors work better than busy prints. Light colors highlight the raised areas more than dark ones.
Cotton works great for beginners. Silk and satin look amazing but need more care. Avoid thick fabrics that fight the machine.
Batting and Stuffing Materials
You need two types of batting. Regular batting goes in your quilt sandwich. Extra batting or loose polyester stuffing fills the trapunto areas.
Loose stuffing gives more control over thickness. Pre-cut batting pieces work for simple shapes. Cotton batting holds its shape well. Polyester gives more loft.
Thread and Needle Selection
Match thread color to your fabric for invisible quilting lines. Use contrasting colors to make quilting part of the design.
Size 90/14 needles handle multiple fabric layers. Quilting needles have sharp points that pierce cleanly. Change needles often when working through thick areas.
Preparing Your Design
Choosing Trapunto Patterns
Start with simple shapes like circles, hearts, or leaves. Avoid tiny details that get lost in the puffiness.
Large, smooth curves work better than sharp corners. Think about how the stuffed areas will look next to each other.
Marking Your Fabric
Use water-soluble or air-erasable markers. Test on fabric scraps first. Some markers react badly to heat from your iron.
Mark lightly. Heavy lines show through light fabrics even after washing. Stencils help keep shapes consistent.
Creating Templates
Make templates from cardboard or template plastic. Trace around them for perfect repeated shapes.
Cut templates slightly smaller than your finished trapunto area. This accounts for the fabric that gets pulled in during quilting.
Two Main Machine Trapunto Methods
Corded Trapunto Method
This method uses yarn or cord threaded through channels you create. It works great for linear designs like vines, letters, or geometric patterns.
You quilt two parallel lines, then thread cord through the channel between them. The cord pushes up the fabric strip.
Best Cord Materials
Cotton yarn works well and washes easily. Wool yarn gives more height but may shrink. Synthetic cord stays consistent but can be stiff.
Match cord thickness to your channel width. Too thick and it won’t fit. Too thin and it won’t fill the space.
Stuffed Trapunto Method
This method stuffs loose filling into enclosed shapes. It works for flowers, animals, and any shape you can outline with stitching.
You quilt around the shape outline, then add stuffing through a small opening in the backing fabric.
Step-by-Step Machine Trapunto Process
Setting Up Your Machine
Lower your feed dogs if doing free-motion quilting. Use a quilting foot or walking foot depending on your technique.
Set stitch length to 10-12 stitches per inch. Shorter stitches hold better through thick areas. Test on scraps first.
Creating the Quilt Sandwich
Layer your top fabric, batting, and backing as usual. Baste well since you’ll be handling it a lot.
Add extra batting pieces only in trapunto areas. Pin or baste them in place before quilting.
Quilting the Outline
Start quilting around your marked shapes. Go slowly through thick areas. Let the machine do the work.
Keep stitching lines smooth and even. Uneven stitching shows more in raised areas. Backstitch at start and end points.
Managing Bulk Under the Machine
Roll up the sides of your quilt to fit through your machine throat. Use quilt clips to hold rolls in place.
Support the weight of your quilt so it doesn’t drag on the machine. A table beside your machine helps.
Adding the Stuffing
For stuffed trapunto, cut a small slit in the backing fabric inside your quilted shape. Push stuffing through with a blunt tool.
Add stuffing gradually. Too much makes lumpy areas. Too little looks flat. Aim for gentle curves, not sharp peaks.
Close the slit with a few hand stitches or a small piece of fusible interfacing.
Final Quilting
Add background quilting around your trapunto areas. This makes them pop up even more.
Echo quilting works great. Quilt lines that follow your trapunto shapes at regular distances. Each line makes the center puff higher.
Troubleshooting Common Problems
Uneven Stuffing
Lumpy trapunto usually means uneven stuffing distribution. Pull some stuffing out and redistribute it.
Use a blunt knitting needle or stuffing tool to push filling into corners and curves.
Puckered Quilting Lines
Puckering happens when fabric layers shift during sewing. Baste more thoroughly next time.
Loosen your thread tension slightly. Tight tension pulls fabric and creates puckers.
Thread Breaking
Heavy areas stress your thread. Use stronger thread or slow down your sewing speed.
Check your needle. Dull needles create more friction and break thread. Change needles more often.
Advanced Trapunto Techniques
Layered Trapunto
Create different heights by varying stuffing amounts. Some areas get light stuffing, others get more.
This creates realistic shading and dimension. Flower petals can have thick centers and thin edges.
Combining Methods
Use corded trapunto for stems and stuffed trapunto for flowers. This creates complete designs with varied textures.
Plan your quilting order. Do corded areas first, then stuffed areas. This prevents distortion.
Shadow Trapunto
Use colored batting between white or light fabric layers. The colored batting shows through faintly, creating subtle color effects.
This works great for realistic designs like leaves or flowers where you want natural color variation.
Design Ideas for Machine Trapunto
Beginner Projects
Try simple shapes first. Hearts, circles, and basic flowers teach the technique without frustration.
Table runners make great first projects. They’re small enough to manage but large enough to show off your work.
Intermediate Designs
Combine multiple elements in one design. Add leaves around your flowers. Create border designs with repeating motifs.
Try alphabet letters for personalized quilts. Names or meaningful words become dimensional focal points.
Advanced Applications
Whole-cloth quilts showcase trapunto beautifully. The solid fabric background lets texture take center stage.
Portrait quilts can use trapunto for facial features. This creates incredibly realistic three-dimensional effects.
Care and Maintenance
Washing Trapunto Quilts
Wash gently in cool water. Hot water may shrink stuffing materials and flatten your trapunto areas.
Use mild detergent. Harsh chemicals can break down batting fibers over time.
Drying and Storage
Air dry when possible. High heat flattens stuffing. If using a dryer, use low heat and remove while slightly damp.
Store flat or rolled around a tube. Folding creates permanent creases in stuffed areas.
Conclusion
Machine trapunto transforms ordinary quilts into stunning three-dimensional art. You can master these techniques with practice and patience. Start with simple designs and work up to more detailed projects.
Remember that every quilter develops their own style. What works for others might not work for you, and that’s perfectly fine. The key is practicing these basic techniques until they become second nature.
Your first trapunto project might not be perfect, but it will teach you valuable lessons. Each project gets easier as you learn to manage the bulk, control your stuffing, and plan your quilting sequence.
Can I do trapunto quilting on any sewing machine?
Yes, any home sewing machine can handle trapunto quilting. You don’t need special attachments, just a walking foot or quilting foot helps manage the thick layers more smoothly.
What’s the best batting thickness for trapunto work?
Use regular loft batting for your main quilt sandwich, then add thin batting or loose stuffing only in trapunto areas. Too much batting everywhere makes the quilt difficult to handle and quilt.
How do I prevent my trapunto areas from looking flat after washing?
Use quality polyester stuffing that bounces back after washing. Avoid overstuffing, which compresses permanently. Wash in cool water and air dry when possible to maintain the dimensional effect.
Should I quilt the background before or after adding trapunto stuffing?
Quilt your trapunto outlines first, add the stuffing, then do background quilting. This sequence prevents the stuffing from shifting and makes the trapunto areas appear more raised against the quilted background.
What’s the easiest trapunto design for complete beginners?
Start with simple circles or hearts using the stuffed method. These shapes are forgiving, easy to stuff evenly, and teach you the basic techniques without complex curves or corners to navigate.