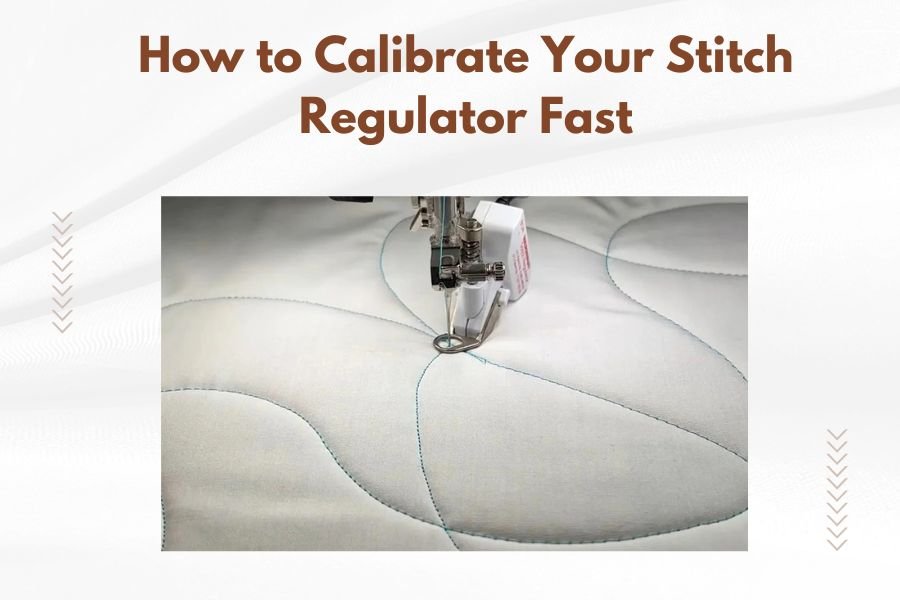
A properly calibrated stitch regulator ensures consistent stitch length by automatically adjusting your quilting machine’s needle speed to match your fabric movement speed.
You can calibrate your stitch regulator fast by measuring your actual stitches per inch, comparing them to your machine settings, then adjusting the calibration values until they match perfectly.
Does your quilting machine produce uneven stitches? You’re not alone. Many quilters struggle with stitch regulators that drift out of calibration over time.
Think of your stitch regulator like the cruise control in your car. When it works perfectly, you get smooth, consistent performance. When it’s off, the ride gets bumpy.
Let me walk you through the fastest way to get your stitch regulator back on track.
What Is Stitch Regulator Calibration
Stitch regulator calibration means teaching your machine to match stitch length with fabric movement speed. When you move fabric slowly, the machine should sew slowly. When you speed up, it should speed up too.
Your machine uses sensors to track fabric movement. These sensors send signals to control the needle speed. Calibration makes sure those signals translate into the right stitch length.
Most machines come pre-calibrated from the factory. But settings can drift over time due to normal wear, software updates, or environmental changes.
Signs Your Stitch Regulator Needs Calibration
You’ll notice these problems when calibration is off:
- Stitches per inch vary wildly across your quilt
- Tiny stitches when you move fast
- Long stitches when you move slowly
- Inconsistent stitch quality
- Machine stuttering or jerking
Some quilters ignore these signs for months. Don’t wait. Poor calibration makes every project harder than it needs to be.
Tools You Need for Fast Calibration
Essential Items
Gather these tools before you start:
- Quilting ruler with clear markings
- Practice fabric (cotton works best)
- Contrasting thread
- Seam ripper
- Small notebook or phone for notes
Optional But Helpful
These items make the process easier:
- Magnifying glass
- Good lighting or desk lamp
- Calculator
- Fabric marking pen
Step-by-Step Calibration Process
Step 1: Access Your Machine Settings
Turn on your quilting machine and navigate to the stitch regulator menu. Most machines have this under “Settings” or “Calibration.”
Look for options like “SPI Calibration,” “Stitch Length,” or “Regulator Setup.” The exact wording depends on your machine brand.
Write down your current settings before making changes. This gives you a backup if something goes wrong.
Step 2: Set Up Your Test Area
Layer practice fabric with batting and backing. Pin or baste lightly to prevent shifting.
Thread your machine with contrasting thread so stitches show clearly. Choose thread that stands out against your fabric color.
Set your desired stitches per inch (usually 10-12 SPI for quilting). This becomes your target measurement.
Step 3: Sew Test Lines
Sew several straight lines at different speeds. Keep each line at least 3 inches long for accurate measuring.
Try these speeds:
- Very slow movement
- Medium speed
- Fast movement
Mark each line so you remember which speed you used. This helps identify patterns in your calibration problems.
Step 4: Measure Your Results
Use your quilting ruler to measure exactly one inch of stitching. Count the stitches in that inch.
Record your measurements like this:
| Movement Speed | Actual SPI | Target SPI | Difference |
|---|---|---|---|
| Slow | 14 | 12 | +2 |
| Medium | 11 | 12 | -1 |
| Fast | 8 | 12 | -4 |
Step 5: Adjust Calibration Values
Return to your machine’s calibration menu. Look for numerical adjustment options.
If your stitches are too small (high SPI), increase the calibration number. If stitches are too long (low SPI), decrease the number.
Make small changes first. Try adjusting by 5-10% of the current value. Big jumps can overcorrect the problem.
Step 6: Test Again
Sew new test lines using the same speeds as before. Measure your results again.
Compare the new measurements to your target. Are you getting closer?
Repeat the adjustment process until all your test lines hit your target SPI within 1-2 stitches.
Machine-Specific Calibration Tips
Longarm Quilting Machines
Longarm machines often have more detailed calibration options. You might see separate settings for X and Y movement.
Calibrate both directions separately. Sew horizontal lines to test X-axis calibration. Sew vertical lines for Y-axis.
Some longarms let you adjust sensitivity too. Higher sensitivity means the machine reacts faster to movement changes.
Domestic Quilting Machines
Domestic machines usually have simpler calibration menus. You might only see one adjustment slider or number.
These machines work best with steady, consistent movement. Practice smooth motion while testing.
Free-motion quilting on domestic machines requires different calibration than longarm quilting.
Computerized Systems
Modern computerized systems often have automatic calibration routines. Look for “Auto Calibrate” or “Quick Setup” options.
These systems guide you through the process step by step. Follow the on-screen prompts carefully.
Manual calibration still gives you more control over the final results.
Common Calibration Mistakes to Avoid
Rushing the Measurement Phase
Take time to measure accurately. Sloppy measurements lead to poor calibration.
Count stitches twice to make sure you get the same number. Use good lighting and magnification if needed.
Making Huge Adjustments
Small changes work better than big jumps. Your machine’s calibration system is sensitive.
Change settings by small amounts, then test. This prevents overcorrection problems.
Testing on Difficult Fabric
Use simple cotton fabric for calibration. Save the fancy fabrics for actual projects.
Slippery or stretchy fabrics can skew your calibration results.
Ignoring Movement Consistency
Try to move at consistent speeds during testing. Jerky or uneven movement confuses the calibration process.
Practice smooth motion before you start measuring stitches.
Troubleshooting Calibration Problems
Calibration Won’t Hold
If settings keep drifting back to old values, check for software issues. Some machines need firmware updates to maintain calibration.
Clean your machine’s sensors too. Dust and lint can interfere with accurate readings.
Different Results Each Time
Inconsistent results usually mean mechanical problems. Check your machine’s tension and timing.
Worn parts can cause erratic stitch regulation. Schedule professional maintenance if calibration won’t stabilize.
Extreme Calibration Values Needed
If you need very high or very low calibration numbers, something else might be wrong.
Check your machine manual for normal calibration ranges. Values outside these ranges suggest hardware problems.
Maintaining Proper Calibration
Regular Testing Schedule
Test your calibration every few months. Heavy use can cause gradual drift.
Keep a simple log of your settings and test results. This helps you spot trends over time.
Environmental Factors
Temperature and humidity changes can affect calibration. Machines in unheated workshops might need more frequent adjustment.
Moving your machine to a new location often requires recalibration too.
Software Updates
Some software updates reset calibration values to factory defaults. Always test after updating your machine’s firmware.
Back up your calibration settings before any major software changes.
When to Call for Professional Help
Some calibration problems need professional attention. Call a technician if you notice:
- Calibration values outside normal ranges
- Settings that won’t save properly
- Mechanical noise during operation
- Sensor error messages
- Inconsistent results after multiple calibration attempts
Professional calibration costs less than dealing with poor stitch quality on expensive projects.
Advanced Calibration Techniques
Speed-Specific Calibration
Some quilters calibrate differently for different quilting speeds. Fast quilting might need slightly different settings than slow, detailed work.
Advanced machines let you save multiple calibration profiles. Switch between them based on your project needs.
Pattern-Specific Adjustments
Different quilting patterns might benefit from slight calibration tweaks. Curved patterns need different settings than straight lines.
Experiment with small adjustments for your favorite quilting patterns.
Final Calibration Tips
Keep your calibration simple and consistent. Perfect calibration matters less than consistent quilting technique.
Document your settings and process. Good records save time when you need to recalibrate later.
Practice smooth, consistent movement. Even perfect calibration can’t fix jerky quilting motion.
Remember that calibration is a tool, not a magic fix. Good quilting still requires skill and practice.
Conclusion
Calibrating your stitch regulator doesn’t have to take all day. With the right tools and systematic approach, you can get consistent stitches in under an hour.
Remember to measure carefully, make small adjustments, and test thoroughly. Your quilts will show the difference immediately.
Regular calibration maintenance keeps your machine performing at its best. Set up a simple testing schedule and stick to it.
Now you have the knowledge to keep your stitch regulator working perfectly. Your future quilting projects will thank you for the time you spend getting this right.
How often should I calibrate my stitch regulator?
Test your calibration every 2-3 months with regular use, or whenever you notice inconsistent stitch lengths. Machines used heavily or in changing environments may need monthly checks.
Can I calibrate my stitch regulator on any fabric?
Use medium-weight cotton fabric for most accurate calibration results. Avoid slippery, stretchy, or heavily textured fabrics during the calibration process as they can give false readings.
What if my machine doesn’t have a calibration menu?
Older machines might have physical adjustment screws or dials instead of digital menus. Check your owner’s manual for the location of these mechanical adjustments, or contact your dealer for guidance.
Why does my calibration change after cleaning my machine?
Cleaning can remove buildup from sensors or slightly shift mechanical components. Always test and recalibrate after deep cleaning or professional servicing to ensure optimal performance.
Should different thread weights affect my calibration settings?
Thread weight has minimal impact on stitch regulator calibration, but very thick or thin threads might require slight adjustments. Test with your most commonly used thread weight for best overall results.