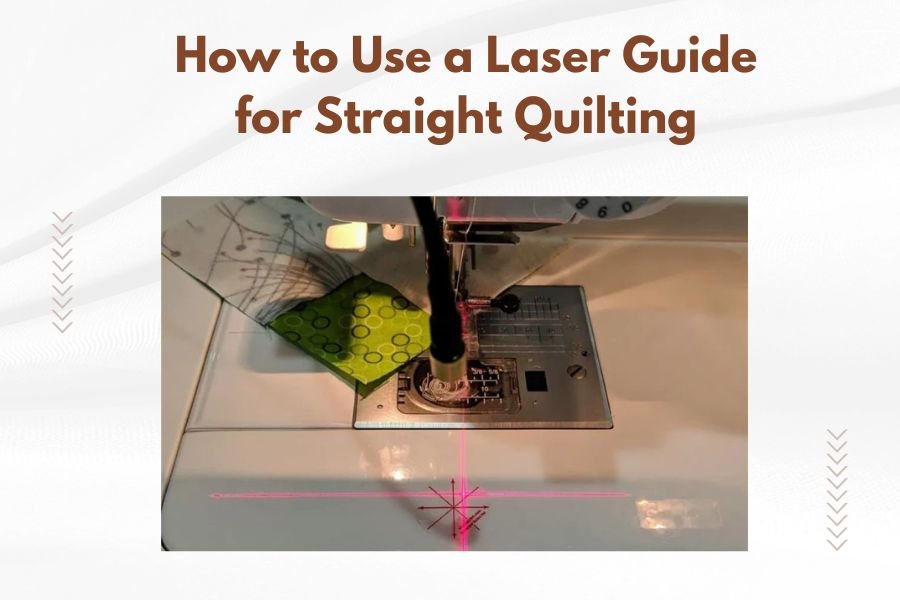
A laser guide for straight quilting works by projecting a straight line of light onto your fabric, giving you a visual reference to follow while sewing. Position the laser guide on your quilting machine according to manufacturer instructions, turn it on, and align your fabric edge with the projected line as you quilt.
Most laser guides attach to the needle area or throat plate of your quilting machine and can be adjusted for different seam allowances and quilting patterns.
What Is a Laser Guide and Why Do You Need One?
Think of a laser guide as your quilting GPS. Just like GPS keeps you on track while driving, a laser guide keeps your stitching perfectly straight.
You know that frustrating moment when you’re halfway through a long quilting line and realize you’ve veered off course? A laser guide prevents that heartbreak. It projects a bright, thin line of light that serves as your roadmap.
I found that many quilting experts recommend laser guides for both beginners and seasoned quilters. The tool eliminates guesswork and reduces eye strain from constantly checking your seam allowances.
Benefits of Using a Laser Guide
Your quilting accuracy improves dramatically with a laser guide. No more wobbly lines or uneven borders that make you want to start over.
Speed is another major advantage. You can quilt faster when you’re confident about your direction. Your eyes stay focused on the laser line instead of jumping between the fabric edge and needle.
- Perfect seam allowances every time
- Reduced fabric waste from cutting mistakes
- Less shoulder and neck tension from hunching over your work
- Professional-looking results on complex patterns
Types of Laser Guides Available
Laser guides come in several styles, each designed for different quilting needs and machine types.
Magnetic Laser Guides
These attach directly to your machine’s metal surfaces using strong magnets. They’re popular because they don’t require permanent installation.
Magnetic guides work well on most machines, but check that your machine has enough metal surface area near the needle. Some newer machines use more plastic components.
Clamp-On Laser Guides
Clamp-on models grip onto your machine’s throat plate or other edges. They offer more flexibility in positioning compared to magnetic types.
I researched and found that clamp-on guides typically provide better stability for heavy-duty quilting projects.
Built-In Laser Systems
High-end quilting machines sometimes include factory-installed laser guides. These integrate seamlessly with your machine’s controls.
Built-in systems often offer multiple laser lines and can be programmed for different quilting modes.
Setting Up Your Laser Guide
Proper setup makes the difference between a helpful tool and a frustrating gadget. Let’s walk through the process step by step.
Safety First
Always turn off your quilting machine before installing any laser guide. Never look directly into the laser beam, even though quilting lasers are typically low-power.
Keep the laser away from children and pets. The bright light can be distracting or harmful if misused.
Choosing the Right Position
Position matters more than you might think. The laser should project onto your fabric at the exact distance you want to maintain from your needle.
For standard quarter-inch seam allowances, position the laser guide so the line appears exactly 1/4 inch from your needle. Use a quilting ruler to measure this distance accurately.
Common Position Mistakes
Many quilters place the laser too far from the needle. This creates parallax errors – the laser line looks different depending on your viewing angle.
Another mistake is mounting the laser too high or too low. The laser beam should hit your fabric at a slight angle, not straight down.
Testing Your Setup
Before starting your actual project, test your laser guide setup on fabric scraps. Sew a few straight lines while following the laser guide.
Measure your seam allowances with a ruler. Are they consistent? If not, adjust the laser position until you get perfect results.
Using Your Laser Guide for Different Quilting Techniques
Different quilting styles require slightly different approaches with your laser guide. Let’s break down the most common techniques.
Straight-Line Quilting
This is where laser guides really shine. Whether you’re doing echo quilting, crosshatching, or simple parallel lines, the laser keeps everything perfectly aligned.
Start at one edge of your quilt and align that edge with the laser line. Keep the fabric edge touching the laser line as you sew across the entire quilt.
Maintaining Consistent Speed
Smooth, consistent speed helps you follow the laser line more accurately. Jerky starts and stops make it harder to stay on track.
Practice maintaining steady pressure on your machine’s speed control. Many quilters find that medium speeds work best for laser-guided quilting.
Border Quilting
Borders need to look professional, and laser guides make this achievable for any skill level. Position your border fabric so one edge aligns with the laser line.
For multiple border strips, use the laser guide to maintain consistent distances between each strip. This creates that polished, store-bought appearance.
Free-Motion Quilting with Laser Assistance
You might think laser guides only work for straight lines, but they can help with free-motion work too. Use the laser as a reference point for maintaining consistent spacing between design elements.
When quilting feathers or other flowing designs, the laser line can help you keep your overall pattern alignment correct.
Troubleshooting Common Laser Guide Problems
Even the best tools sometimes act up. Here are solutions to the most common laser guide issues.
Laser Line Appears Dim or Invisible
Check your batteries first – this fixes most visibility problems. Some laser guides have adjustable brightness settings that might need tweaking.
Room lighting affects laser visibility too. Bright overhead lights can wash out the laser line. Try adjusting your workspace lighting or repositioning your machine.
Laser Line Wobbles or Moves
Loose mounting causes wobbly laser lines. Check all clamps, magnets, or screws holding your laser guide in place.
Machine vibration can also cause laser movement. Some quilters place rubber mats under their machines to reduce vibration transfer to the laser guide.
Inaccurate Seam Allowances
If your finished seams don’t match your intended measurements, recalibrate your laser position. Use a quilting ruler to verify the distance from needle to laser line.
Remember that thick batting or multiple fabric layers can affect how your seam allowances turn out. Test on your actual project materials, not just single fabric layers.
Maintaining Your Laser Guide
Proper maintenance keeps your laser guide working reliably for years. These tools are generally low-maintenance, but they do need some care.
Cleaning the Laser Lens
Fabric dust and lint can accumulate on the laser lens, making the beam dim or fuzzy. Clean the lens gently with a soft, dry cloth.
Avoid harsh cleaners or wet cloths that might damage the laser housing. A clean lens produces the sharpest, brightest line.
Battery Management
Remove batteries if you won’t use your laser guide for extended periods. This prevents battery corrosion that can damage the internal components.
Keep spare batteries handy. Nothing’s more frustrating than a dead laser guide in the middle of a quilting session.
Advanced Tips for Laser Guide Success
Once you’re comfortable with basic laser guide use, these advanced techniques can take your quilting to the next level.
Using Multiple Reference Points
Some quilters use rulers or other straight edges alongside their laser guides. This creates multiple reference points for extra accuracy on large projects.
You can also mark key points on your quilt with removable fabric markers, then use the laser guide to connect these points perfectly.
Adjusting for Fabric Thickness
Thick batting or multiple layers change how your seam allowances work out. The laser line position might need slight adjustment for different project thicknesses.
Keep notes about successful laser positions for different types of projects. This saves setup time on future quilts.
Creating Consistent Quilting Density
Use your laser guide to maintain consistent spacing between quilting lines. This creates even quilting density across your entire project.
Measure and mark your desired spacing, then use the laser to replicate that spacing throughout your quilt.
| Quilting Style | Recommended Laser Position | Best Techniques |
|---|---|---|
| Straight Line | 1/4″ from needle | Follow fabric edge along laser |
| Echo Quilting | Desired echo distance | Use previous stitch line as guide |
| Border Work | Border width measurement | Align outer fabric edge with laser |
| Crosshatch | Grid spacing distance | Alternate directions for each pass |
Choosing the Right Laser Guide for Your Machine
Not all laser guides work with every quilting machine. Here’s how to pick the right one for your setup.
Compatibility Considerations
Check your machine’s manual or manufacturer website for recommended laser guides. Some brands work better with specific machine models.
Measure the available space around your needle area. Some machines have limited mounting options due to their design.
Power and Brightness Options
Brighter lasers cost more but work better in well-lit rooms. Consider your typical quilting environment when choosing brightness levels.
Battery life varies significantly between models. Rechargeable options save money long-term if you quilt frequently.
Budget vs. Features
Basic laser guides start around $30 and work fine for most quilting needs. Premium models with multiple lines or adjustable brightness cost $100 or more.
Consider how often you’ll use the laser guide. Occasional quilters can do well with basic models, while daily quilters benefit from premium features.
Safety Considerations
Laser guides are generally safe, but following basic safety guidelines protects you and others in your workspace.
Eye Protection
Never stare directly into the laser beam. While quilting lasers are low-power, direct eye contact can still be harmful.
Position the laser so it points away from your normal sitting position. The beam should hit your fabric, not shine toward your face.
Child and Pet Safety
Turn off laser guides when children or pets are in your sewing room. The bright light can be tempting to look at directly.
Store your laser guide in a safe place when not in use. Many models have safety switches or covers to prevent accidental activation.
Conclusion
A laser guide transforms your quilting accuracy and confidence. This simple tool eliminates guesswork, reduces mistakes, and helps you achieve professional-looking results on every project.
Start with basic straight-line techniques and gradually work up to more complex applications. Remember that proper setup and positioning make all the difference in getting great results.
With practice, following a laser guide becomes second nature. Your quilting will be more accurate, faster, and far more enjoyable. The investment in a quality laser guide pays off quickly through better results and less frustration.
How do I know if my quilting machine can use a laser guide?
Most quilting machines can accommodate laser guides through magnetic or clamp-on attachments. Check your machine manual or contact the manufacturer to confirm compatibility. Look for metal surfaces near the needle area for magnetic guides, or suitable edges for clamp-on models.
Can I use a laser guide with free-motion quilting?
Yes, laser guides can help with free-motion quilting by providing reference lines for spacing and alignment. While you won’t follow the laser line directly like in straight quilting, it helps maintain consistent spacing between design elements and keeps your overall pattern aligned.
What should I do if my laser line keeps moving while I quilt?
Moving laser lines usually indicate loose mounting or machine vibration. Tighten all clamps or check magnet contact points. Consider placing a rubber mat under your machine to reduce vibration, and ensure your work surface is stable and level.
How bright should my laser guide be?
Choose brightness based on your workspace lighting. Dimmer lasers work fine in low-light conditions, while brighter lasers are necessary in well-lit rooms. Many quilters prefer adjustable brightness options to accommodate different lighting conditions throughout the day.
Do I need special thread or needles when using a laser guide?
No special thread or needles are required when using laser guides. The laser only provides visual guidance and doesn’t interact with your thread or needle. Use whatever thread and needle combination works best for your specific quilting project and fabric types.