Stitch in the ditch means quilting directly on top of the seam lines where fabric pieces join together, creating invisible stitches that secure your quilt layers.
This technique works by hiding your quilting thread in the “ditch” or groove created by pressed seams, making it perfect for beginners who want professional-looking results.
What Is Stitch in the Ditch Quilting?
Think of stitch in the ditch like following a path that’s already there. When you piece your quilt top, seams create natural grooves. You stitch right in those grooves.
The beauty lies in its simplicity. Your stitches disappear into the seam line. No fancy patterns needed. No worrying about perfect spacing.
Most quilters use this technique for their first few quilts. It builds confidence while keeping all three layers secure.
Why Choose This Method?
You get several benefits with this approach. First, it’s nearly impossible to mess up the design. The seam lines guide your stitching path.
Second, it works on any quilting machine. You don’t need special feet or expensive equipment.
Third, it’s fast. You follow existing lines instead of marking new ones.
Tools You Need to Get Started
Getting the right tools makes this technique much easier. I found through research that having proper equipment prevents most common problems.
Essential Machine Accessories
A walking foot is your best friend here. This foot feeds all quilt layers evenly through the machine. Without it, layers can shift and pucker.
Many experts recommend starting with a walking foot before trying free-motion quilting. It gives you control and prevents fabric from bunching.
Needle Selection
Use a size 90/14 quilting needle for most projects. Cotton batting works well with universal needles too.
For thicker batts, try a size 100/16 needle. It punches through layers more easily.
Thread Choices
Cotton thread blends beautifully with cotton fabrics. Choose colors that match your seam lines for true invisibility.
Polyester thread is stronger but can create slight shine. Some quilters love this effect.
Workspace Setup
Clear a large flat surface near your machine. Quilts get heavy and bulky quickly.
Support the weight with tables or chairs on both sides of your machine. This prevents pulling and distortion.
Step-by-Step Technique Guide
Let’s walk through the actual process. Take your time with each step. Rushing leads to wonky stitches.
Preparing Your Quilt Sandwich
Start with your backing fabric face-down on a flat surface. Smooth out all wrinkles.
Add batting next. Make sure both backing and batting extend 2-3 inches beyond your quilt top on all sides.
Place your pressed quilt top face-up on the batting. All seams should be pressed consistently in the same direction.
Basting Methods
Pin basting works well for beginners. Use curved safety pins every 4-5 inches across the entire quilt.
Spray basting is faster but permanent. Many quilters prefer pins because they can reposition if needed.
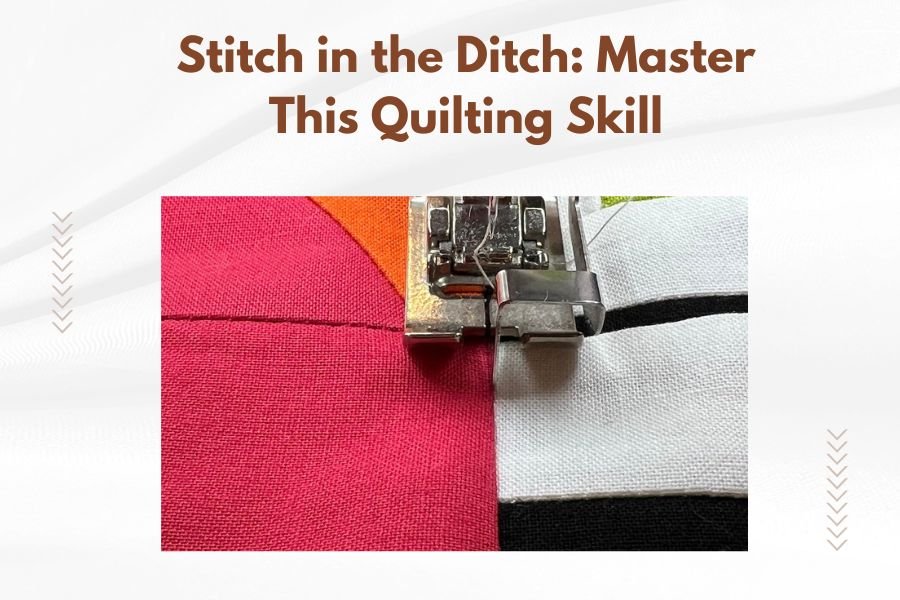
Finding the Ditch
Look closely at your seam lines. You’ll see a slight valley where pieces join together. That’s your ditch.
Press seams toward the darker fabric when possible. This creates deeper ditches that hide stitches better.
Starting Your First Line
Begin in the center of your quilt and work outward. This prevents bunching and puckering.
Drop your needle into the ditch. Lower your presser foot. Take a few small stitches to lock the thread.
Machine Settings for Success
Your machine settings can make or break this technique. I researched common problems and found most stem from wrong settings.
Stitch Length Adjustments
Use slightly longer stitches than normal sewing. About 8-10 stitches per inch works well.
Shorter stitches can perforate your fabric. Longer stitches might not hold batting securely.
Tension Considerations
Start with normal tension settings. Test on a small sandwich first.
If top thread shows on the back, reduce upper tension slightly. If bobbin thread shows on top, increase upper tension.
Speed Control
Go slow at first. Racing through creates uneven stitches and skipped spots.
Consistent moderate speed gives you better control than stopping and starting frequently.
Common Mistakes and How to Avoid Them
Everyone makes mistakes learning this technique. Here are the most common ones I found quilters struggle with.
Stitching Off the Line
This happens when you stop watching the needle. Keep your eyes on the needle tip, not the presser foot.
If you drift off the seam line, don’t panic. Stop, lift the foot, and reposition. Take a few backstitches to secure.
Fixing Wonky Lines
Small deviations usually aren’t noticeable in the finished quilt. Don’t rip out every imperfect stitch.
Major wandering needs fixing. Carefully remove stitches with a seam ripper and try again.
Puckering Problems
Puckering means layers aren’t feeding evenly. Check your walking foot attachment first.
Too much pressure can also cause puckering. Lighten your presser foot pressure if possible.
Batting Bunching
This usually happens with inadequate basting. Add more pins in problem areas.
Sometimes batting shifts during quilting. Stop and rebaste loose sections.
Advanced Stitch in the Ditch Tips
Once you master basic technique, these tips will improve your results even more.
Planning Your Quilting Path
Map out your stitching route before starting. This prevents getting trapped in corners.
Quilt longest lines first. Then add shorter connecting lines.
Combining with Other Techniques
Stitch in the ditch anchors your quilt. Then add decorative quilting in open areas.
This combination gives you structural security plus visual interest.
Working with Different Seam Allowances
Quarter-inch seams create narrow ditches. Half-inch seams create wider ditches that hide stitches better.
Adjust your seam allowances during piecing if you plan to stitch in the ditch.
Handling Intersections
Seam intersections get bulky. Slow down and take your time through these areas.
Sometimes you need to stitch around bulk rather than over it. That’s perfectly fine.
Troubleshooting Guide
When things go wrong, stay calm. Most problems have simple solutions.
| Problem | Likely Cause | Solution |
|---|---|---|
| Skipped stitches | Wrong needle or dull needle | Change to fresh quilting needle |
| Thread breaking | Tension too tight or old thread | Reduce tension or replace thread |
| Fabric puckering | No walking foot or poor basting | Attach walking foot, rebaste |
| Uneven stitches | Inconsistent speed | Practice steady moderate speed |
When to Take Breaks
Large quilts are marathons, not sprints. Take breaks every 30-45 minutes.
Your shoulders and back will thank you. Plus, fresh eyes catch mistakes better.
Finishing Your Quilted Project
After completing all your stitch in the ditch lines, step back and admire your work. You’ve just completed professional-looking quilting.
Trimming and Binding
Trim excess batting and backing, leaving enough for your chosen binding method.
Your quilt is now ready for binding and final finishing touches.
Conclusion
Mastering stitch in the ditch opens doors to successful quilting. This technique gives you confidence, teaches machine control, and creates beautiful finished quilts. Start with small projects to build your skills. Soon you’ll be tackling larger quilts with ease. Remember, every expert quilter started exactly where you are now. Your first attempts might not be perfect, but each project teaches you something new. Keep practicing, stay patient, and enjoy the journey of creating something beautiful with your own hands.
What’s the difference between stitch in the ditch and outline quilting?
Stitch in the ditch goes directly on the seam line, while outline quilting stitches about 1/4 inch away from seams. Outline quilting is more visible and adds a shadow effect around each piece.
Can I use stitch in the ditch with curved seams?
Yes, but go very slowly around curves. The walking foot handles gentle curves well. For tight curves, you might need to switch to free-motion quilting for better control.
Should I backstitch at the beginning and end of each line?
Use tiny lock stitches instead of backstitching. Set your stitch length very short for the first few stitches, then return to normal length. This secures thread without creating bulk.
How do I handle seams that were pressed open instead of to one side?
Pressed-open seams don’t create a clear ditch. You can still quilt along the seam line, but your stitches will be more visible. Consider using matching thread color.
What if my quilt design has no clear seam lines to follow?
You can create your own “ditches” by quilting 1/4 inch inside borders or sashing strips. This gives you straight guidelines while maintaining the invisible effect of traditional stitch in the ditch.