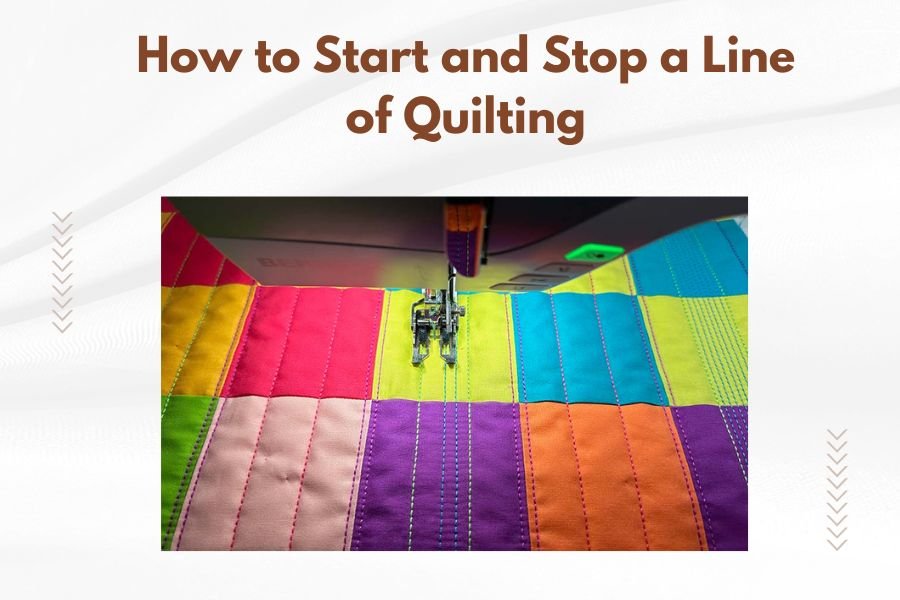
To start a line of quilting, position your quilt sandwich under the needle, lower the presser foot, and begin stitching slowly while guiding the fabric smoothly.
To stop a line of quilting cleanly, complete your stitch line, raise the needle to its highest position, lift the presser foot, and carefully pull the quilt away before trimming threads.
What You Need Before Starting Your First Quilting Line
Getting ready to quilt feels exciting, doesn’t it? But before you press that foot pedal, let’s make sure you have everything set up properly.
Your quilt sandwich needs to be smooth and secure. This means your quilt top, batting, and backing should lie flat without wrinkles or bubbles. Think of it like making a perfect sandwich – every layer matters.
Essential Setup Steps
First, check your needle. A dull or bent needle creates uneven stitches and can damage your fabric. I found that quilting needles work better than regular sewing needles because they’re designed to pierce through multiple layers.
Next, choose the right thread tension. Most quilting machines work well with tension set between 3 and 4. Too tight, and your fabric puckers. Too loose, and your stitches look messy.
Thread Selection That Makes a Difference
Cotton thread remains the top choice for most quilters. It’s strong, doesn’t stretch much, and comes in countless colors. Polyester thread works too, but some quilters find it creates more lint.
Match your top and bobbin thread colors, or use a neutral color that blends with your quilt. This small detail makes your finished project look professional.
The Right Way to Start Your Quilting Line
Ready to begin? Here’s where many beginners make their first mistake. They rush into stitching without proper preparation.
Positioning Your Quilt Correctly
Place your quilt sandwich under the needle where you want to start. The needle should be about 1/4 inch from your starting edge, not right at the corner.
Lower your presser foot before you start stitching. This step seems obvious, but you’d be surprised how often people forget it. A raised presser foot means uneven stitches and potential fabric jams.
The First Few Stitches Matter Most
Start with your machine set to a slow speed. Many quilting machines have a speed control feature. Use it. Racing through your first few stitches often leads to crooked lines or bunched fabric.
Take three to four stitches, then stop with your needle down. Check that your stitches look even and your fabric layers aren’t shifting. This quick pause saves you from ripping out bad stitches later.
Securing Your Starting Point
Some quilters backstitch to secure their starting point. Others prefer to leave long thread tails and tie them off later. Both methods work well. Choose what feels comfortable to you.
If you backstitch, keep it short – just three or four stitches back and forward. Long backstitches create thick spots that show through your quilt top.
Maintaining Smooth Stitching Throughout Your Line
Now that you’re stitching, how do you keep that line straight and even? This part separates beginners from experienced quilters.
Hand Positioning for Better Control
Place your hands on either side of the needle, about 6 to 8 inches away. Your hands should guide the fabric, not push or pull it. Let the machine’s feed dogs do most of the work.
Keep light pressure on the fabric. Pressing too hard creates drag and can bend your needle. Think of your hands as gentle guides, not heavy anchors.
Speed Control for Consistent Results
Consistent speed produces consistent stitches. Many quilters find a moderate pace works best – not so slow that stitches become uneven, but not so fast that they lose control.
Research shows that maintaining steady rhythm helps create more uniform stitch length. Practice finding your comfortable speed on scrap fabric first.
Dealing with Thick Seams
When you hit a thick seam intersection, slow down even more. These spots can cause your needle to bend or break if you rush through them.
Some quilters use a hump jumper tool to help their presser foot glide over thick spots. Others simply go extra slow and let the machine work through the layers gradually.
How to Stop Your Quilting Line Properly
Stopping might seem simple, but doing it wrong can mess up your entire line of quilting. Here’s the right way to finish.
Planning Your Stopping Point
Don’t just stop anywhere. Plan to stop at logical points like seam intersections or pattern breaks. This makes your quilting look intentional rather than random.
As you approach your planned stopping point, slow down gradually. Sudden stops can cause your last few stitches to bunch up or become uneven.
The Final Stitches
When you’re ready to stop, complete your current stitch. Don’t stop with the needle halfway through the fabric – this can leave holes or weak spots.
Raise the needle to its highest position using your hand wheel if necessary. This ensures you won’t pull thread through the fabric when you move your quilt.
Securing Your End Point
Like starting, you have options for securing your end point. You can backstitch a few stitches, or leave thread tails to tie off later.
If you choose to backstitch, keep it short and neat. Long backstitches at the end look just as bad as they do at the beginning.
Removing Your Quilt from the Machine
This final step prevents damage to your work and keeps your machine running smoothly.
Lifting the Presser Foot
Always lift your presser foot before moving your quilt. This releases tension on the fabric and prevents stretched or damaged stitches.
Pull your quilt away from the machine gently. Yanking it can bend your needle or damage your last few stitches.
Thread Management
Leave about 4 to 6 inches of thread tail when you cut your threads. This gives you enough length to tie off or weave in ends later.
Cut both the top and bobbin threads close to your quilt, but not so close that they might pull out during handling.
Cleaning Up Loose Threads
Remove any loose threads from your work area before starting your next line. These can get caught in your next stitching line and create problems.
| Step | What to Do | Why It Matters |
|---|---|---|
| Start | Position needle 1/4″ from edge | Prevents edge fraying |
| Begin | Stitch slowly for first few stitches | Ensures straight line start |
| Continue | Maintain steady speed and light hand pressure | Creates even stitches |
| Stop | Complete stitch with needle up | Prevents thread pulling |
| Finish | Lift presser foot before moving quilt | Protects final stitches |
Common Problems and Quick Fixes
Even experienced quilters run into issues sometimes. Here are the most common problems and how to fix them quickly.
Stitches That Look Uneven
Uneven stitches usually mean your speed isn’t consistent. Practice maintaining the same pace throughout your stitching line.
Thread tension problems also cause uneven stitches. If your top thread shows on the back of your quilt, loosen the top tension slightly.
Fabric That Bunches or Puckers
Bunching often happens when you push or pull the fabric instead of guiding it gently. Let your machine do the work.
Check that your quilt layers are smooth before you start. Wrinkles in your backing or batting create puckers that show on your quilt top.
Thread That Keeps Breaking
Old or poor-quality thread breaks more often. Replace thread that’s been sitting in sunlight or humid conditions for long periods.
A bent or dull needle also causes thread breaks. Change your needle every 8 to 10 hours of quilting time, or sooner if you hit pins.
Tips for Smoother Quilting Lines
Want to take your quilting to the next level? These tips help create professional-looking results.
Mark Your Lines Beforehand
For straight-line quilting, use a ruler and water-soluble marker to draw your stitching lines. This removes guesswork and helps you stitch confidently.
Quilting templates work well for curved or decorative lines. Place them on your quilt top and trace around them lightly.
Use Your Machine’s Features
Many modern sewing machines have a needle-down feature. This keeps your needle in the fabric when you stop, making it easier to pivot or adjust your fabric position.
Walking feet help feed thick quilt layers evenly. If your machine has one, use it for straight-line quilting.
Practice Makes Perfect
Before quilting your masterpiece, practice starting and stopping on scraps. Make a small quilt sandwich from leftover fabric and batting.
Try different quilting patterns and speeds. The more you practice, the more natural these movements become.
When to Take Breaks
Quilting requires focus and steady hands. Taking regular breaks helps maintain quality and prevents fatigue-related mistakes.
Signs You Need a Break
If your stitching lines start wandering or your thread keeps breaking, you might be tired. Step away from your machine for a few minutes.
Shoulder or neck tension also signals it’s time for a break. Quilting should be enjoyable, not painful.
Conclusion
Starting and stopping quilting lines properly makes the difference between amateur-looking and professional results. Remember to position your quilt carefully, start slowly, maintain consistent speed, and stop with intention. These basic skills form the foundation for all your future quilting projects. With practice, these steps become second nature, and you’ll find yourself quilting with confidence and precision. Take your time, be patient with yourself, and enjoy the process of creating something beautiful with your own hands.
How long should I make my stitching lines when quilting?
Keep stitching lines manageable – usually no longer than what feels comfortable to guide smoothly. For most quilters, this means lines of 12 to 18 inches work well before stopping and repositioning.
Should I tie off threads or backstitch when starting and stopping?
Both methods work well. Backstitching is faster but can create thick spots that show through thin fabrics. Tying off takes more time but gives you cleaner results, especially on light-colored quilts.
What causes my quilting lines to curve when I want them straight?
Curved lines usually result from uneven fabric feeding or inconsistent hand guidance. Make sure your quilt layers are smooth, use even pressure with your hands, and consider using a walking foot for better fabric control.
How do I know if my thread tension is correct for quilting?
Proper tension shows balanced stitches with threads meeting in the middle of your quilt sandwich. If you see top thread on the back or bobbin thread on top, adjust your tension dial gradually until stitches look even on both sides.
Can I quilt without marking my stitching lines first?
Yes, many quilters stitch without marking, especially for straight lines using their machine’s seam guides or edge of the presser foot as reference points. Free-form quilting also doesn’t require marking, though beginners often find light marking helpful for confidence.