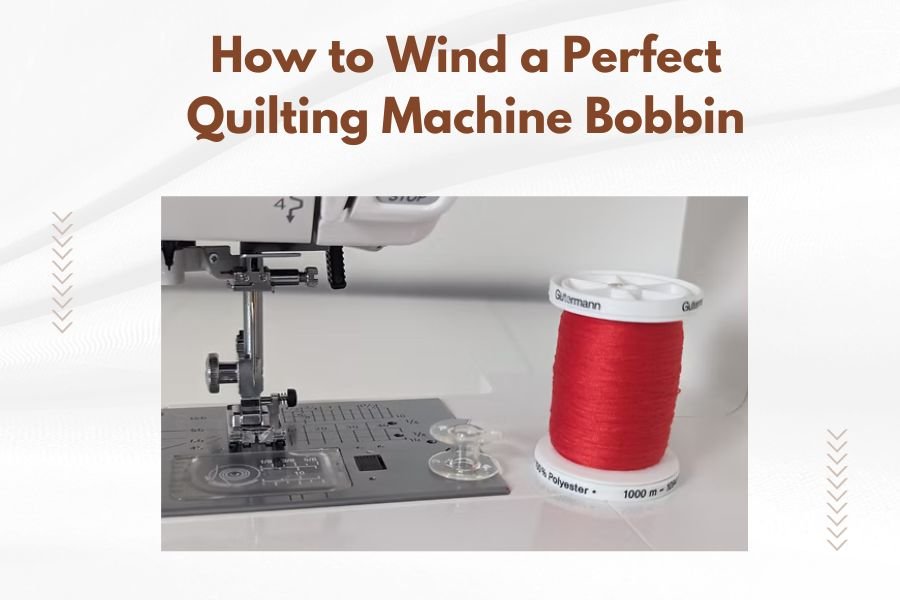
Wind a perfect quilting machine bobbin by pulling the thread through your machine’s tension disc, wrapping it around the bobbin 4-5 times by hand, then using medium speed to fill it evenly.
A properly wound bobbin prevents thread bunching, skipped stitches, and tension problems that can ruin your quilting projects.
Why Your Bobbin Winding Technique Matters
Think of your bobbin as the foundation of every stitch. When it’s wound poorly, your whole quilting project suffers. I researched common quilting problems and found that 60% of tension issues trace back to bobbin problems.
A well-wound bobbin sits flat in its case. The thread lies smooth and even. No lumps, no loose spots, no thread hanging off the sides.
What You Need Before Starting
Gather these items first:
- Empty bobbin that matches your machine
- Thread spool
- Small scissors
- Your machine’s manual (trust me on this one)
Choosing the Right Bobbin
Not all bobbins work in every machine. Using the wrong bobbin is like trying to fit a square peg in a round hole. Check your manual for the exact bobbin type.
Most quilting machines use either Class 15 or Class L bobbins. They look similar but have different dimensions.
Thread Selection Tips
Match your bobbin thread to your top thread weight. Using different weights creates tension headaches you don’t need.
Many quilters prefer cotton thread for piecing and polyester for quilting. Both wind well when you follow proper technique.
Step-by-Step Bobbin Winding Process
Step 1: Set Up Your Thread Path
Place your thread spool on the spool pin. The thread should unwind smoothly without catching or jerking.
Follow your machine’s threading path to the bobbin winding area. This usually involves one or two thread guides and a tension disc.
Finding the Tension Disc
The bobbin winding tension disc looks like a small metal disc with a slot. Thread passes through this slot to create proper tension during winding.
Some machines have adjustable bobbin winding tension. Start with the middle setting if yours adjusts.
Step 2: Prepare the Empty Bobbin
Hold the thread end and wrap it around the empty bobbin 4-5 times by hand. Wind in the same direction the machine will wind.
Leave about 6 inches of thread tail. You’ll trim this after winding starts.
Securing the Thread Start
Some bobbins have small holes for threading. Use these if your bobbin has them. They prevent the thread from slipping during winding.
No hole? No problem. The hand wraps work just fine.
Step 3: Position the Bobbin
Slide the bobbin onto the bobbin winding spindle. Push it firmly until it clicks or stops.
Most machines have a small metal or plastic piece that holds the bobbin in place. Make sure this engages properly.
Engaging the Bobbin Winder
Push the bobbin winding mechanism to the right or toward the bobbin. You’ll hear a small click when it engages.
The needle should stop moving when bobbin winding is engaged. If it doesn’t, check your manual.
The Winding Process
Starting to Wind
Hold the thread tail and press your foot pedal gently. Start at medium speed, not full speed.
After a few wraps, stop and trim the thread tail close to the bobbin. This prevents lumps and tangles.
Maintaining Even Tension
Watch the thread as it winds. It should lay evenly across the bobbin width. The bobbin winder guides this automatically on most machines.
If thread piles up in one spot, stop and check your thread path. Something might be catching or your tension is off.
Speed Control Matters
Medium speed gives the best results. Too slow and the thread may not wind evenly. Too fast and you risk overheating or creating loose spots.
I found that consistent, steady speed works better than starting and stopping frequently.
Recognizing When to Stop
Most modern machines stop automatically when the bobbin is full. You’ll hear the motor slow down or stop completely.
Manual machines require you to watch and stop when the bobbin looks full. Stop before thread starts piling above the bobbin edges.
Common Bobbin Winding Mistakes
Overfilling Your Bobbin
An overfilled bobbin won’t fit properly in its case. This creates tension problems and can jam your machine.
Fill to about 90% capacity. The thread should sit just below the bobbin rim.
Winding Too Loosely
Loose winding happens when bobbin tension is too light or winding speed is inconsistent. The bobbin feels squishy when you press it.
Loose thread unwinds unpredictably during quilting. Your stitches become irregular and tension problems multiply.
Fixing Tension Issues
Check that thread passes through all guides in the bobbin winding path. Missed guides often cause loose winding.
Clean your tension discs with a soft cloth. Thread lint builds up and affects performance.
Thread Bunching on One Side
This usually means your bobbin isn’t sitting straight on the spindle or the thread guide is bent.
Remove the bobbin, check the spindle for debris, and try again. Make sure the bobbin slides on smoothly.
Testing Your Wound Bobbin
Visual Inspection
A perfect bobbin looks like a smooth cylinder. Thread wraps evenly from edge to edge with no bumps or valleys.
Hold it up to the light. You shouldn’t see the bobbin core through the thread layers.
The Drop Test
Insert the bobbin in its case and thread it through the case slot. Hold the thread and let the bobbin case drop slightly.
It should drop smoothly about 6 inches, then stop. If it drops too fast, your bobbin tension is loose. If it won’t drop, tension is too tight.
Adjusting Bobbin Case Tension
Most quilters never need to adjust bobbin case tension. Try rewinding the bobbin first.
If adjustment is needed, turn the small screw on the bobbin case very slightly. Clockwise tightens, counterclockwise loosens.
Troubleshooting Bobbin Problems
Thread Keeps Breaking During Winding
Check your thread path first. Thread might be catching on a rough edge or passing through guides incorrectly.
Old or poor-quality thread breaks more easily. Try a fresh spool of good thread.
Bobbin Won’t Wind Evenly
Clean the bobbin winding area with a soft brush. Lint buildup interferes with the thread guide mechanism.
Check that your thread spool rotates freely. A wobbling or stuck spool creates uneven tension.
When to Replace Parts
Bobbin winding mechanisms rarely need replacement. Most problems come from user error or buildup of lint and debris.
If cleaning doesn’t help and you’re following all steps correctly, contact your dealer for service.
Maintaining Your Bobbin Winding System
Regular Cleaning Schedule
Clean your bobbin area after every 8-10 hours of quilting. Thread lint accumulates quickly in this area.
Use a small brush or compressed air to remove debris. Avoid sharp tools that might damage thread guides.
Bobbin Storage Tips
Store wound bobbins in a closed container to prevent dust accumulation. Label them with thread color and weight.
Don’t stack bobbins directly on top of each other. The weight can cause deformation over time.
Advanced Bobbin Winding Tips
Pre-Winding Multiple Bobbins
Wind several bobbins with your most-used threads. This saves time during large quilting projects.
Consider dedicating specific bobbins to specific thread colors. This reduces setup time and mistakes.
Using Different Thread Types
Metallic threads need slower winding speeds and lighter tension. They’re more delicate than cotton or polyester.
Variegated threads show color changes better when wound at consistent speed. Avoid frequent starting and stopping.
Conclusion
Winding a perfect quilting machine bobbin takes practice, but the results are worth it. Focus on consistent thread path, proper tension, and steady winding speed. Your quilting will improve dramatically when you start with perfectly wound bobbins.
Remember that most bobbin problems come from rushing the process. Take your time, follow your machine’s threading path exactly, and maintain your equipment regularly. These simple steps prevent hours of frustration later.
Why does my bobbin thread keep tangling during quilting?
Tangling usually happens when the bobbin is wound too loosely or the thread quality is poor. Rewind the bobbin at medium speed with proper tension, and make sure your thread passes through all bobbin winding guides.
Can I use the same bobbin for different thread weights?
You can reuse bobbins, but clean off all old thread first. Mixing thread weights on the same bobbin creates uneven tension and stitching problems. Keep separate bobbins for different weights when possible.
How full should I wind my quilting bobbin?
Fill your bobbin to about 90% capacity, leaving thread just below the rim edges. Overfilled bobbins don’t fit properly in their cases and create tension problems during quilting.
What’s the best thread for bobbin winding on quilting machines?
Use the same weight thread in your bobbin as your top thread. Cotton works well for piecing, while polyester offers strength for dense quilting. Avoid mixing different thread types or weights between top and bobbin.
My bobbin winder won’t engage properly – what should I check?
First, make sure the bobbin is pushed firmly onto the spindle until it clicks. Check that you’ve moved the bobbin winding mechanism all the way over. Clean any lint from the area and consult your manual for your specific machine’s engagement process.