A faulty quilting machine USB port can be fixed by checking connection cables, updating drivers, cleaning the port, or replacing damaged hardware components.
Most quilting machine USB port issues stem from loose connections, outdated drivers, or debris blocking the port connection.
Quick Steps to Diagnose Your USB Port Problem
Before you panic about expensive repairs, let’s figure out what’s actually wrong. Your quilting machine’s USB port might seem broken, but often it’s just a simple fix waiting to happen.
Start by wiggling the USB cable gently while it’s connected. Does the connection flicker on and off? That tells you the port itself might be loose.
Visual Inspection First
Grab a flashlight and look inside the USB port. You’re checking for bent pins, dust buildup, or any obvious damage. I found that many quilting machine owners skip this step and miss obvious problems.
Bent pins look like tiny metal pieces that don’t line up straight. Dust appears as gray or black specks inside the port opening.
Test With Different Cables
Swap out your USB cable for a different one. This simple test eliminates cable problems from your troubleshooting list.
Try the original cable with another device too. If it works elsewhere, your quilting machine port needs attention.
Software Solutions That Actually Work
Many USB port problems aren’t hardware issues at all. Your computer might not recognize the quilting machine because of software glitches.
Update Your USB Drivers
Windows and Mac computers need current drivers to talk with quilting machines. Outdated drivers cause connection failures that look like hardware problems.
On Windows, right-click “This PC” and select “Manage.” Click “Device Manager” and look for your quilting machine under “Universal Serial Bus controllers.”
Right-click your machine’s name and choose “Update driver.” Let Windows search automatically for updated software.
Mac Driver Updates
Mac users can check the App Store for quilting software updates. Many machine manufacturers bundle driver updates with their design software.
You can also visit your machine manufacturer’s website directly. Download the latest drivers for your specific model.
Reset USB Power Management
Windows sometimes puts USB ports to sleep to save power. This feature can interfere with quilting machine connections.
Go back to Device Manager and find “Universal Serial Bus controllers.” Right-click each “USB Root Hub” entry and select “Properties.”
Click the “Power Management” tab and uncheck “Allow the computer to turn off this device to save power.”
Hardware Cleaning and Repair Methods
Now let’s get our hands dirty with the physical fixes. Most quilting machine USB ports collect lint, thread bits, and dust over time.
Safe Cleaning Techniques
Turn off your quilting machine and unplug it completely. Safety first when working with electronic ports.
Use compressed air to blow out loose debris. Hold the can upright and use short bursts. Don’t tip the can sideways or you’ll spray liquid into the port.
Deep Cleaning Methods
For stubborn buildup, try a dry cotton swab. Gently insert it into the port and rotate to collect dust and lint.
Never use liquid cleaners directly in the port. If you need moisture, barely dampen the cotton swab with isopropyl alcohol first.
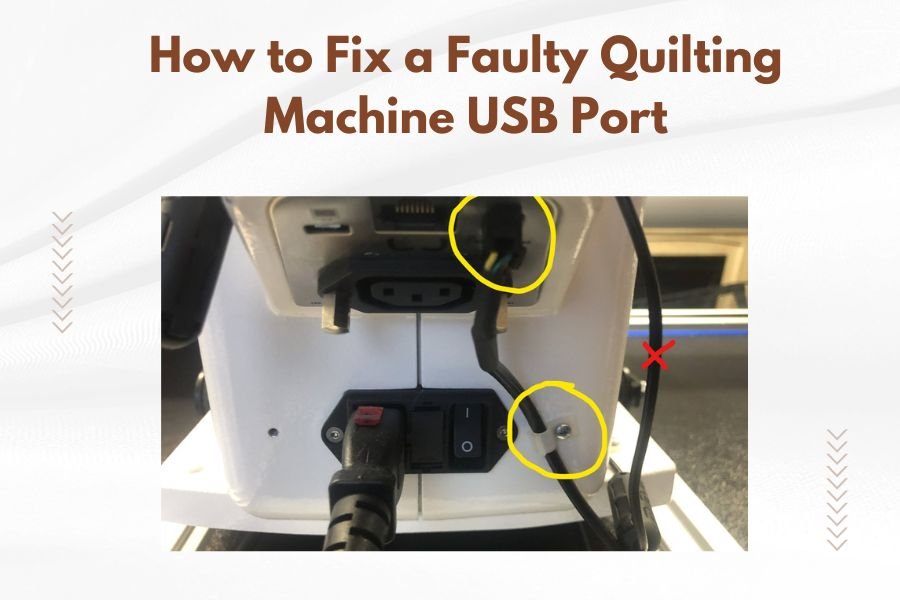
Fixing Loose Connections
A wobbly USB port often means the internal mounting has come loose. This happens with heavy use over time.
You’ll need to remove your machine’s side panel to access the port mounting. Check your owner’s manual for the correct screws to remove.
Tightening Internal Mounts
Look for small screws or clips holding the USB port to the circuit board. Tighten them gently with a small screwdriver.
Don’t over-tighten. Plastic housings can crack if you apply too much pressure.
When to Replace the USB Port
Sometimes the port itself is beyond repair. Here’s how to know when replacement is your best option.
Signs You Need a New Port
Bent pins that won’t straighten out mean replacement time. Cracked plastic housing around the port also signals replacement needs.
If cleaning and tightening don’t solve connection problems, the internal wiring might be damaged.
Professional vs DIY Replacement
Replacing a USB port requires soldering skills and electronic knowledge. Most quilting machine owners should leave this job to professionals.
Contact your machine manufacturer’s service department first. They can provide original replacement parts and certified repair technicians.
Cost Considerations
Professional USB port replacement typically costs between $75 and $150. Compare this to your machine’s value before deciding.
Older machines might not justify expensive repairs if newer models offer better features at reasonable prices.
Prevention Tips for Future Problems
Let’s keep your repaired USB port working smoothly for years to come. A little prevention saves major headaches later.
Proper Cable Handling
Always grab the USB connector itself when unplugging, not the cable. Pulling on cables stresses the port connections.
Avoid bending or twisting the cable near the connector. This area takes the most stress during normal use.
Storage Best Practices
Wind USB cables loosely when storing them. Tight coils create memory that puts stress on connectors.
Store cables in dust-free containers or bags. This prevents debris from transferring to your machine’s port.
Regular Maintenance Schedule
Clean your USB port monthly with compressed air. This simple step prevents most connection problems.
Check for software updates quarterly. Manufacturers release driver updates that improve stability and compatibility.
| Problem Type | Quick Fix | Time Required | Success Rate |
|---|---|---|---|
| Loose Cable | Try Different Cable | 2 minutes | High |
| Driver Issues | Update Drivers | 10 minutes | High |
| Dust/Debris | Compressed Air | 5 minutes | Medium |
| Loose Port | Tighten Mounting | 30 minutes | Medium |
| Damaged Port | Professional Repair | 1-2 weeks | High |
Alternative Connection Methods
While you’re fixing your USB port, you might need backup ways to transfer designs to your quilting machine.
Memory Cards and USB Sticks
Many modern quilting machines accept SD cards or USB flash drives. These bypass the built-in USB port completely.
Transfer your designs from computer to memory card, then insert the card into your machine. This method works great for temporary solutions.
Wireless Transfer Options
Some high-end quilting machines offer WiFi connectivity. You can send designs wirelessly from your computer or tablet.
Check your machine’s manual for wireless setup instructions. This feature might be available but not activated yet.
Troubleshooting Common Error Messages
Your computer might display confusing error messages when the USB port acts up. Let’s decode the most common ones.
“Device Not Recognized” Errors
This message usually means driver problems or power issues. Try updating drivers first, then check your USB cable.
Windows might also show this error if the port doesn’t provide enough power. Try a different USB port on your computer.
“USB Device Malfunction” Messages
Malfunction errors often point to hardware problems. Start with cable replacement, then move to port cleaning.
If the error persists after these fixes, professional repair might be needed.
Understanding USB Port Types
Different quilting machines use various USB connector types. Knowing yours helps with replacement and troubleshooting.
USB-A vs USB-B Connectors
Most quilting machines use USB-B ports (square shape) while computers have USB-A ports (rectangular). You need a USB-A to USB-B cable.
Some newer machines use mini-USB or micro-USB connectors. These are smaller but work the same way.
USB Version Differences
USB 2.0 and USB 3.0 ports are backward compatible. A USB 2.0 quilting machine works fine with USB 3.0 computer ports.
Transfer speeds don’t matter much for quilting designs since the files are usually small.
Conclusion
Fixing a faulty quilting machine USB port doesn’t have to be scary or expensive. Start with simple solutions like checking cables and updating drivers. Most problems resolve quickly with basic troubleshooting.
Clean your port regularly and handle cables gently to prevent future issues. When hardware replacement becomes necessary, weigh repair costs against your machine’s value. Professional repair ensures proper installation and continued reliability.
Remember that alternative connection methods can keep you quilting while repairs happen. Memory cards and wireless transfers offer backup solutions for urgent projects.
Why does my quilting machine USB port work sometimes but not others?
Intermittent connections usually indicate a loose port mounting or worn cable. The connection works when positioned just right but fails when moved slightly. Check cable connections first, then inspect the port mounting screws.
Can I use any USB cable with my quilting machine?
No, you need the correct connector types on both ends. Most quilting machines require USB-A to USB-B cables, but some newer models use mini-USB or micro-USB connectors. Check your machine’s manual for the exact cable type needed.
How do I know if the problem is my computer’s USB port or my quilting machine’s port?
Test your quilting machine with a different computer or laptop. If it works on another computer, your original computer’s port or drivers need attention. If it fails on multiple computers, the quilting machine port is likely the problem.
Is it safe to use compressed air on my quilting machine’s USB port?
Yes, compressed air is safe when used properly. Keep the can upright, use short bursts, and make sure your machine is turned off and unplugged. Never use compressed air while the machine is powered on or connected to your computer.
What should I do if my quilting machine is under warranty and has USB port problems?
Contact your manufacturer’s customer service immediately and avoid attempting repairs yourself. Warranty coverage typically includes USB port problems caused by manufacturing defects. DIY repair attempts might void your warranty protection.