Replacing a broken thread tension spring requires turning off your quilting machine, removing the tension assembly, and carefully installing the new spring in the same position as the old one.
You’ll need basic tools like screwdrivers and needle-nose pliers, plus about 30 minutes to complete this repair that can save you hundreds in professional service fees.
What Is a Thread Tension Spring and Why Does It Break
Your quilting machine’s thread tension spring controls how tightly the thread gets pulled through the fabric. Think of it like the brakes on your car – it provides just the right amount of resistance.
When this tiny but mighty component breaks, your stitches become loose, uneven, or completely wonky. You might notice loops on the bottom of your fabric or threads that seem to have a mind of their own.
Common Signs Your Thread Tension Spring Needs Replacement
How do you know if the tension spring is the culprit? Here are the telltale signs:
- Stitches look loose or baggy on one side
- Thread keeps breaking even with proper threading
- You hear unusual clicking or grinding sounds
- The tension dial feels loose or doesn’t respond
I found that most tension spring failures happen after years of heavy use or when quilters accidentally over-tighten the tension dial.
Tools and Materials You’ll Need
Before you start this repair, gather these items. Trust me, having everything ready makes the job much smoother.
Essential Tools
- Small Phillips head screwdriver
- Flathead screwdriver (tiny one works best)
- Needle-nose pliers
- Tweezers for handling small parts
- Good lighting or desk lamp
Replacement Parts
You’ll need the correct tension spring for your specific machine model. Check your manual or look for the part number on the broken spring if possible.
Many quilting experts recommend buying two springs at once. That way, you have a backup ready if the other side fails later.
Safety Precautions Before Starting
Safety first, right? These steps might seem obvious, but they prevent accidents and protect your machine.
Power and Setup Safety
Always unplug your quilting machine completely. Don’t just turn it off – pull that cord out of the wall.
Work in a well-lit area where you won’t lose tiny screws. I learned this the hard way when I spent 20 minutes crawling around looking for a spring that rolled under my sewing table.
Protecting Your Machine
Place a soft towel under your work area to catch falling parts. Take photos with your phone as you disassemble – these will be lifesavers when putting everything back together.
Step-by-Step Replacement Process
Ready to fix this? Let’s walk through each step carefully. Don’t rush – this isn’t a race.
Step 1: Access the Tension Assembly
Look for the tension dial on your machine’s front or side. You’ll typically see a numbered dial that you turn to adjust thread tension.
Remove any decorative covers or panels that block access to the tension mechanism. Most machines have 2-3 screws holding these covers in place.
Locating Hidden Screws
Some manufacturers hide screws under stickers or rubber plugs. Gently peel back any covering to find all attachment points.
Keep your removed screws in a small bowl. You’ll thank yourself later when you’re not hunting for them.
Step 2: Remove the Tension Dial
The tension dial usually pulls straight off or unscrews counterclockwise. Some models have a small set screw on the side that you need to loosen first.
Once the dial comes off, you should see the tension assembly underneath. This looks like a small metal sandwich with the spring inside.
Dealing with Stuck Dials
If the dial won’t budge, don’t force it. Spray a tiny amount of penetrating oil around the base and wait 10 minutes.
Research shows that forcing stuck parts causes more damage than the original problem (Sewing Machine Repair Association).
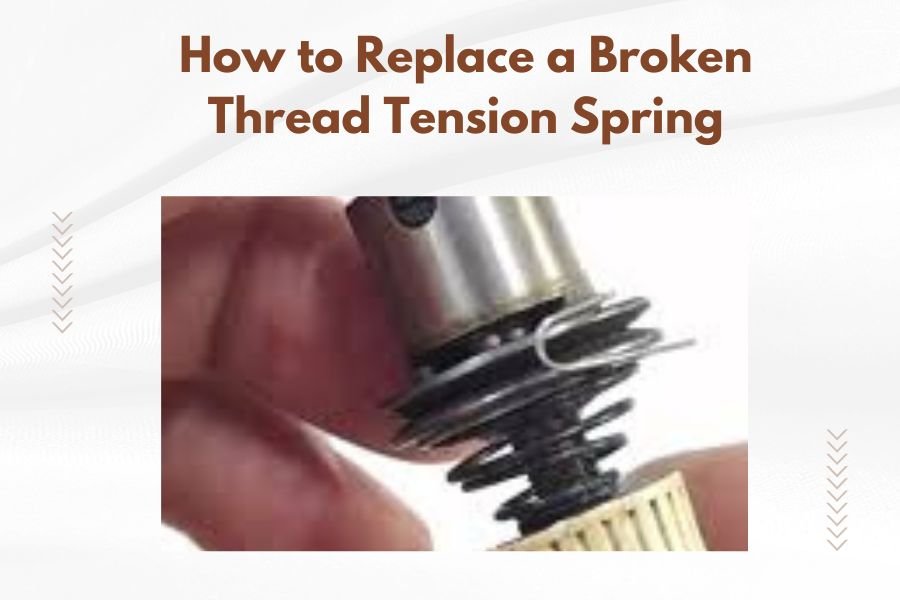
Step 3: Disassemble the Tension Unit
Now comes the delicate part. The tension assembly consists of several small discs held together by the spring and a central post.
Carefully remove the outer disc or cover. The broken spring should be visible now, probably looking sad and twisted.
Keeping Track of Part Order
As you remove each piece, lay them out in order on your towel. This creates a visual map for reassembly.
Some tension assemblies have washers or spacers between the discs. Don’t lose these tiny but important pieces.
Step 4: Remove the Broken Spring
The old spring might come out easily, or it could be wound around other parts. Use your needle-nose pliers to grip it gently.
Sometimes broken springs leave small metal fragments behind. Check carefully and remove any debris with tweezers.
Inspecting for Additional Damage
While you have everything apart, look for worn discs or damaged threads on the central post. If other parts look questionable, now’s the time to replace them too.
Installing the New Thread Tension Spring
Time to put in your shiny new spring. This part requires patience and steady hands.
Proper Spring Orientation
Thread tension springs have a specific direction they need to face. The spring’s ends usually hook into small notches or slots in the tension discs.
Compare your new spring to the photos you took of the old one. The coil direction and end positions must match exactly.
Spring Installation Technique
Start by hooking one end of the spring into place. Then compress the spring slightly while positioning the other end.
Don’t overcompress the spring. You want just enough pressure to hold it in position while you work.
Reassembling the Tension Unit
Now you reverse the disassembly process. Place each disc and washer back in the exact order you removed them.
The tension discs should move smoothly against each other with spring pressure between them. If something feels wrong, stop and double-check your assembly.
Testing Spring Function
Before reinstalling everything, manually test the tension action. Press the discs together and release – they should spring back apart smoothly.
Reassembly and Testing
You’re in the home stretch now. Let’s put your machine back together and see how it works.
Reinstalling Components
Replace the tension dial and any covers you removed. Tighten screws snugly but don’t overtighten – you could strip the threads.
Plug your machine back in and turn it on. Listen for any unusual noises that might indicate a problem.
Initial Thread Test
Thread your machine with contrasting thread colors on top and bottom. This makes it easier to see tension issues.
Start with the tension dial set to your machine’s recommended middle setting, usually around 4 or 5.
Test Stitch Evaluation
Sew a few straight stitches on scrap fabric. Perfect tension shows the top and bottom threads locking together in the middle of the fabric layers.
If you see loops on top, decrease the top tension. Loops on the bottom mean you need to increase top tension.
Troubleshooting Common Issues
What if your repair didn’t go perfectly? Don’t panic – these problems have solutions.
Tension Still Not Working Properly
Double-check that you installed the spring in the correct orientation. Even experienced repair technicians sometimes get this backwards on the first try.
Make sure all washers and spacers went back in their original positions. One misplaced washer can throw off the entire tension mechanism.
Unusual Noises After Repair
Clicking or grinding sounds usually mean something isn’t seated properly. Turn off the machine and recheck your assembly.
Sometimes a tiny bit of old spring or debris gets left behind. This creates noise and can damage other parts over time.
When to Seek Professional Help
If you’ve tried the repair twice and still have issues, it might be time to call a professional. Some machines have additional complications that aren’t obvious to home repair folks.
I found that most quilting machine repair shops charge $80-120 for tension spring replacement, including parts and labor.
Preventing Future Spring Failures
Want to avoid doing this repair again anytime soon? Here’s how to baby your tension system.
Proper Tension Dial Usage
Never force the tension dial past its normal range. Those numbers exist for a reason, and going beyond them stresses the spring unnecessarily.
When adjusting tension, make small changes – quarter turns rather than full rotations. This gives you better control and reduces wear.
Regular Maintenance Schedule
Clean around your tension assembly monthly with a soft brush or compressed air. Lint and thread fragments can interfere with smooth operation.
Annual professional servicing helps catch small problems before they become expensive repairs.
Thread Quality Considerations
Cheap or old thread creates more friction and debris in your tension system. Quality thread costs more upfront but saves money on repairs.
| Thread Type | Tension Stress Level | Recommended Usage |
|---|---|---|
| High-quality polyester | Low | Daily quilting |
| Cotton thread | Medium | Regular projects |
| Bargain thread | High | Practice only |
| Metallic thread | Very high | Special occasions |
Cost Comparison: DIY vs Professional Repair
Let’s talk money. Is this repair worth doing yourself?
DIY Repair Costs
A replacement tension spring typically costs $8-15. Add basic tools if you don’t have them, and you’re looking at $30-40 total investment.
Your time investment is about 30-45 minutes for the actual repair, plus research and part ordering time.
Professional Service Costs
Most repair shops charge $80-150 for this service. Higher-end or computerized machines might cost more due to complexity.
The advantage? Professional repair usually includes a warranty and full machine inspection.
Machine-Specific Considerations
Different quilting machine brands have their quirks. Here’s what I learned about the major manufacturers.
Brother and Singer Machines
These brands typically use similar tension spring designs. Parts are widely available and relatively inexpensive.
Most models have easily accessible tension assemblies with minimal disassembly required.
Janome and Bernina Machines
Higher-end machines often have more complex tension systems. Springs might be part of larger assemblies that need replacement as a unit.
Parts cost more but tend to last longer than budget machine components.
Computerized Machine Challenges
Some computerized quilting machines have electronic tension control. These systems might require calibration after spring replacement.
Check your manual for specific reset procedures after completing the repair.
Conclusion
Replacing a broken thread tension spring isn’t as scary as it first appears. With the right tools, patience, and careful attention to detail, most quilters can handle this repair successfully.
Remember to work slowly, take photos during disassembly, and don’t force anything that doesn’t want to move. Your quilting machine will reward you with perfect stitches and years of continued service.
The money you save on this repair can go toward that beautiful fabric you’ve been eyeing. Plus, you’ll have the satisfaction of knowing you fixed it yourself.
How long does a thread tension spring typically last?
Most thread tension springs last 5-10 years with regular home use. Heavy quilters or those running small businesses might see failures after 3-5 years. The lifespan depends on usage frequency, thread quality, and how often you adjust the tension settings.
Can I use a tension spring from a different machine brand?
Generally no – tension springs are designed specifically for each machine model. The spring rate, size, and mounting points vary between manufacturers. Using the wrong spring can cause poor stitch quality or damage other components in your tension assembly.
What happens if I install the spring backwards?
Installing a tension spring backwards usually results in no tension control or extremely loose stitches. The spring ends need to engage properly with the tension discs to create the right amount of pressure. You won’t damage anything, but your stitches will look terrible until you flip it around.
Should I replace both tension springs at the same time?
If your machine has dual tension springs and one breaks, consider replacing both. Springs from the same manufacturing batch tend to fail around the same time. Replacing both saves you from doing this repair again in a few months when the other spring gives up.
Why does my tension spring keep breaking repeatedly?
Repeated spring failures usually indicate other problems like worn tension discs, damaged threading guides, or using inappropriate thread types. Check for rough edges in your tension assembly that might stress the spring, and make sure you’re not consistently running tension settings at maximum levels.