To tighten a loose needle plate screw, turn off your sewing machine and use the correct screwdriver to turn the screw clockwise until snug but not overtightened.
A loose needle plate screw can cause fabric puckering, skipped stitches, and thread jams, but fixing this common quilting machine problem takes just a few minutes with the right approach.
What Causes Needle Plate Screws to Loosen
Your needle plate screw doesn’t just loosen randomly. Machine vibration during quilting gradually works the screw loose over time.
Heavy quilting projects put extra stress on your machine. The constant motion and pressure can shake components loose. I found that quilters who work on thick batting or multiple layers see this problem more often.
Thread tension issues can also contribute to the problem. When your thread pulls too hard against the needle plate, it creates extra movement that loosens screws.
Signs Your Needle Plate Screw Needs Attention
You’ll know something’s wrong before the screw falls out completely. Watch for these warning signs:
- Fabric bunching or puckering near the needle
- Unusual rattling sounds during sewing
- Thread catching on the needle plate edge
- Visible gap between the needle plate and machine body
- Needle hitting the plate when sewing
Tools You Need for the Job
Don’t reach for just any screwdriver. Using the wrong tool can strip the screw head and create a bigger problem.
Most sewing machines use either Phillips head or flathead screws. Check your machine’s manual to confirm which type you have. The size matters too – a screwdriver that’s too big or small won’t grip properly.
Essential Tools for the Repair
- Correct size screwdriver (Phillips or flathead)
- Good lighting or small flashlight
- Magnifying glass if needed
- Small container for screws
- Clean cloth for wiping surfaces
Optional but Helpful Items
A magnetic parts tray keeps tiny screws from rolling away. Thread locker (like Loctite) prevents future loosening, but check your warranty first.
Safety First – Power Down Your Machine
This might seem obvious, but always turn off and unplug your machine before starting any repair. I’ve read too many stories about accidental needle strikes during maintenance.
Remove any fabric or thread from the machine area. You want a clean workspace without distractions.
Position Your Machine Properly
Good lighting makes all the difference. Position a lamp to shine directly on the needle plate area. You need to see what you’re doing clearly.
If your machine has a removable extension table, take it off. This gives you better access to the needle plate from different angles.
Step-by-Step Tightening Process
Ready to fix that loose screw? Here’s exactly how to do it safely and effectively.
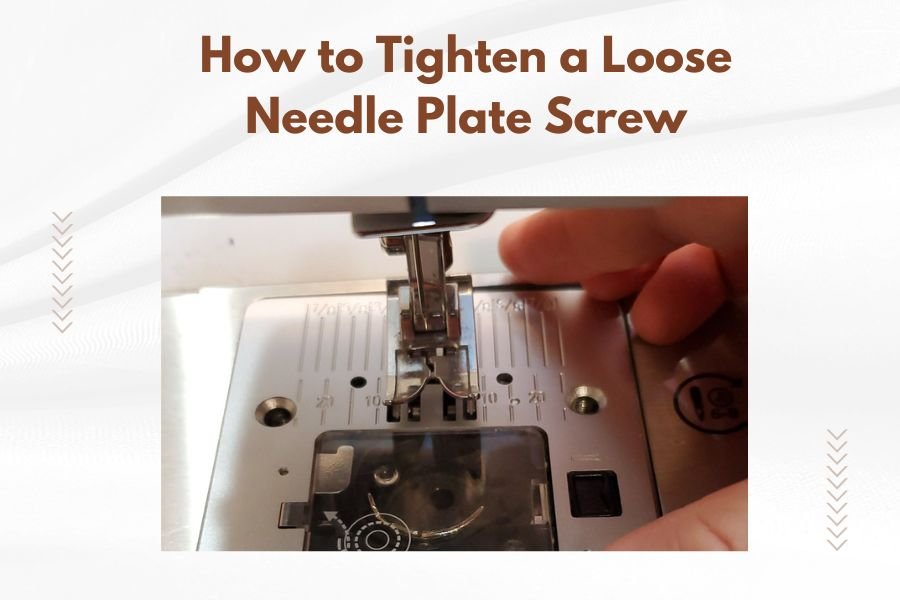
Step 1: Locate the Problem Screw
Most needle plates have one or two screws holding them in place. Look for the screw that appears raised or sits unevenly compared to others.
Gently wiggle the needle plate with your finger. A loose screw will let the plate move slightly.
Step 2: Test the Screw Tightness
Place your screwdriver in the screw head. Try turning it clockwise very gently. A loose screw will turn easily without much pressure.
Don’t force it yet. You’re just testing to confirm this is the problem screw.
Step 3: Clean the Area
Lint and thread bits often accumulate around the needle plate. Clean these away with a soft brush or cloth.
A clean surface lets the needle plate sit flush against the machine body. This prevents future loosening.
Step 4: Tighten the Screw
Turn the screw clockwise slowly and steadily. Apply gentle pressure – you’re not trying to muscle it tight.
Stop when the screw feels snug and the needle plate sits flat. Overtightening can strip the threads or crack the plate.
How Tight is Right
Think of tightening a jar lid. You want it secure but not so tight that you can’t open it later. The screw should feel firm without requiring excessive force.
Testing Your Repair
Don’t assume the job is done just because the screw feels tight. You need to test the fix properly.
Visual Inspection
Look at the needle plate from different angles. It should sit completely flush with no gaps or raised edges.
The screw head should be level with the plate surface, not sticking up or sunk too deep.
Function Test
Thread your machine and sew a test seam on scrap fabric. Listen for unusual sounds and watch how the fabric feeds.
Try different stitch types if your machine has them. A properly seated needle plate works smoothly with all stitches.
What Good Results Look Like
- Smooth fabric feeding without catching
- Even stitches with proper tension
- No unusual rattling or clicking sounds
- Thread flows cleanly without snagging
When Simple Tightening Isn’t Enough
Sometimes you’ll discover the screw turns freely without getting tight. This usually means stripped threads in either the screw or the machine body.
Stripped Screw Threads
If the screw head is damaged or the threads are worn, you need a replacement screw. Contact your machine manufacturer or a sewing machine repair shop.
Don’t try to force a damaged screw tight. You’ll only make the problem worse.
Machine Body Thread Damage
Stripped threads in the machine body require professional repair. A technician can install a thread insert or re-tap the hole.
This type of damage often happens from overtightening screws repeatedly over time.
Signs You Need Professional Help
- Screw won’t tighten no matter how much you turn it
- Screw head is damaged or rounded off
- Metal shavings appear when turning the screw
- Needle plate cracks during tightening
Preventing Future Problems
Regular maintenance prevents most needle plate screw issues. A little attention goes a long way.
Regular Inspection Schedule
Check your needle plate screws monthly if you quilt regularly. Weekly checks make sense for heavy users.
Add this to your routine machine cleaning. It takes just a minute but saves frustration later.
Proper Machine Use
Avoid pulling fabric through the machine while sewing. Let the feed dogs do their job. Excessive pulling stresses the needle plate connection.
Use appropriate needles for your fabric weight. Wrong needle sizes create extra vibration that loosens screws.
Smart Quilting Habits
| Good Practice | Why It Helps |
|---|---|
| Regular oiling per manual | Reduces vibration and wear |
| Clean lint after each project | Prevents buildup that causes problems |
| Use quality thread | Reduces tension and catching issues |
| Check screws monthly | Catches problems before they worsen |
Common Mistakes to Avoid
I’ve researched many sewing machine repair forums and found the same mistakes pop up repeatedly. Learn from others’ experiences.
Using the Wrong Screwdriver
A screwdriver that doesn’t fit properly will strip the screw head. This turns a simple tightening job into a complicated extraction problem.
When in doubt, check your machine manual. Most manufacturers specify the exact screwdriver type and size needed.
Overtightening
More isn’t always better when it comes to screw tightness. Overtightened screws can crack needle plates or strip threads.
Tighten until snug, then stop. The screw doesn’t need to be as tight as a car wheel bolt.
Working in Poor Light
Squinting at tiny screws in dim light leads to mistakes. Good lighting helps you work confidently and safely.
A small LED flashlight or desk lamp makes the job much easier. Your eyes will thank you too.
Troubleshooting Persistent Issues
What if your needle plate screw keeps coming loose even after proper tightening? This suggests an underlying problem needs attention.
Excessive Machine Vibration
Machines that vibrate more than normal will loosen screws faster. Check that your machine sits level and stable on its table.
Worn motor mounts or internal components can cause excessive vibration. A qualified technician can diagnose these issues.
Wrong Needle Plate
Using a needle plate designed for a different machine model can cause fit problems. Even plates that look similar may have slightly different dimensions.
Always use the exact needle plate specified for your machine model. Generic plates rarely fit as precisely as original parts.
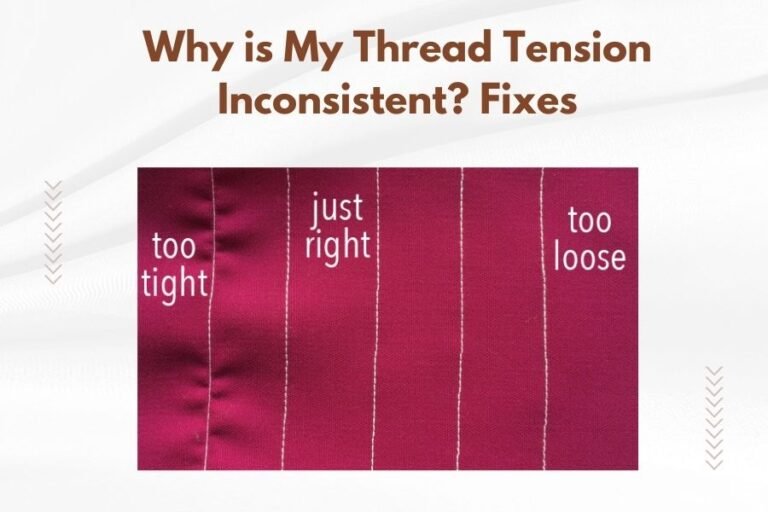
Thread Tension Problems
Incorrect thread tension puts extra stress on the needle plate area. This can work screws loose over time.
Adjust your thread tension according to your manual. Most quilting projects work well with tension set between 3 and 5 on most machines.
Conclusion
Tightening a loose needle plate screw is one of the easiest sewing machine repairs you can do yourself. With the right screwdriver and a gentle touch, you can fix this common problem in minutes.
Remember to work safely with your machine powered off and unplugged. Take your time, use good lighting, and don’t overtighten the screw. Regular maintenance checks will help you catch loose screws before they cause bigger problems.
If simple tightening doesn’t solve the issue, don’t hesitate to consult a professional repair technician. Sometimes the smart move is knowing when you need expert help.
Why does my needle plate screw keep coming loose?
Repeated loosening usually indicates excessive machine vibration, worn screw threads, or using the wrong needle plate for your machine model. Check that your machine sits stable and level, and consider having a technician inspect for internal wear if the problem persists.
Can I use thread locker on my needle plate screw?
Light-duty thread locker can help prevent loosening, but check your warranty first as some manufacturers void coverage for modified parts. Use only removable thread locker, never permanent types that could make future maintenance impossible.
What happens if I overtighten the needle plate screw?
Overtightening can crack the needle plate, strip the screw threads, or damage the machine body threads. This turns a simple repair into an expensive replacement job requiring professional service.
How often should I check my needle plate screws?
Monthly checks work well for regular quilters, while weekly inspection makes sense if you sew daily or work on heavy projects. Add screw checking to your routine machine cleaning schedule for best results.
My screw turns but won’t tighten – what’s wrong?
This typically means stripped threads in either the screw or machine body. Stop trying to tighten it and consult a sewing machine repair professional, as forcing a damaged screw will only worsen the problem and increase repair costs.