A stuck presser foot lever usually happens when lint builds up in the mechanism or when internal parts need lubrication.
You can fix a stuck presser foot lever by cleaning around the lever area, applying sewing machine oil to moving parts, and gently working the lever back and forth.
Why Your Presser Foot Lever Gets Stuck
Think of your presser foot lever like a door hinge. When dust and debris collect in the moving parts, everything starts to feel stiff and stubborn.
The most common reasons your lever won’t budge include lint accumulation, dried oil residue, and simple lack of maintenance. Sometimes thread pieces work their way into tiny spaces where they don’t belong.
Lint and Debris Buildup
Every time you sew, tiny fabric fibers break loose. These little pieces love to hide in mechanical parts. Over time, they create a fuzzy blanket that stops your lever from moving smoothly.
Check around the lever base and underneath your machine. You’ll often see obvious lint deposits right where the lever connects to the internal mechanism.
Old Oil Turns Into Glue
Here’s something many sewists don’t realize: old sewing machine oil can actually make problems worse. When oil sits for months without use, it gets thick and sticky.
This gummy residue acts like cement between moving parts. Your lever might feel completely frozen when this happens.
Quick Safety Check Before You Start
Always unplug your machine before working on any mechanical parts. This protects you and prevents accidental damage.
Remove any fabric and thread from the machine area. You want a clean workspace where you can see everything clearly.
Gather Your Tools
You’ll need these basic items:
- Small brush or old toothbrush
- Lint-free cloth
- Sewing machine oil
- Tweezers (optional)
- Compressed air can (optional)
Step 1: External Cleaning
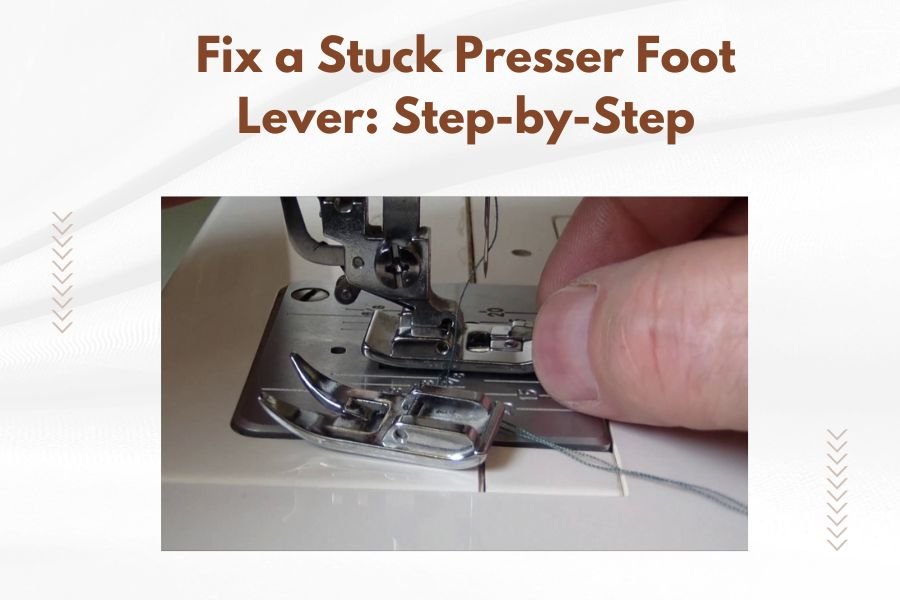
Start with what you can see. Look closely at the presser foot lever and the area around it.
Use your brush to gently sweep away visible lint and thread pieces. Don’t push debris deeper into the machine – brush it out toward you.
Clean the Lever Pivot Point
The pivot point is where your lever connects to the machine body. This spot collects the most gunk.
Brush around this area carefully. You might see lint packed tightly against the metal parts. Take your time and work it loose bit by bit.
Use Compressed Air Wisely
If you have compressed air, use short bursts at an angle. Don’t blow straight down into the machine – this can push debris deeper where you can’t reach it.
Step 2: Test the Movement
After your initial cleaning, try moving the lever gently. Don’t force it if it’s still stuck.
You should feel some improvement even from basic cleaning. If the lever moves but feels rough, you’re on the right track.
Listen to Your Machine
Pay attention to sounds as you work the lever. Grinding or scraping noises mean there’s still debris in the mechanism.
A properly working lever should move quietly and smoothly from up to down position.
Step 3: Apply Lubrication
Now comes the oil treatment. Use only sewing machine oil – never household oils or spray lubricants.
Place one small drop of oil right at the pivot point where the lever connects to the machine body. One drop is enough.
Work the Oil Into Moving Parts
Gently move the lever up and down several times. This spreads the oil to all the internal surfaces that need lubrication.
You should notice the movement getting smoother with each motion. If not, add one more drop and repeat.
Wipe Away Excess Oil
Too much oil attracts lint and creates future problems. Use your cloth to clean any oil that appears on outside surfaces.
Step 4: Deep Cleaning for Stubborn Cases
Sometimes surface cleaning isn’t enough. If your lever is still sticky, you need to look deeper.
Check your machine manual for instructions on removing the presser foot bar assembly. Some machines allow you to take this apart for thorough cleaning.
When to Remove the Presser Foot Bar
Only attempt this if you’re comfortable with small mechanical parts. Take photos before you remove anything so you remember how to put it back together.
Clean each part separately with your brush and cloth. Look for hardened oil residue that needs to be scraped off gently.
Reassembly Tips
When putting parts back together, apply a tiny amount of fresh oil to contact surfaces. This prevents immediate re-sticking.
Step 5: Test Your Repair
Before you declare victory, test the lever thoroughly. Move it through its full range of motion several times.
The lever should lift and lower smoothly without hesitation or rough spots. If you feel any catching, repeat the cleaning process.
Thread Up and Test Sew
Put thread back in your machine and try sewing on scrap fabric. The presser foot should press down firmly and lift completely.
Check that your stitches look normal and that fabric feeds smoothly. A properly working presser foot system affects stitch quality.
Preventing Future Stuck Levers
Regular maintenance prevents most presser foot lever problems. Clean lint from your machine after every few sewing sessions.
Oil your machine according to the manufacturer’s schedule. This keeps all moving parts working smoothly before they seize up.
Monthly Maintenance Routine
Set aside 10 minutes each month for basic machine care. Brush out lint, oil moving parts, and test all functions.
This small time investment saves you from major repairs later. A well-maintained machine rarely develops stuck parts.
Cover Your Machine
Dust and pet hair contribute to lever sticking. Keep your machine covered when not in use to reduce debris accumulation.
When to Seek Professional Help
Some presser foot lever problems need professional attention. If cleaning and oiling don’t solve the issue, internal parts might be damaged.
Bent lever arms, worn pivot points, and broken springs require expert repair. Don’t keep forcing a lever that won’t move after proper cleaning.
Signs You Need a Technician
Call for service if your lever moves but the presser foot doesn’t respond properly. This suggests internal disconnection or damage.
Also seek help if the lever feels loose or wobbly after cleaning. Worn parts need replacement to maintain proper sewing function.
| Problem | DIY Solution | Professional Help Needed |
|---|---|---|
| Lever sticks slightly | Clean and oil | No |
| Lever won’t move at all | Deep clean and lubricate | If no improvement |
| Lever moves but foot doesn’t respond | Check connections | Usually yes |
| Lever feels loose or wobbly | Tighten visible screws | Often yes |
Common Mistakes to Avoid
Don’t use WD-40 or household oils on your sewing machine. These products can damage internal parts and attract more debris.
Never force a stuck lever with excessive pressure. You might bend the mechanism or break internal connections.
Over-Oiling Problems
More oil doesn’t mean better lubrication. Excess oil drips onto your fabric and creates staining problems.
It also acts like a magnet for lint and dust. Use the minimum amount needed for smooth operation.
Conclusion
Fixing a stuck presser foot lever is usually straightforward when you follow the right steps. Start with thorough cleaning to remove lint and debris, then apply proper lubrication to moving parts.
Most lever problems come from simple neglect rather than serious mechanical failure. Regular maintenance keeps your machine running smoothly and prevents frustrating stuck parts. Remember to use only sewing machine oil and avoid forcing any mechanical components.
With proper care, your presser foot lever should provide years of reliable service. When basic maintenance doesn’t solve the problem, don’t hesitate to consult a professional technician for expert diagnosis and repair.
Why does my presser foot lever keep getting stuck even after cleaning?
Repeated sticking after cleaning usually means you have hardened oil residue deep in the mechanism or worn internal parts that need replacement. Try removing the presser foot bar completely for thorough cleaning, or consult a technician if the problem continues.
Can I use household oil instead of sewing machine oil on my lever?
No, never use household oils, cooking oil, or WD-40 on sewing machine parts. These products can gum up over time and damage internal mechanisms. Only use oil specifically designed for sewing machines, which stays fluid and doesn’t attract debris.
How often should I clean my presser foot lever area?
Clean around your presser foot lever every 8-10 hours of sewing time, or whenever you notice lint buildup. Monthly deep cleaning works well for casual sewists, while heavy users should clean weekly to prevent debris accumulation.
My lever moves but the presser foot doesn’t go up and down – what’s wrong?
This usually means the internal connection between your lever and the presser foot bar is broken or disconnected. This type of problem typically requires professional repair since it involves internal machine mechanisms that are difficult to access.
Is it normal for my presser foot lever to feel slightly stiff when new?
Brand new machines sometimes have stiff levers until the parts break in through normal use. Light stiffness is normal, but the lever should still move easily without forcing. If it feels stuck or requires significant pressure, clean and oil the mechanism before first use.