Stuck feed dogs happen when lint, thread, or mechanical issues prevent your sewing machine’s feed system from moving fabric properly.
You can fix stuck feed dogs by cleaning out debris, oiling the mechanism, checking for bent parts, and adjusting the feed dog height according to your machine’s manual.
What Are Feed Dogs and Why Do They Get Stuck?
Feed dogs are those metal teeth under your sewing machine’s presser foot. They grab your fabric and pull it through as you sew. Think of them like tiny conveyor belts that keep your stitches even.
When feed dogs get stuck, your fabric won’t move. You’ll notice bunched stitches, fabric that won’t advance, or feed dogs that don’t rise up when they should.
Common Reasons Feed Dogs Stop Working
I found that most feed dog problems come from these issues:
- Lint and thread buildup blocking movement
- Old, thick oil turning into gummy residue
- Bent or damaged feed dog teeth
- Loose screws in the feed mechanism
- Feed dogs accidentally lowered for free-motion sewing
Quick Check: Is It Really Stuck Feed Dogs?
Before you start taking things apart, let’s make sure feed dogs are your problem. Run this quick test.
The Hand Wheel Test
Remove your fabric and thread. Turn your hand wheel slowly and watch the feed dogs. Do they move up and down? Do they shift back and forth?
If they don’t move at all, you’ve got stuck feed dogs. If they move but seem sluggish or jerky, you likely have buildup issues.
Check Your Feed Dog Lever
Many machines have a lever that raises and lowers feed dogs. Look for a small lever or knob near your needle plate. Make sure it’s in the “up” position.
I can’t tell you how many times people think their feed dogs are broken when they’re just lowered for free-motion quilting.
Tools You’ll Need
Gather these items before you start:
- Small screwdrivers (Phillips and flathead)
- Tweezers
- Lint brush or old toothbrush
- Compressed air (optional but helpful)
- Sewing machine oil
- Clean cloth or paper towels
- Your machine’s manual
Step 1: Turn Off and Unplug Your Machine
Safety first. Unplug your machine completely. You don’t want it accidentally starting while your fingers are near moving parts.
Remove the needle and presser foot too. This gives you better access and prevents accidents.
Step 2: Remove the Needle Plate
The needle plate (also called throat plate) covers your feed dogs. Most plates have two screws holding them down.
Removing Different Plate Types
Some plates have thumb screws you can turn by hand. Others need a screwdriver. A few newer machines have plates that just pop out.
Keep track of your screws. Drop them in a small bowl so they don’t roll away.
What You’ll See Underneath
Once the plate comes off, you’ll see your feed dogs and the area around them. Don’t be surprised if there’s a lot of lint and thread bits down there.
Step 3: Clean Out All the Debris
This is where most feed dog problems get solved. All that lint acts like glue when it builds up.
Start with the Big Stuff
Use tweezers to pull out thread pieces and large lint clumps. Don’t force anything that seems stuck to metal parts.
Brush Away Fine Lint
Use your lint brush or old toothbrush to sweep away fine debris. Brush in the same direction the feed dogs move.
If you have compressed air, give the area a few short bursts. Don’t overdo it – you might blow lint deeper into your machine.
Pay Attention to These Spots
- Around the feed dog teeth
- In the grooves where feed dogs slide
- Under the feed dog assembly
- Near any visible gears or mechanisms
Step 4: Test Feed Dog Movement
With the debris cleared, turn your hand wheel slowly. Watch how the feed dogs move.
They should rise up smoothly, move forward, drop down, then move back. The motion should be steady without jerking or stopping.
If They Still Don’t Move
The problem might be mechanical. Look for bent feed dog teeth or loose screws you can see.
Sometimes old, gummy oil hardens and blocks movement. That’s where Step 5 comes in.
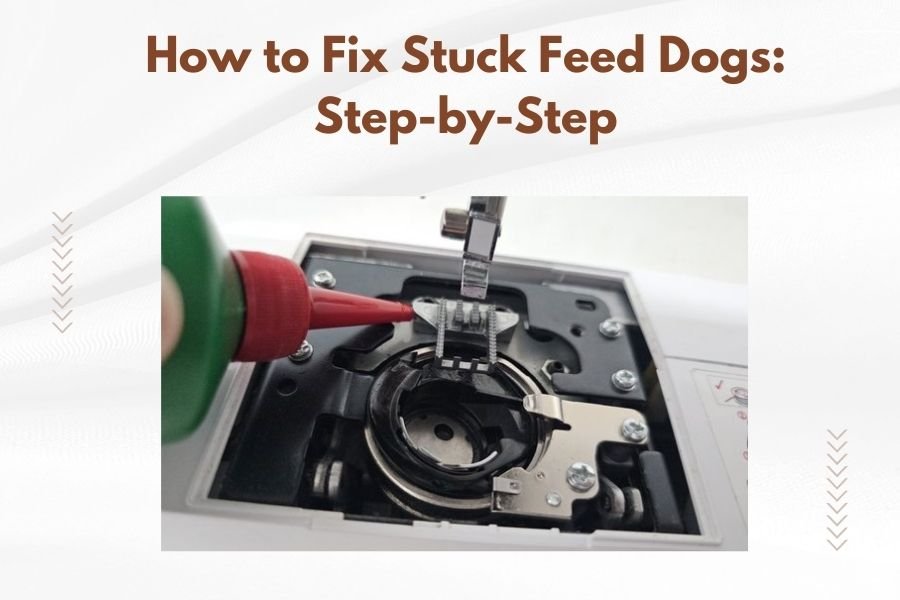
Step 5: Oil the Feed Dog Mechanism
Feed dogs need lubrication to move smoothly. Over time, oil gets thick and sticky.
Where to Oil
Check your manual for oil points. Generally, you’ll oil:
- Pivot points where feed dogs connect to their mechanism
- Any visible sliding surfaces
- Spots marked in your manual’s oiling diagram
How Much Oil to Use
Just one tiny drop per oil point. Too much oil attracts more lint and creates bigger problems.
After oiling, turn your hand wheel several times to distribute the oil. Wipe away any excess with a clean cloth.
Step 6: Check for Bent or Damaged Parts
Look closely at your feed dog teeth. They should be straight and evenly spaced.
Signs of Damage
Watch for these problems:
- Bent or broken teeth
- Feed dogs that sit crooked
- Loose screws in the feed mechanism
- Cracks in the feed dog assembly
What You Can Fix Yourself
You can tighten loose screws if you can reach them safely. Some slightly bent teeth can be carefully straightened with pliers.
But major damage needs professional repair. Don’t force anything that might break more parts.
Step 7: Adjust Feed Dog Height
Feed dogs need to rise to the right height above your needle plate. Too low and they won’t grab fabric. Too high and they’ll snag.
Finding the Adjustment
Most machines have a screw or mechanism that controls feed dog height. Your manual will show you where it is.
The correct height is usually flush with the needle plate surface or just barely above it.
Making Small Adjustments
Turn the adjustment screw just a quarter turn at a time. Test the movement with your hand wheel after each adjustment.
Research from sewing machine manufacturers shows that most feed dog problems come from incorrect height settings (Singer, Brother).
Step 8: Reassemble and Test
Put your needle plate back on. Make sure it sits flat and the screws are snug but not over-tightened.
Replace your presser foot and needle. Thread your machine with scrap fabric.
Test Stitching
Try a few straight stitches on scrap fabric. The fabric should move smoothly without you pulling it.
If stitches are still bunching or fabric won’t advance, you might need professional help.
When to Call a Professional
Some feed dog problems need expert repair. Don’t try to fix these yourself:
- Broken gears in the feed mechanism
- Major bent or cracked parts
- Internal timing issues
- Problems you can’t identify
A good sewing machine repair shop can diagnose and fix complex feed dog issues safely.
Preventing Future Feed Dog Problems
Regular maintenance keeps feed dogs working smoothly.
Clean After Every Project
Remove lint from the feed dog area after each sewing session. It takes just a minute but prevents big buildups.
Oil According to Your Manual
Most machines need oiling every 8-10 hours of sewing time. Check your manual for the exact schedule.
Use the Right Oil
Only use sewing machine oil. Other oils can gum up your machine or damage seals.
Troubleshooting Specific Feed Dog Issues
Different symptoms point to different problems.
| Problem | Likely Cause | Quick Fix |
|---|---|---|
| Feed dogs don’t rise | Lowered for free-motion | Check feed dog lever |
| Fabric won’t advance | Lint buildup | Clean thoroughly |
| Jerky movement | Needs oil | Oil mechanism |
| Uneven stitches | Wrong height | Adjust height setting |
Feed Dogs Won’t Stay Up
If feed dogs keep dropping down, the height adjustment screw might be loose. Tighten it according to your manual.
Only One Feed Dog Moves
Machines with multiple feed dogs sometimes have one that gets stuck while others work. Clean around the stuck one specifically.
Conclusion
Stuck feed dogs usually come from simple buildup issues you can fix at home. Start with thorough cleaning and proper oiling. Most of the time, that’s all it takes to get your feed dogs moving smoothly again.
Remember to clean your machine regularly and oil it according to the manual. Prevention is much easier than repair.
If cleaning and oiling don’t solve your problem, don’t force anything. A professional repair might save you from bigger damage and costs.
Why won’t my feed dogs move even after cleaning?
The mechanism might need oil, or there could be internal damage like broken gears. Try oiling first, then consider professional repair if they still don’t move.
How often should I clean my feed dogs?
Clean the feed dog area after every major project or when you notice lint building up. For heavy users, this might be weekly.
Can I sew without feed dogs working?
You can do free-motion sewing without feed dogs, but regular sewing needs working feed dogs to move fabric evenly through the machine.
What type of oil should I use on feed dogs?
Only use sewing machine oil designed for your machine. Household oils can damage seals and attract more lint.
How do I know if my feed dogs are the right height?
Feed dogs should be flush with or slightly above the needle plate surface. Check your manual for the exact specification for your machine model.