To check for needle plate burrs fast, run your fingertip gently around the needle hole and thread path – any catches or rough spots indicate burrs that need immediate attention.
Needle plate burrs happen when needles strike the metal plate repeatedly, creating tiny metal fragments that can snag thread and damage fabric during quilting.
What Are Needle Plate Burrs and Why They Matter
Think of needle plate burrs like tiny metal splinters around your needle hole. When your needle hits the plate at the wrong angle or breaks, it leaves behind rough edges.
These rough spots grab your thread like velcro. Your beautiful quilting project suddenly develops tension problems, thread breaks, or fabric snags.
I found that most quilters don’t check their needle plates often enough. Yet this simple 30-second check can save hours of frustration.
Quick Visual Inspection Method
Start with good lighting. Hold a small flashlight or use your phone’s flashlight to illuminate the needle plate area.
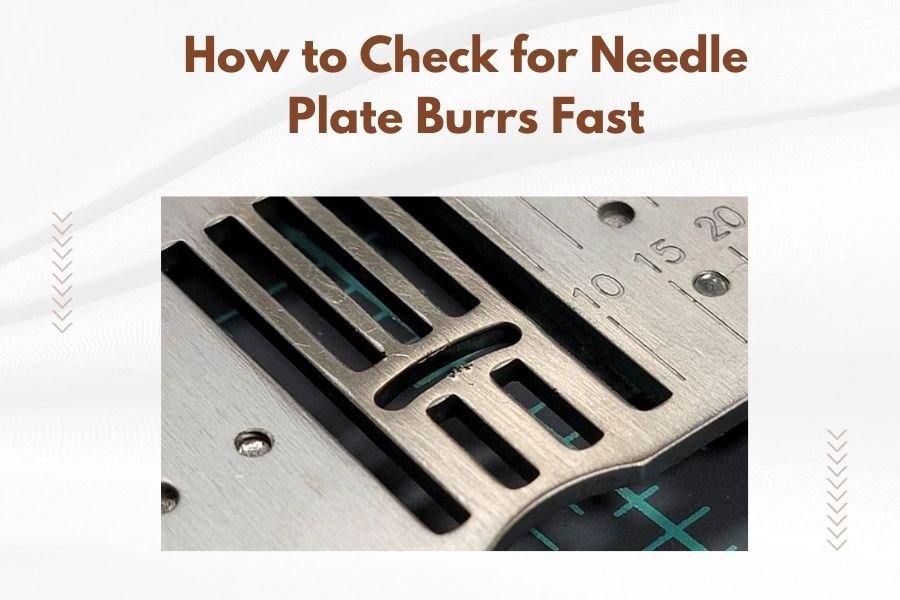
Look directly at the needle hole opening. A smooth hole appears perfectly round with clean edges. Burrs show up as tiny metal flakes or rough spots around the rim.
What to Look For
Check these common burr locations:
- Around the needle hole rim
- Inside the needle hole itself
- Along the thread path grooves
- Near the bobbin area opening
Signs of Burr Damage
You might notice these visual clues:
- Shiny metal fragments catching light
- Irregular or oval-shaped needle holes
- Scratches radiating from the hole
- Dark spots from thread residue buildup
The Touch Test Technique
Your fingertips are incredibly sensitive tools for detecting burrs. This method works better than visual inspection alone.
Turn off your machine and remove any thread. Clean hands work best for this test.
Step-by-Step Touch Method
Gently run your fingertip around the needle hole opening. Use light pressure – you’re feeling for texture changes, not trying to sand anything down.
Move your finger slowly around the entire circumference. Smooth metal feels like glass. Burrs feel like tiny catches or rough patches.
Don’t forget to check inside the hole if your finger fits. Sometimes burrs hide just inside the opening where you can’t see them.
Safety Tips for Touch Testing
Keep these safety points in mind:
- Use gentle pressure only
- Stop if you feel any sharp edges
- Clean your hands first to avoid transferring oils
- Never force your finger into tight spaces
Using Cotton Thread as a Detection Tool
This clever trick uses thread to find burrs you might miss with other methods. I came across this technique from experienced quilting instructors.
Take a piece of cotton thread about 6 inches long. Cotton works better than polyester because it’s more delicate and catches easier.
Thread Detection Process
Thread the cotton through your needle hole slowly. Pull it back and forth gently several times.
Watch for these warning signs:
- Thread frays or breaks during the test
- You feel resistance or catching
- Thread leaves behind fibers in the hole
- The thread changes color from metal particles
If the thread glides smoothly without damage, your needle plate is probably burr-free.
Why Cotton Works Best
Cotton thread has natural fibers that separate easily when they hit rough surfaces. Polyester thread might slide over small burrs without showing damage.
Common Locations Where Burrs Form
Knowing where burrs typically appear saves you time during inspection. Some spots are burr magnets.
Primary Burr Zones
The needle hole gets the most abuse. Every stitch creates tiny impacts that gradually rough up the metal edges.
Thread guide areas also develop burrs from constant thread friction. These spots might not look damaged but feel rough to touch.
Hidden Burr Locations
Check these often-missed spots:
- Underside of the needle plate
- Feed dog contact points
- Throat plate edges
- Bobbin case opening
Machine-Specific Burr Patterns
Different quilting machines develop burrs in predictable patterns. Long-arm machines often get burrs from high-speed operation.
Domestic machines typically show burrs around needle holes from varied fabric thicknesses and frequent needle changes.
Tools That Make Burr Detection Easier
While fingers work great, a few simple tools can improve your burr-hunting accuracy.
| Tool | Best Use | Cost |
|---|---|---|
| LED flashlight | Visual inspection | Under $10 |
| Magnifying glass | Detailed examination | $5-15 |
| Cotton swab | Gentle probing | Under $5 |
| White cotton thread | Friction testing | Under $3 |
Professional-Grade Detection Tools
Some quilting shops use jeweler’s loupes for precise burr inspection. These 10x magnification tools reveal tiny imperfections clearly.
Dental mirrors help you see burrs from different angles, especially on the underside of plates.
How Often Should You Check for Burrs
Regular checking prevents small problems from becoming big headaches. But how often is enough?
I found that most quilting experts recommend checking every 8-10 hours of machine use. Heavy quilters might need weekly inspections.
Factors That Increase Burr Risk
Check more often if you:
- Break needles frequently
- Use metallic or specialty threads
- Quilt thick batting regularly
- Notice thread tension problems
Seasonal Maintenance Schedule
Many quilters check for burrs during regular machine cleaning sessions. This creates a good habit without extra effort.
Spring cleaning might include thorough burr inspection along with oiling and general maintenance.
What to Do When You Find Burrs
Finding burrs isn’t the end of the world. Small burrs are fixable with the right approach.
Stop using your machine immediately when you confirm burrs exist. Continued quilting will make the problem worse and potentially damage your projects.
DIY Burr Removal Options
Very light burrs might respond to gentle polishing with fine automotive polish and a soft cloth. Work slowly and check progress frequently.
Some quilters use 0000-grade steel wool for stubborn burrs. This requires extreme care to avoid making scratches worse than the original burr.
When to Seek Professional Help
Large burrs or deep gouges need professional attention. Sewing machine repair shops have specialized tools and experience with needle plate restoration.
Expensive machines deserve professional care rather than DIY experiments that might cause permanent damage.
Prevention Strategies
Preventing burrs beats dealing with them later. A few simple habits protect your needle plate.
Use the right needle size for your thread and fabric combination. Oversized needles create unnecessary wear on the needle hole.
Needle Maintenance for Burr Prevention
Change needles regularly before they become dull. Dull needles push through fabric rather than cutting cleanly, creating more plate impact.
Replace needles immediately after any bending or hitting the needle plate. Even slightly damaged needles can create burrs quickly.
Thread and Fabric Considerations
Metallic threads and thick fabrics increase needle plate stress. Consider using microtex needles or reducing speed when working with challenging materials.
Troubleshooting Common Detection Problems
Sometimes burr detection isn’t straightforward. Here are solutions for tricky situations.
When You Can’t Feel Anything
Your fingertips might not be sensitive enough for tiny burrs. Try the cotton thread test or use a cotton swab instead.
Clean the needle plate thoroughly first. Oil residue or lint can mask burr texture.
False Positive Results
Sometimes normal wear patterns feel like burrs but aren’t problematic. If your machine quilts smoothly without thread problems, minor texture changes might be acceptable.
When in doubt, test with different thread types. True burrs cause problems with multiple thread varieties.
Signs Your Needle Plate Needs Replacement
Some burr damage goes beyond simple repair. Knowing when to replace saves time and frustration.
Multiple large burrs or a significantly enlarged needle hole indicate replacement time. Research shows that severely damaged plates affect stitch quality permanently.
Cost vs. Repair Analysis
Replacement needle plates typically cost $20-80 depending on your machine model. Professional burr removal might cost nearly as much.
For expensive machines, professional repair makes sense. Budget machines might be better served with replacement plates.
Conclusion
Checking for needle plate burrs takes just minutes but prevents hours of quilting problems. The touch test combined with visual inspection catches most issues early when they’re still fixable.
Make burr checking part of your regular machine maintenance routine. Your quilting projects will thank you with smoother stitching and fewer thread breaks. Remember that prevention through proper needle maintenance beats dealing with burrs after they form.
How do I know if a burr is too big to fix myself?
If you can catch your fingernail on the burr or if it’s wider than the original needle hole, seek professional repair. Large burrs can damage your needle and create bigger problems if removal goes wrong.
Can I use sandpaper to remove needle plate burrs?
Avoid sandpaper on needle plates. It’s too aggressive and can create scratches worse than the original burr. Use fine automotive polish or steel wool grade 0000 for gentle burr removal only.
Why do some needles create more burrs than others?
Needle quality and type affect burr formation. Cheap needles often have inconsistent points that strike the plate unevenly. Specialty needles like leather or denim needles are harder and can damage plates more easily.
Is it normal to have slight roughness around old needle holes?
Minor texture changes happen with normal use and aren’t always problematic. If your thread doesn’t catch or fray when passing through, slight roughness might be acceptable wear rather than true burrs.
How can I tell the difference between burrs and normal needle plate wear?
Burrs catch thread and feel sharp or raised. Normal wear creates smooth texture changes that don’t grab thread. Test with delicate cotton thread – burrs will fray or break it while normal wear won’t.