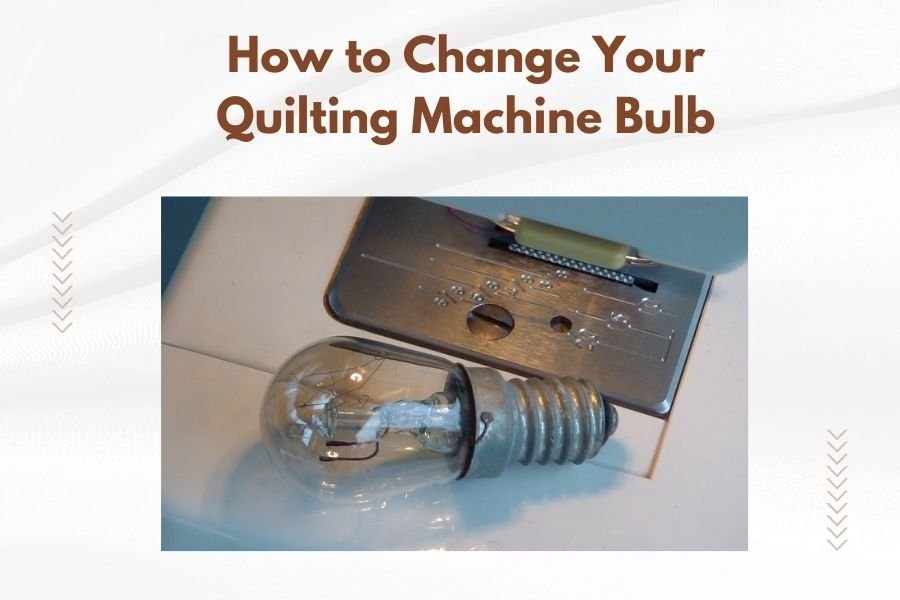
To change your quilting machine bulb, first unplug the machine, then remove the old bulb by gently unscrewing or pulling it out, depending on your machine’s design.
Replace it with the correct wattage bulb recommended in your manual, reassemble any covers, and plug the machine back in to test the new light.
Why Your Quilting Machine Light Matters
Good lighting makes all the difference when you’re working on detailed quilting projects. Without proper illumination, you’ll strain your eyes and miss important details.
When that little bulb burns out, it’s not the end of the world. You can replace it yourself in just a few minutes. No need to haul your machine to a repair shop or call a technician.
Safety First: Unplug Your Machine
Before you touch anything, unplug your quilting machine from the wall. This step isn’t optional.
Even when the machine is turned off, electrical components can still carry power. You don’t want any surprises while working near the bulb area.
Let the Bulb Cool Down
If you’ve been quilting recently, give the bulb time to cool. Hot bulbs can burn your fingers or crack when touched.
Wait at least 10 minutes after turning off your machine. Trust me, burned fingers make the rest of this job much less pleasant.
Finding Your Machine’s Manual
Your owner’s manual contains the exact bulb specifications you need. Different machines use different types of bulbs.
Can’t find your manual? Most manufacturers post them online. Search for your machine’s model number plus “manual” or “owner’s guide.”
Common Bulb Types for Quilting Machines
Most quilting machines use one of these bulb types:
- 15-watt screw-in bulbs (most common)
- 25-watt push-in bulbs
- LED replacement bulbs
- Halogen mini bulbs
Why Wattage Matters
Using the wrong wattage can damage your machine or create safety issues. Too high and you risk overheating. Too low and you won’t get enough light.
Stick with what your manual recommends. It’s usually printed right on a sticker near the bulb area too.
Step-by-Step Bulb Replacement Process
Now for the main event. Each machine design varies slightly, but these steps work for most models.
Step 1: Locate the Light Assembly
Your quilting machine’s light is usually mounted above the needle area. Look for a small plastic cover or housing.
Some machines have lights built into the arm. Others mount them on flexible stems that you can adjust.
Step 2: Remove Any Protective Covers
Many machines have plastic covers or shields over the bulb. These usually pop off or unscrew easily.
Be gentle here. Plastic parts can become brittle over time, especially if your machine gets a lot of use.
Common Cover Types
- Snap-on plastic shields
- Twist-off lens covers
- Hinged protective housings
- Slide-out bulb compartments
Step 3: Remove the Old Bulb
Here’s where you need to pay attention to your specific bulb type. Screw-in bulbs turn counterclockwise (lefty-loosey). Push-in bulbs usually pull straight out or twist slightly.
If the bulb feels stuck, don’t force it. Sometimes a gentle wiggle helps loosen things up.
Handling a Broken Bulb
If your bulb broke off in the socket, you’ll need needle-nose pliers. Grip the metal base and turn counterclockwise.
Keep those bulb pieces away from your sewing area. Glass and fabric don’t mix well.
Step 4: Install the New Bulb
Before installation, check that your replacement matches the old bulb exactly. Same size, same wattage, same base type.
For screw-in types, turn clockwise until snug. Don’t overtighten or you might crack the bulb or strip the socket.
Push-In Bulb Installation
Push-in bulbs need gentle, steady pressure. You should feel them click or seat properly when fully inserted.
If it doesn’t go in easily, you might have the wrong bulb type. Double-check your manual.
Step 5: Replace Covers and Test
Put any covers or shields back in place. Make sure everything clicks or screws back securely.
Now plug in your machine and test the light. If it doesn’t work, recheck your connections and bulb seating.
Troubleshooting Common Issues
Sometimes the replacement doesn’t go as smoothly as planned. Here are the most common problems I’ve found people run into.
New Bulb Won’t Turn On
First, make sure the bulb is seated properly. Loose connections are the most common culprit.
Check that you’re using the right wattage and bulb type. The wrong bulb might not make proper contact with the socket.
Bulb Flickers or Dims
Flickering usually means a loose connection somewhere. Unplug the machine and reseat the bulb.
If the problem continues, you might have a socket issue that needs professional attention.
Can’t Remove the Old Bulb
Stuck bulbs happen, especially in older machines. Try these approaches:
- Use rubber gloves for better grip
- Gently rock the bulb while turning
- Apply light penetrating oil around the base (let it sit first)
- Use needle-nose pliers as a last resort
LED Upgrade Options
Many quilters are switching to LED replacement bulbs. They last longer and produce better light quality.
LED bulbs also run cooler, which is better for your machine and more comfortable during long quilting sessions.
Benefits of LED Bulbs
Research shows LED bulbs can last 25 times longer than traditional incandescent bulbs (Department of Energy). That means fewer replacements and less hassle.
They also use less electricity and produce a cleaner, whiter light that’s easier on your eyes.
LED Compatibility Check
Not all machines work well with LED replacements. Older models might not have compatible sockets or electrical systems.
Check with your machine manufacturer before making the switch. Some companies offer specific LED upgrade kits.
When to Call a Professional
Most bulb changes are simple DIY tasks. But sometimes you need expert help.
If you notice scorch marks around the socket, smell burning odors, or see damaged wiring, stop and call a repair technician.
Signs You Need Professional Help
- Electrical burning smells
- Visible wire damage
- Socket corrosion or melting
- Repeated bulb failures
- Sparking or electrical issues
Preventing Future Bulb Problems
A few simple habits can extend your bulb life and prevent problems down the road.
Turn Off When Not in Use
Don’t leave your machine light on between projects. Even when you’re just stepping away for a few minutes, switch it off.
This simple habit can double or triple your bulb’s lifespan.
Keep the Area Clean
Dust and thread bits can build up around the light assembly. Clean this area regularly with compressed air or a soft brush.
Buildup causes heat retention, which shortens bulb life and can create safety issues.
Use Quality Replacement Bulbs
Cheap bulbs might save money upfront, but they often fail quickly. Stick with name-brand replacements or those recommended by your machine manufacturer.
| Bulb Quality | Average Lifespan | Cost Difference |
|---|---|---|
| Generic/Cheap | 200-500 hours | Lowest upfront cost |
| Name Brand | 800-1200 hours | 20-30% more expensive |
| LED Upgrade | 15,000+ hours | 300-400% more expensive |
Conclusion
Changing your quilting machine bulb is one of those tasks that seems harder than it actually is. With the right replacement bulb and a few minutes of your time, you’ll have bright, clear lighting for your next project.
Remember to always unplug your machine first, use the correct wattage, and don’t force anything that doesn’t want to move. When in doubt, check your manual or contact your machine manufacturer for guidance.
Good lighting makes quilting more enjoyable and helps you create better results. Don’t let a burned-out bulb slow down your creative process.
How often should I replace my quilting machine bulb?
Most incandescent bulbs last 500-1000 hours of use, which translates to about 1-2 years for average quilters. LED bulbs can last 10-15 years with normal use.
Can I use a higher wattage bulb for brighter light?
No, always stick to your machine’s recommended wattage. Higher wattage bulbs generate more heat and can damage your machine’s electrical components or plastic housing.
Why does my new bulb keep burning out quickly?
Frequent bulb failures usually indicate electrical issues like voltage fluctuations or socket problems. Have a technician check your machine if you’re replacing bulbs more than twice per year.
Is it normal for my quilting machine light to get very hot?
Incandescent bulbs do generate heat, but excessive heat could indicate ventilation problems or the wrong bulb type. LED bulbs run much cooler if your machine is compatible.
What should I do if the light socket looks corroded?
Don’t attempt to clean corroded sockets yourself. Corrosion indicates moisture or electrical problems that require professional repair. Contact a qualified technician before using your machine.