Clean your longarm bobbin area every 8-10 hours of quilting by removing lint, thread bits, and dust with compressed air and a soft brush.
Regular bobbin area cleaning prevents thread tension problems, skipped stitches, and costly repairs while keeping your longarm quilting machine running smoothly.
Why Your Bobbin Area Gets So Dirty
Ever wonder why your bobbin area looks like a textile tornado hit it? Thread creates tiny fibers every time it moves through your machine. These microscopic pieces mix with fabric dust and oils from your hands.
The bobbin area is like a magnet for debris. The spinning motion pulls everything down into that small space. Add batting fibers from your quilts, and you get a real mess fast.
Common Debris Types
I found that most longarm machines collect the same types of dirt. Here’s what builds up in your bobbin area:
- Thread lint and broken pieces
- Cotton and polyester batting fibers
- Fabric dust from cutting and handling
- Oil residue mixed with particles
- Metal shavings from normal wear
What You Need for Proper Cleaning
You don’t need fancy tools to keep your bobbin area spotless. Most cleaning supplies are things you probably already have around your sewing room.
Essential Cleaning Tools
From what I read in quilting forums, these tools work best for bobbin area maintenance:
- Small brush with natural bristles
- Compressed air canister
- Tweezers for stubborn threads
- Lint-free cloths
- Small vacuum with brush attachment
Optional But Helpful Items
These extras make cleaning easier if you quilt frequently:
- Dental picks for tight corners
- Small flashlight or headlamp
- Magnifying glass
- Cotton swabs for detail work
Step-by-Step Cleaning Process
Cleaning your bobbin area takes about 10 minutes when you do it right. Always turn off your machine and unplug it first. Safety comes before everything else.
Step 1: Remove the Bobbin and Case
Take out your bobbin first. Then remove the bobbin case if your machine has one. Some longarms have drop-in bobbins that make this step super easy.
Set these parts on a clean cloth where you won’t lose them. Trust me, bobbin cases love to hide in the strangest places.
Step 2: Clear Large Debris
Use your tweezers to pull out any visible threads or fabric chunks. Don’t force anything that seems stuck. You might damage delicate machine parts.
Work gently around the tension springs and hook assembly. These parts are more fragile than they look.
What to Watch For
Look for wrapped threads around the hook or shuttle. These can cause serious timing problems if you leave them there.
Step 3: Brush Away Fine Lint
Use your soft brush to sweep lint from all surfaces. Brush in the same direction as the metal grain when possible. This prevents scratching.
Pay special attention to the thread path and tension discs. Lint loves to hide in these tight spaces.
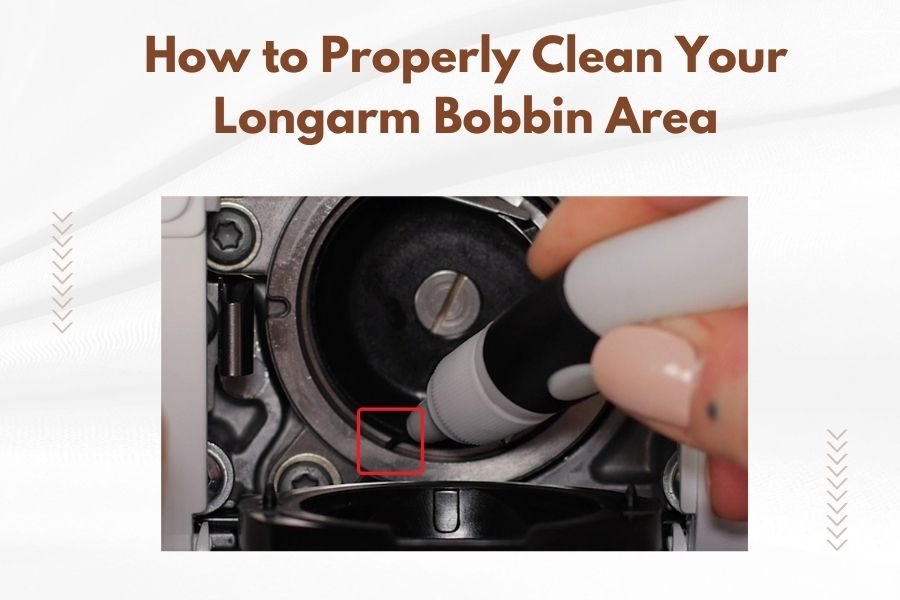
Step 4: Blow Out Remaining Particles
Here’s where compressed air becomes your best friend. Hold the can upright and use short bursts. Long blasts can push debris deeper into your machine.
Aim the air stream away from electrical components. You don’t want to blow lint into your motor or circuit boards.
Air Pressure Safety Tips
Never use more than 30 PSI of air pressure. High pressure can damage seals and gaskets in your machine.
Deep Cleaning Your Bobbin Case
Your bobbin case needs extra attention because it handles so much thread friction. Clean it separately for best results.
Removable Bobbin Case Cleaning
If your case comes out completely, you can clean it thoroughly. Soak it in warm water with a drop of dish soap for 15 minutes.
Use a soft toothbrush to scrub away stubborn lint. Rinse well and dry completely before putting it back.
Drop-In Bobbin Area Cleaning
Drop-in systems need careful cleaning since you can’t remove everything. Use cotton swabs dampened with rubbing alcohol to clean the walls.
Work around the edges first, then clean the center area. Let everything dry before reassembling.
Checking and Cleaning the Hook Assembly
The hook assembly is the heart of your bobbin area. It needs to be perfectly clean to form good stitches.
Rotary Hook Maintenance
Rotary hooks spin fast and collect lint quickly. Clean the hook race with a lint-free cloth and a tiny bit of sewing machine oil.
Wipe away excess oil so it doesn’t attract more debris. Too much oil is worse than too little.
Signs Your Hook Needs Professional Service
Watch for these warning signs that mean you need expert help:
- Scratches or burrs on the hook point
- Loose or wobbly hook movement
- Timing issues after cleaning
- Unusual noises during operation
Common Cleaning Mistakes to Avoid
I came across several cleaning mistakes that can damage your machine. These errors cost quilters hundreds of dollars in repairs.
Using Wrong Cleaning Products
Never use household cleaners on your machine parts. Dish soap and water work fine for removable pieces. Use only sewing machine oil where lubrication is needed.
Avoid petroleum-based products. They can swell rubber seals and cause leaks.
Forcing Stuck Parts
If something won’t move easily, don’t force it. You might bend or break expensive components. Call your dealer instead.
Over-Oiling Problems
Too much oil attracts lint like crazy. Use just one tiny drop where your manual shows oil points. Wipe away any excess.
How Often Should You Clean
Cleaning frequency depends on how much you quilt and what materials you use. Cotton batting creates more lint than polyester.
Regular Quilters (40+ Hours Monthly)
Clean your bobbin area every 8-10 quilting hours. This prevents heavy buildup that’s harder to remove later.
Occasional Quilters (Less Than 20 Hours Monthly)
Monthly cleaning works fine for light use. But always check for lint buildup before starting big projects.
Signs You Need Immediate Cleaning
Stop quilting and clean right away if you notice:
- Thread breaking frequently
- Uneven stitch tension
- Skipped stitches
- Unusual machine noises
- Visible lint chunks
Seasonal Deep Cleaning Schedule
Plan deeper cleaning sessions every three months. This catches problems before they become expensive repairs.
Many quilting experts recommend professional service annually. Your dealer can spot wear issues you might miss.
| Cleaning Type | Frequency | Time Required |
|---|---|---|
| Basic lint removal | Every 8-10 hours | 5-10 minutes |
| Deep bobbin cleaning | Monthly | 15-20 minutes |
| Professional service | Annually | 1-2 hours |
Troubleshooting After Cleaning
Sometimes cleaning reveals other problems. Here’s how to handle common post-cleaning issues.
Timing Problems
If your stitches look wrong after cleaning, you might have bumped the timing. This needs professional adjustment. Don’t try to fix it yourself.
Thread Tension Changes
Clean machines often need slight tension adjustments. Test on scraps before quilting your project.
Preventing Future Buildup
Good habits keep your bobbin area cleaner longer. Small changes make a big difference.
Quality Thread Matters
Cheap thread sheds more fibers. Invest in good thread to reduce lint production.
Proper Storage
Cover your machine when not in use. Dust and pet hair add to bobbin area debris.
Conclusion
Keeping your longarm bobbin area clean isn’t hard work, but it makes a huge difference in your quilting results. Regular cleaning every 8-10 hours of use prevents most problems before they start. Remember to turn off your machine, work gently, and never force stuck parts. With the right tools and techniques, you can keep your bobbin area running smoothly for years. Clean machines make better quilts and cost less to maintain. Your future self will thank you for taking good care of your longarm investment.
How do I know if my bobbin area is too dirty to use?
Stop quilting immediately if you see thread breaking frequently, hear unusual grinding noises, or notice visible lint clumps around the bobbin case. These signs mean debris is interfering with proper machine function and could cause damage if you continue quilting.
Can I use a regular vacuum cleaner on my bobbin area?
Only use a small handheld vacuum with variable suction control and a brush attachment. Full-size vacuums create too much suction and can pull small parts loose or damage delicate components. Always use the lowest setting that still removes lint effectively.
What should I do if I accidentally drop my bobbin case while cleaning?
Pick it up gently and inspect it for cracks or bent parts before reinstalling. Check that any springs or tension mechanisms are still properly positioned. If anything looks damaged or doesn’t fit back together smoothly, contact your dealer for replacement parts.
Is it normal for my bobbin area to get dirty faster with certain fabrics?
Yes, flannel, minky, and heavily textured fabrics shed more fibers and create lint faster than smooth cotton. Dark fabrics also show less lint buildup than light colors, but they still need the same cleaning frequency. Plan for more frequent cleaning when working with high-lint materials.
Should I oil my bobbin area after every cleaning?
Only oil the specific points shown in your machine manual, and only when the manual recommends it. Most modern longarms need very little oil, and over-oiling attracts more lint and debris. When in doubt, consult your manual or dealer about proper lubrication schedules for your specific machine model.