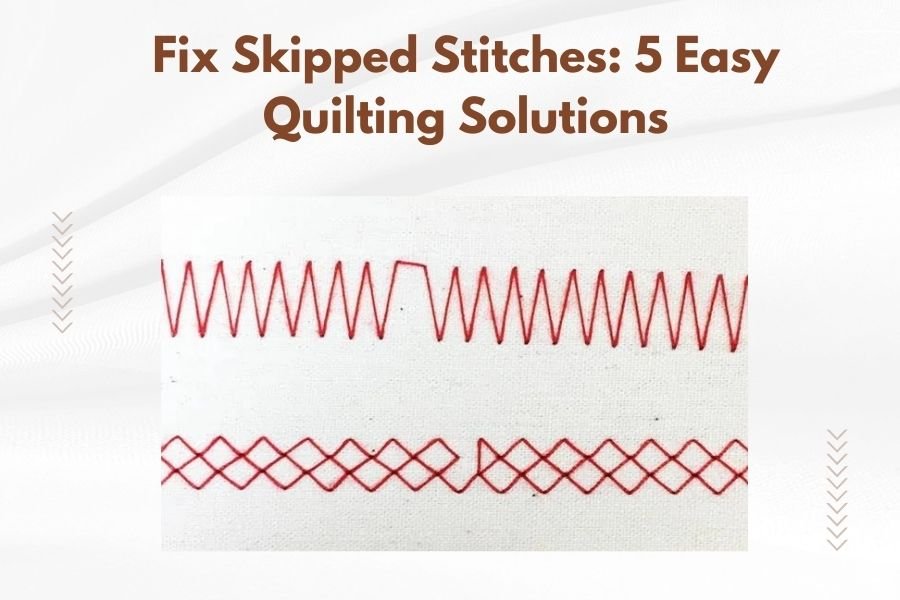
Skipped stitches happen when your quilting machine needle fails to catch the bobbin thread, creating gaps in your quilting line.
You can fix skipped stitches by checking your needle condition, adjusting thread tension, using the right needle size, maintaining proper fabric handling, and cleaning your machine regularly.
Why Your Quilting Machine Skips Stitches
Your quilting machine talks to you through its stitches. When it starts skipping, it’s sending you a message that something needs attention.
Think of skipped stitches like missing words in a sentence. The meaning gets lost, and your beautiful quilt project suffers. I found that most quilters face this frustrating problem at some point in their crafting journey.
The Science Behind Skipped Stitches
Every perfect stitch requires precise timing. Your needle must punch through the fabric layers at the exact moment the bobbin hook catches the upper thread.
When this timing gets disrupted, you get gaps where stitches should be. It’s like trying to high-five someone who’s looking the other way – the connection just doesn’t happen.
Solution 1: Check and Replace Your Needle
Your needle does the heavy lifting in quilting. A dull, bent, or wrong-sized needle causes most skipped stitch problems.
Signs Your Needle Needs Replacing
Look for these red flags that scream “new needle time”:
- Popping sounds when stitching
- Pulls or holes in your fabric
- Thread keeps breaking
- Visible burr or hook on the needle tip
- You’ve been using the same needle for more than 8 hours
How to Choose the Right Needle Size
Needle size matters more than you might think. I researched quilting forums and found that using the wrong needle size ranks as the top cause of skipped stitches.
Match your needle to your fabric weight:
| Fabric Type | Needle Size | Best For |
|---|---|---|
| Lightweight cotton | 70/10 – 80/12 | Thin quilting cottons |
| Medium cotton | 90/14 | Most quilting projects |
| Heavy cotton/denim | 100/16 – 110/18 | Thick batting, multiple layers |
Proper Needle Installation
Installing your needle correctly prevents wobbling that leads to skipped stitches. Push the needle all the way up into the needle clamp. The flat side should face the back of your machine.
Tighten that screw firmly. A loose needle bounces around like a ping pong ball, missing the bobbin thread every time.
Solution 2: Adjust Your Thread Tension
Thread tension controls how tightly your upper and lower threads lock together. Wrong tension creates loose loops or skipped stitches.
Understanding Tension Balance
Perfect tension looks like a handshake between your top and bobbin threads. They should meet right in the middle of your fabric layers.
Too loose, and you get loops on top. Too tight, and the threads can’t connect properly, causing skips.
Testing Your Tension Settings
Use two different colored threads to see what’s happening. Stitch on a test sandwich made from the same materials as your project.
Look at both sides of your test piece. You should barely see the opposite thread color peeking through.
Quick Tension Fixes
Start with your upper tension dial. Most machines work best between 3 and 5. Make small adjustments – a quarter turn at a time.
If adjusting upper tension doesn’t help, your bobbin tension might need tweaking. This requires more care, so check your manual first.
Solution 3: Use Quality Thread and Proper Threading
Cheap thread breaks down and creates lint that gunks up your machine. Quality thread flows smoothly and reduces skipped stitches.
Thread Quality Matters
I found that many quilting experts recommend 100% cotton or polyester threads from reputable brands. Bargain thread might save money upfront, but it costs you time and frustration later.
Old thread gets brittle and weak. If your thread spool has been sitting around for years, it might be time to refresh your stash.
Proper Threading Technique
Threading your machine correctly ensures smooth thread flow. Follow your machine’s threading path exactly – skipping even one guide can cause problems.
Keep your presser foot up while threading. This opens the tension discs so your thread seats properly.
Thread Direction and Spool Position
Thread should unwind from your spool in the direction your machine expects. Some spools work better lying flat, others standing up.
Watch how your thread unwinds. It should flow smoothly without twisting or jerking.
Solution 4: Perfect Your Fabric Handling
How you guide your fabric affects stitch formation. Pulling, pushing, or wrestling with your quilt creates timing issues that cause skipped stitches.
Let Your Machine Do the Work
Your quilting machine’s feed dogs want to move the fabric for you. Fighting them creates uneven stitching and skips.
Guide your fabric gently. Think of yourself as a dance partner, not a bulldozer operator.
Proper Fabric Support
Heavy quilts pull on the needle area, throwing off timing. Support your quilt’s weight with a table or quilting frame.
Let the bulk of your quilt rest on a flat surface beside your machine. This prevents dragging that can cause needle deflection.
Speed Control
Slow and steady wins the quilting race. Racing through thick seams or batting changes stresses your machine and increases skipped stitches.
Reduce your speed when crossing seam intersections or changing directions. Your machine needs time to punch through multiple layers cleanly.
Solution 5: Keep Your Machine Clean and Maintained
Lint buildup in your machine creates friction that affects timing. Regular cleaning prevents most mechanical causes of skipped stitches.
Daily Cleaning Routine
Remove your needle plate and clean out lint after every few hours of quilting. Use a small brush or canned air to clear debris from the bobbin area.
Pay special attention to the hook race where your bobbin sits. Lint loves to hide there and cause timing problems.
Bobbin Area Maintenance
Your bobbin case needs regular attention. Remove it completely and clean both the case and the area where it sits.
Look for scratches or burrs on the bobbin case. Small nicks can catch your thread and cause skipped stitches.
When to Call for Professional Help
Some timing issues need professional adjustment. If cleaning and basic maintenance don’t solve your skipped stitch problems, a qualified technician can help.
Annual professional servicing keeps your machine running smoothly. It’s like a yearly checkup for your quilting companion.
Troubleshooting Specific Situations
Different quilting scenarios create unique challenges. Here’s how to handle common skipped stitch situations.
Free Motion Quilting Problems
Free motion quilting puts extra stress on your needle. Moving your fabric in all directions can cause needle deflection and skipped stitches.
Use a slightly larger needle for free motion work. The extra strength helps the needle stay straight through complex movements.
Batting Considerations
Dense batting requires more needle power to penetrate cleanly. Wool and cotton battings compress differently than polyester.
Test your stitch quality on batting scraps before starting your project. Different battings might need tension adjustments.
Thick Seam Solutions
Seam intersections create thick spots that challenge your machine. These areas commonly produce skipped stitches.
Slow down when approaching thick seams. Some quilters use a stiletto or seam roller to flatten bulky areas before stitching.
Prevention Tips for Future Projects
Preventing skipped stitches beats fixing them every time. These habits keep your stitching smooth from start to finish.
Pre-Project Checklist
Start every quilting session with fresh supplies. New needle, clean machine, and quality thread set you up for success.
Test your settings on a practice sandwich before touching your actual project. This catches problems when they’re easy to fix.
Environmental Factors
Temperature and humidity affect thread behavior. Very dry conditions make thread brittle and more likely to cause problems.
Store your thread in a cool, dry place away from direct sunlight. Heat and light break down thread fibers over time.
Conclusion
Skipped stitches don’t have to ruin your quilting joy. These five solutions – checking needles, adjusting tension, using quality materials, proper handling, and regular maintenance – solve most skipped stitch problems you’ll encounter.
Remember that quilting machines need attention and care to perform their best. Small preventive steps save hours of frustration later. Your next quilting project can have perfect, consistent stitches when you apply these practical solutions.
Why does my quilting machine skip stitches only on thick seams?
Thick seams deflect your needle slightly, preventing it from forming proper loops with the bobbin thread. Slow down your stitching speed and consider using a larger, stronger needle when crossing multiple fabric layers.
Can old thread cause skipped stitches even if it looks fine?
Yes, thread deteriorates over time even when stored properly. Old thread becomes brittle and can break microscopically, causing feeding problems that lead to skipped stitches. Replace thread that’s more than 3-4 years old.
How often should I change my quilting needle during a large project?
Change your needle every 6-8 hours of actual stitching time, or when you notice any signs of dullness like popping sounds or fabric pulls. Large projects require multiple needle changes to maintain stitch quality.
What’s the difference between skipped stitches and tension problems?
Skipped stitches create gaps with no thread connection, while tension problems show loose loops or puckering but still have thread in every stitch location. Skipped stitches usually indicate mechanical timing issues rather than just tension settings.
Should I adjust bobbin tension if upper tension changes don’t fix skipped stitches?
Only adjust bobbin tension as a last resort after trying needle replacement, re-threading, and cleaning your machine. Bobbin tension rarely needs adjustment, and incorrect changes can create more problems than they solve.